
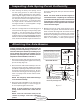
User's Manual

4
Technical Support
1-800-248-0892
Ext. 2
Installing the RoadTamer System
DANGER: Compressed air can cause injury and
damage to the vehicle and parts if it is not handled
properly. For your safety, do not try to infl ate the air
springs until they have been properly secured to the
vehicle.
IMPORTANT: Measure and record the driveline angles
in the chassis as fi rst received (Figure 21).
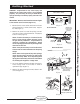
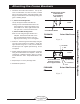
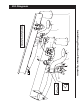
1. Elevate the rear of the vehicle and secure the frame
with jack stands or a frame-contact hoist. Support
the axle (Figure 1).
2. Remove the spare tire, both leaf springs, and the
rear frame contact overload brackets, if equipped,
from the frame (Figure 2).
NOTE: It will be necessary to cut the driver side
bolt out of the spring retainer because of how
the gas tank is positioned. A replacement 16
mm bolt is supplied for reinstallation. Retain
the front spring eye bolt from the passenger side
and nuts for later use.
NOTE: It may be necessary to remove the trailer
hitch in order to remove the bolts from the spring
hanger.
NOTE: After removing the factory steel springs,
check the axle spring perches for side-to-side
angle uniformity. Refer to the Inspecting Axle
Spring Perch Uniformity section for information
on installing the supplied 1° wedge shim.
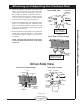
3. Cut off the tailpipe behind the muffl er and remove.
Leave enough room on the muffler to install a
replacement pipe (Figure 3).
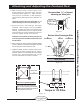
4. Remove the bolts securing the brake cables to the
rear end (Figure 4).
Getting Started
Figure 1
Figure 2
Figure 4
Figure 3
Top Rear End
Cover Bolt
Remove bolt and
discard bracket.
Remove
Bolt
Driver Side
Emergency Brake Cable
No Load in Truck
Remove Wheel Remove Wheel
Support the axle with jack
stands and raise or lower
to Normal Ride Height.
Driver-Side View
REMOVE Frame
Contact Overload
Upper Bracket
if equipped.
REMOVE
Spare Tire.
REMOVE
Leaf Spring.
Axle
Driver-Side View
CUT OFF tailpipe behind
muffler. Leave enough
room to attach a
replacement pipe.
REMOVE
excess tailpipe.
Axle