
User's Manual

6
Technical Support
1-800-248-0892
Ext. 2
Installing the RoadTamer System
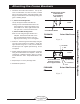
1. Install the driver-side frame bracket. Line up the
lower crossmember rivet with the lower, forward
hole in the upper bracket. Clamp the bottom of the
fl ange on the bracket to the frame fl ange using vise
grips or welding clamps.
2. a) If there are existing holes:
Line up the upper bracket holes with the
existing contact overload bracket holes in the
frame (Figure 6). Attach the bracket to the
frame with four ½” bolts, eight washers and
four nyloc nuts. Leave loose at this time.
b) If there are NO existing holes:
Drill a ½” hole using the upper bracket as a
template. Attach the bracket with one ½”
bolt, two fl at washers and one nyloc nut.
Tighten just until snug. Do not overtighten.
3. Drill two ½” holes through the frame fl ange using the
top hole in the bracket as a template. Attach the
upper bracket using two ½” bolts, four fl at washers
and two nyloc nuts. Tighten just until snug. Do not
overtighten.
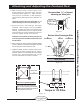
4. Drill the remaining holes through the side, if needed,
using the bracket holes as a template. Attach the
remaining ½” hardware shown in Figure 7, starting
with the bottom ½” bolts. Torque all hardware to 107
ft.lbs.
5. Repeat steps 1-4 for the passenger side.
6. Reinstall the spare tire.
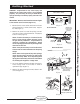
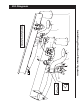
Attaching the Frame Brackets
Figure 6
Figure 7
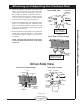
Cross Member Rivets
Driver-Side Shown
Trailer Hitch
FORWARD
Frame
Existing Frame Contact
Overload Holes
(If not equipped,
drill out to ½")
Cross member rivet
must be in forward
hole in upper bracket.
Driver-Side Shown
Trailer Hitch
FORWARD
Frame
½" Flat Washer
½" Bolt
½" Flat Washer
½" Bolt