
User's Manual

7
Technical Support
1-800-248-0892
Ext. 2
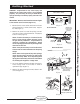
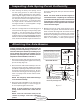
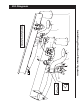
Attaching and Adjusting the Panhard Rod
1. Attach the panhard rod bracket to the driver side
frame. Use the oval hole in the side of the frame
shown in Figure 8 as your starting point. Insert a ½”
bolt through a fl at washer, the bracket, the frame, a
large fl at washer and a nyloc nut. Push the bracket
to the rear as far as possible and clamp both the
frame and bracket fl ange together (Figure 9).
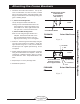
2. Drill out the remaining holes, even through the frame
fl ange, to ½” (Figure 8, Figure 9). Attach with three
more ½” bolts, six fl at washers and three nyloc nuts
(Figure 10). Starting with the bottom fl ange, tighten
all hardware to 107 ft.lbs.
3. Attach the panhard rod assembly to the panhard rod
bracket to the frame rail using one
9
/16” bolt, two fl at
washers and one nyloc nut (Figure 10). Leave loose
at this time.
NOTE: Insert the bolt front-to-rear so the nyloc
nut is in the back towards the rear of the vehicle
(Figure 10).
Installing the RoadTamer System
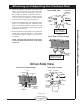
Figure 8
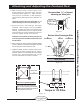
Figure 9
Figure 10
Driver-Side View
Frame
Existing
Oval Hole
in Side of
Frame
REAR
Panhard Rod
Bracket
(Front View)
Drill out ½" holes in
frame using the
bracket as a template.
Inner View of Frame Flange
Drill out a ½" hole in the
frame flange using the
bracket as a template.
Panhard Rod
Bracket
(Back View)
Driver-Side View
Inner View of Frame Flange Outer View of Frame
Panhard Rod
Bracket
(Back View)
2.5" Washer
½" Washer
Frame
Existing
Oval Hole
in Side of
Frame
REAR
Panhard Rod
Bracket
(Front View)
Panhard
Rod
9
/
16
" Bolt
½" Bolt
½" Washer
9
/
16
" Nut
9
/
16
" Washer
½" Nut
½" Nut
½" Washer
½" Bolt