
User's Manual

8
Technical Support
1-800-248-0892
Ext. 2
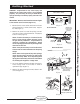
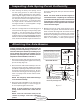
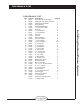
Torque to 170 ft/lbs.
Axle
Tighten 1 until snug. Then tighten 2, 3
and 4, in that order, until snug but not
tight. Continue tightening in increments
following the same pattern until all U-bolt
nuts are torqued to 170 ft./lbs.
Criss-Cross Tightening Pattern:
Bottom View
of
U-Bolt Bracket
3
2
4
1
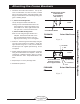
Installing the RoadTamer System
4. Raise or lower the axle to create a space of 12.5
inches between the rolling lobe upper and lower
mounting brackets (Figure 14). Adjust the heim,
using a pry bar if necessary, so both passenger-
side and driver-side beam-to-frame distances are
equal.
CAUTION: There must be no more than 1½” of
thread showing on the heim joint (Figure 11).
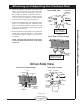
5. Attach the heim to the passenger side beam
assembly. Refer to Figure 12 for an installation
diagram. Tighten both ends of the panhard rod
securely. Turn the heim joint so the cage is parallel
with the bracket to prevent suspension travel from
interfering. Tighten the jam nut on the heim.
CAUTION: The panhard rod heim joint jam nut
must be torqued to 150 ft/lbs and the heim must
be lubricated.
6. Refer to Figure 21 and the Checking Driveline Angles
section at this time. If angles are acceptable, proceed
with torquing the U-bolts and pivot bolts.
7. Tighten the beam U-bolts to 170 ft/lbs. using a criss-
cross pattern to tighten evenly (Figure 13). Using a
hacksaw, grinder, or cut-off wheel, trim off the excess
U-bolt so it is 1” above the retaining nuts. Torque
the front stock beam pivot bolts to 110 ft/lbs.
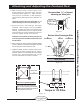
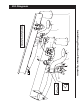
Attaching and Adjusting the Panhard Rod
Figure 11
Figure 13
Figure 12
¾" Bolt
¾" Spacers
¾"
Jam Nut
¾"
Flat Washer
Bottom View Passenger-Side
¾" Nut
¾"
Flat Washer
Beam Assembly
No more than 1½" of thread
showing on heim joint
0-1½"