
User's Manual


2
Technical Support
1-800-248-0892
IMPORTANT: Always keep safety in mind when
working on your vehicle. Completely read these
instructions before installing the kit.
I. Preparing the Vehicle
1. Jack the vehicle up and support the body on jackstands.
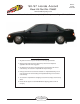
2. Remove the rear wheels (Figure 1).
II. Strut Removal
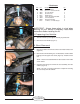
1. Remove the bolt in the lower strut mount and retain for later use
(Figure 2).
2. Remove the O.E.M retaining nut, one flatwasher, and the rubber
bushing from the upper strut mount (Figure 3). Retain for later
use.
NOTE: These are located behind the back-seats on the inside
of the vehicle.
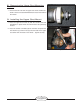
3. Compress the spring and remove the strut assembly from the
vehicle (Figure 4).
NOTE: The use of a spring compressor is helpful in removing
the strut safely from the vehicle.
Figure 1
Figure 2
Figure 3
Figure 4
Hardware
Item P/N Description Qty.
26303 Upper Strut Mount 2
17197 3/8 - 16 x 1” Countersunk Bolt 4
18427 3/8” Lock Washer 4
18430 3/8-16 Hex Nut 4
09191 Rubber Spacer 2
17264 10mm-1.25 x 80mm Bolt GD8 2
18494 10mm Flat Washer 10
35062 Rear Strut Assembly 2
21261 1/4” NPT to 1/2” Tube Straight 2
A
B
C
D
E
F
G
H
I