
User's Manual


4
Technical Support
1-800-248-0892
Figure 8
V. Strut Assembly Installation
1. Place a rubber spacer (E) onto the threaded end of the strut.
2. Place the threaded end of the strut into the upper strut mount
and attach using the O.E.M. rubber bushing and flat washer
and a supplied nylock nut. Tighten securely.
NOTE For Passenger-Side: The air fitting will face towards
the outside of the vehicle and the welded nut on the clevis will
face towards the front.
NOTE For Driver-Side: The air fitting will face towards the
outside of the vehicle and the welded nut on the clevis will face
towards the rear.
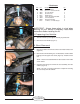
3. Insert the air fitting (I) into the strut.
4. Tighten the fitting finger-tight plus 1 1/2 turns being careful to
tighten on the metal hex nut only.
NOTE: The fitting needs to be turned so that a base of the hex
nut is parallel to the end cap (Figure 9).
5. Insert the previously removed bolt through the strut mount and
using flat washers (G), shim the lower strut clevis between the
mount and the clevis (Figure 7).
NOTE: The bolts (F) and flat washers (G) can be used in the
case of damage to the O.E.M. bolts upon removal of the O.E.M.
strut assembly.
6. Tighten all upper and lower strut mounting hardware at this time
(Figures 5, 7 and 8).
VI. Before Operating
1. Tighten and visually inspect all hardware after 100 miles.
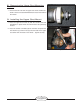
2. The struts for this vehicle come with a nine-position dampening
dial (shown below) for added adjustability. To start, we recommend
setting the dial at the third position for the most versatility.
3. Air Lift part #27741 is highly recommended for this product.
4. Please continue by reading the Maintenance and Operation
section.
Figure 7
Figure 9
Correct Air
Fitting Installation:
Hex Nut edges are
parallel with top
and bottom upper
end cap edges.
Incorrect Air
Fitting Installation:
Hex Nut point extends
over bottom of upper
end cap edge and
could puncture air bag.
9-position
dampening
dial
strut body