
Owners manual


LoadLifter 5000 Series
MN-1085
11
INSTALLING BRAIDED STAINLESS STEEL AIR LINES
KEEP THE AIR LINE AWAY FROM THE FUEL LINE, BRAKE LINES AND ELECTRICAL
WIRES.
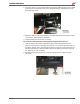
1. Use zip ties to secure
the air line to fixed points
along the chassis every
6” to 8” (150-200mm).
Leave at least 2” (50mm)
of slack to allow for any
movement that might pull
on the air line.
2. Tighten the air line hex
nut finger tight, then use
2 wrenches to turn
1 additional flat (1/6
of one full turn). Do
not overtighten
(Figs. E.4 or E.5). The
easiest way to tighten the
fitting is off the vehicle.
Install the Schrader valve
in the chosen location.
3. Coil and secure any
excess air line in an
area where it will not be
susceptible to damage.
The braided stainless
steel air line cannot be trimmed.
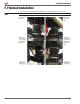
Hex nuts
Star washer
Rubber washer
Air Line Setup for Compressor Integration
Air Line Setup Without Compressor System
Vehicle body
or bumper
Hex nuts
Flat washer
Star washer
Rubber washer
Nylon air line
to compressor
system and
Schrader valve
Flat
Flat
Vehicle body
or bumper
Braided stainless steel
air line to air spring
5/16” (8mm)
hole
AN to PTC
fitting
Schrader
valve
Vehicle
body or
bumper
AN
Schrader
valve
Air line hex nut
Flat washer
Nylon air line
to air spring
5/16” (8mm) hole
Braided
stainless
steel air line
to air spring
Hex nuts
Flat washer
Star washer
Rubber washer
Schrader
valve
Vehicle
body or
bumper
Nylon air line
to air spring
5/16” (8mm) hole
g. E.4
g. E.5
CAUTION