
Installation Manual


MN-420
9
6. Route the air line along the frame to the fitting on the air spring (fig. C.1). Keep
AT LEAST 6” of clearance between the air line and the exhaust system. Avoid sharp
bends and edges. Use plastic tie straps to secure the air line to fixed points along the
chassis. Be sure that the tie straps are tight, but do not pinch the air line. Leave at least 2”
of slack to allow for any movement that might pull on the air line.
7. Cut off the air line, leaving approximately 12” of extra air line. A clean square cut will
prevent leaks. Insert the air line into the air fitting. This is a push-to-connect fitting.
Simply push the air line into the 90° swivel fitting until it bottoms out (9/16” of air line
should be in the fitting).
g. C.3
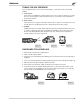
TIPS FOR INSTALLING AIR LINES
When cutting air lines, use a sharp knife or a hose
cutter and make clean, square cuts (Fig. C.3). Do not
use scissors or wire cutters because these tools may
deform the air line, causing it to leak around fittings.
Do not cut the lines at an angle.
Do not bend the 1/4” hose at a radius of less than 1” or
bend the 3/8” hose at a radius of less than 1 1/2”. Do
not put side load pressure on fitting. The hose should be
straight beyond the fitting for 1” before bending.
Inspect hose for scratches that run lengthwise on hose
prior to installation. Contact Air Lift customer service at
(800) 248-0892 if the air line is damaged.
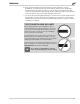
Go to air-lift.co/cuttingairline to watch a
video demonstrating proper air line cutting.
RideControl