
Instructions / Assembly


MODELS: S-4// Master Guard// Stom Guard// Aluminun Jal.// Tubular 2375// Awning S-9*
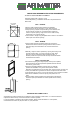
STEP I : OPENING
● Opening shall be finished before starting the installation
● Verify the finish opening dimension, F.O.D. (width & height)
● Verify if opening is square and plumb taking cross measures and
angle as shown on detail "A". Cross dimensions shall be the
same for a plumb opening. Angle at each corner shall be ninety
degrees (90°) for a square opening.
● When the window is Awning S-9 please refer to detail "E" to make the
bottom part of the window opening
STEP II : WINDO
W
● Verify window dimensions (width & height) and compare the
measurements with the finished opening dimension. Both, window
width and height, must be between 1/8" and 3/8" less than the \
opening.
● Manually, verify the window operation by opening and closing vents.
Process should be easy. If a rough movement is noted, add a
lubricant to all vent intersections with operational system. If
situation persists do not proceed with next step and call Air Master
Customer Service Division.
STEP III : INSTALLATION
● Put window at opening and using temporay shims (wood or plastic)
fixed it maintaining the same perimeter separation between window
and masonry (1/8" to 3/8").
● Using the pre-drilled installation holes as shown on detail "B",
proceed with installation using screws and expansion shields
we recommend use 10x3" P/H S/S & 1/4" green exp.
10-24x 1 1/2" P/H S/S screw with 10-24 nut for window join.
"B" ● After window installation, clean the opening with pressure air or a
brush.
● Apply perimeter caulking sealant as recommended by manufacturer
to seal the open space between the window jambs and the masonry
opening.
STEP IV: HARDWAR
E
● Install operator using the provided screws.
"C" ● All screws must be adjusted as shown on drawing "C".
● Verify window operation.
STEP VI : ADJUSTMENTS
●After the window have been installed you must adjust the safety lock for better
● Using a Phillip screwdriver loose each safety lock half turn
counter clockwise as shown on drawing "D"
● Using the operator close the window at the same time apply small pressure
to the vents to be sure that is closed.
"D" ●Using the screwdriver adjusts the safety locks again.
NOTE: DO NOT USED ELECTRIC SCREWDRIVER TO PERFORM THIS
A
DJUSTMENT
STEP V : FINAL CLEANIN
G
● Upon completion of the installation process , all aluminum painted
"E" and glasses must be cleaned only with plain water and a soft cloth,
for no reason an abrasive agent will be use for cleaning.
All standard and custom hardware can be replaced in case of damage or bad function . It is recommended that
replacement will be done by a technician trained in windows operation.
In case of problems or assistance with window operation, please contact Air Master Inc. head quarters,
Customer Service Division at (787) 623-1800 or (787) 846-1800 .
STANDARD WINDOW INSTALLATION PROCEDURES
HARDWARE REPLACEMENT PARTS
CROSS MEASURES
FINISH OPENING
DIMENSION
90°
FINISH OPENING
DIMENSION
"A"