
Instruction manual

11
COMPUTER SYSTEM REQUIREMENTS
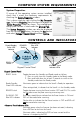
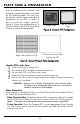
System Properties.
If unsure of the operating system version installed,
check that it meets the necessary requirements by
checking the
SSyysstteemm PPrrooppeerrttiieess
window.
This is done simply by right clicking the
MMyy CCoommppuutteerr
iiccoonn..
Selecting
PPrrooppeerrttiieess
from the menu list displays the
SSyysstteemm PPrrooppeerrttiieess
window as shown. The installed oper-
ating system version is listed under the
GGeenneerraall TTaabb..
The
SSyysstteemm PPr
rooppeerrttiieess
window can also be displayed
from the Desktop
SSttaarrtt
button. Just press the
SSttaarrtt
button
and select
SSeettttiinnggssCCoonnttrrooll PPaanneell
and then
SSyysstteemm..
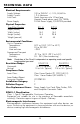
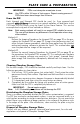
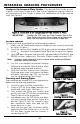
CONTROLS AND INDICATORS
ALLPRO
IMAGING
READY ERA SER
FLASHING
OFF
ALLPRO
IMAGING
READY ERA SER
FLASHING
OFF
READY
Switch
FLASHING OFF
Blue LED
Indicator
ERASER
Switch
Ready/Standby
Green LED
indicator
KKeeyyppaadd CCoonnttrrooll PPaanneell
READY Switch Toggles between the Standby and Ready mode as follows:
1. Press to switch from the Standby mode to the Ready mode.
2. Press and hold down for at least 2 seconds to switch to the
Standby mode from the Ready mode.
Ready/Standby
Green LED indicator
Illuminates green to indicate that the ScanX is Ready for operation.
When extinguished, it indicates that the ScanX is in the Standby mode.
ERASER Switch Toggles between turning the Erase function OFF and ON. This switch
has
nnoo
effect once the plate scanning or erasing starts.
FLASHING OFF
Blue LED indicator
Illuminates steady blue to indicate that the Erase function is ON and
PSPs will be erased after scanning.
Flashes blue to indicate that the Erase function is OFF and PSPs will
nnoott
be erased after scanning.
44 SSccaannnneerr TTrraacckk IInnddiiccaattoorr LLEEDDss
Illuminate green when the Scanner has been activated, indicating
that a PSP can be fed into the ScanX.
Illuminate yellow, indicating the PSP has been sensed and the
Scanner is transporting the PSP.
Keypad Control Panel
4 Scanner Track
Indicator LEDs