
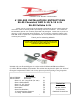
Owners manual

2
Installation Instructions. Read Me!
1. DISCONNECT NEGATIVE (-) BATTERY CABLE.
2. Remove air cleaner housing from throttle body.
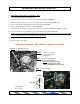
3. Using 10mm socket, remove (2) stud nuts from front side of throttle body (Ref. “C”).
4. Remove air cleaner housing riser and (1) stud nut from back side of throttle body (Ref. “D”).
5. Remove stud from stud nut. Install stud supplied with parts kit. (Fig. 2 & 3)
6. Remove throttle linkage bracket and (2) stud nuts (Ref. “B”).
7. Lift throttle body and locate power plate with “O” ring up and reinstall using (Ref. “C” & “D”) as examples.
8. Locate and install (2) 1” long aluminum spacers under throttle linkage bracket (Ref. “B”).
9. Inspect & Test throttle linkage for full Open & Closed travel before driving. Some cruise or kickdown cables may
require adjustment. Refer to service manual for proper adjustment.
10. Reinstall air cleaner housing using (Step 2) as an example.
11. Reconnect battery cable. Enjoy!
The sound of power...The “whistle” means its working!
Ref. B- (2) Aluminum Spacers
(2) 6mm x 50mm Bolts
Ref. D- (1) 6mm x 3 1/2” Stud
(1) 6mm Flat Washer
(1) 6mm Nut
Ref. C- (2) 6mm x 60mm Bolts
(2) 6mm Flat Washers
* Note: Some early models will
require (2) 6mm x 5 1/2” Studs
which are included in your parts bag.
Ref. A- (1) Power Plate
Figure 1
Figure 2
Figure 3
Separates
AIR-I20580B
Rev. 12.21.16
Airaid. 1815 West Crest Lane. Phoenix AZ 85027 (800) 498-6951 AiraidInfo@airaid.com www.airaid.com