
Use and Care Manual


6
FOR HELP, CALL 1.800.547.3888 OR VISIT AIRCAREPRODUCTS.COM
DETAILED SET UP
Unpack and Assemble the Unit
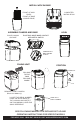
1. Open the box, revealing the chassis.
2. Remove any packaged literature on top.
3. Lift the chassis up and out of the carton.
4. Carefully pull the cardboard packing away
from around the float rod.
5. Remove cardboard and pull the base from the
carton.
NOTE
Do not dispose of the small Styrofoam
block. This is not packing material, it is the float.
6. Remove contents of the base including parts bag.
7. Turn the cabinet upside down. Remove the
casters from the parts bag and install them in
the base.
8. Casters should be fully inserted and fit snug
-
gly with stem shoulder reaching the cabinet
surface.
9. Set the base right-side up to install contents.
Install Components
10. Install the small Styrofoam float onto the float
rod. Insert the float into the correlating shape
on the base. Note the float rod retainer in the
back of the base.
11. Secure the float rod in position by twisting the
flexible float rod retainer around the upright rod
.
12. I
nstall the wick retainer (with the wick inside)
in the front of the base. Observe the word
“front” on the wick retainer and place it facing
the front (curved edge) of the humidifier base.
REMOVE PACKING FROM
AROUND FLOAT ROD
STYRO
FOAM
FLOAT
FLOAT
ROD
LOCATOR VIEW
FLOAT
LOCATION
FLOAT ROD RETAINER
WICK RETAINER
LOCATION
FRONT
FRONT
TWIST RETAINER
TO SECURE ROD
CASTER
LOCATION
REFERENCE
ONLY