READ AND SAVE THESE INSTRUCTIONS ® PEDESTAL EVAPORATIVE HUMIDIFIER EP9 SERIES USE AND CARE GUIDE Adjustable Humidistat Variable Speed Fan Easy Front Fill EP9(R) 800;EP9(R) 500 Français ………….13 Español ………..…25 TO ORDER PARTS AND ACCESSORIES CALL 1.800.547.
IMPORTANT SAFEGUARDS GENERAL SAFETY INSTRUCTIONS READ BEFORE USING YOUR HUMIDIFIER DANGER: means if the safety information is not followed someone will be seriously injured or killed. WARNING: means if the safety information is not followed someone could be seriously injured or killed. CAUTION: means if the safety information is not followed someone may be injured. 1. To reduce the risk of fire or shock hazard, this humidifier has a polarized plug (one blade is wider than the other.
INTRODUCTION Your new humidifier adds invisible moisture to your home by moving dry inlet air through a saturated wick. As air moves through the wick, the water evaporates into the air, leaving behind any white dust, minerals, or dissolved and suspended solids in the wick. Because the water is evaporated, there is just clean and invisible moist air. As the evaporative wick traps accumulated minerals from the water, its ability to absorb and evaporate water decreases.
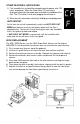
NOTES ON LOCATION: In order to get the most effective use from your humidifier, it is important to position the unit where the most humidity is needed or where the moist air will be circulated throughout the house such as near a cold air return. If the unit is positioned close to a window, condensation may form on the window pane. If this occurs the unit should be repositioned in another location. Place humidifier on a flat level surface.
WATER FILL CAUTION: Before filling, ensure unit is turned OFF and unplugged 7) Open the fill door on the front of the unit. Insert funnel into the open fill door. Using a pitcher, carefully pour water to the MAX FILL level on the wick frame. NOTE: On initial fill up, it will take approximately 20 Insert funnel minutes for the unit to become ready for operation, into open since the wick must become saturated.
CONTROL PANEL This unit has a digital control panel that allows you to adjust fan speed and humidity level, as well as view information on the status of the unit. The display will also indicate if the optional Remote Control is in use at the time. Remote is included with models EP9R 500 and EP9R 800, or can be purchased separately and used with any EP9 series unit. See parts list at back to order part number 1999.
OTHER FEATURES / INDICATIONS 2) This humidifier has a check filter reminder timed to appear after 720 hours of operation. When the Check Filter (CF) message is displayed, disconnect the power cord and check the condition of the filter. The CF function is reset after plugging the unit back in. 3) When the unit is out of water, a flashing F will display on the display panel.
REMOTE CONTROL INSTRUCTIONS (EP9R Series) If your unit has the remote control, or if you have purchased the remote control, Model 1999, you have the option of controlling your humidifier functions from a distance. To Turn the Remote on: With both the humidifier and remote control OFF, Press the I/O button on the remote control once. This turns the humidifier ON and enables the remote control to operate all the functions of the humidifier.
CARE AND MAINTENANCE Cleaning your humidifier regularly helps eliminate odors and bacterial and fungal growth. Ordinary household bleach is a good disinfectant and can be used to wipe out the humidifier base and bottle/reservoir after cleaning We recommend cleaning your humidifier whenever changing the wicks. We also ® recommend using Essick Air Bacteriostat Treatment each time you refill your humidifier to eliminate bacterial growth. Add bacteriostat according to the instructions on the bottle.
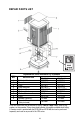
REPAIR PARTS LIST TEMPERATURE 9 HUMIDITY ® Replacement Parts Available For Purchase ITEM NO. DESCRIPTION EP9(R) 500 1 2 3 4 5 6 7 8 9 -- Part Number EP9(R) 800 Deflector/Vent 1B71973 1B72714 Funnel 1B72282 1B72282 Float 1B71971 1B71971 Float Retainer 1B71972 1B72713 Casters (4) 1B5460070 1B5460070 Wick support assy.
TROUBLESHOOTING GUIDE Trouble Unit does not operate on any speed setting Light remains on in chassis after unit has been turned off. Probable Cause Remedy No power to unit. Ensure polarized plug is fully inserted in wall outlet. Unit has run out of water – fan will not operate without water is present. Refill reservoir. Refill switch operation/improper positioning of float assy. Ensure float assembly is correctly positioned as described in Water Fill, page 5.
HUMIDIFIER TWO YEAR LIMITED WARRANTY POLICY SALES RECEIPT REQUIRED AS PROOF OF PURCHASE FOR ALL WARRANTY CLAIMS. This warranty is extended only to the original purchaser of this humidifier when the unit is installed and used under normal conditions against defects in workmanship and materials as follows: Two (2) years from date of sale on the unit, and Thirty (30) days on wicks and filters, which are considered disposable components and should be replaced periodically.
LISEZ ET CONSERVEZ CES INSTRUCTIONS ® PIÉDESTAL HUMIDIFICATEUR À ÉVAPORATION SÉRIE EA12 MANUEL D'UTILISATION ET D'ENTRETIEN Humidostat réglable Ventilateur à variable vitesses Avant remplissage facile EP9(R) 800; EP9(R) 500 Anglais ………….. 1 Español ………... 25 POUR COMMANDER DES PIÈCES ET DES ACCESSOIRES APPELEZ LE 1.800.547.
INSTRUCTIONS GÉNÉRALES DE SÉCURITÉ À LIRE AVANT D’UTILISER VOTRE HUMIDIFICATEUR DANGER: Signifie que si les informations de sécurité ne sont pas suivies, des blessures graves ou fatales s'ensuivront. AVERTISSEMENT: Signifie que si les informations de sécurité ne sont pas suivies, des blessures graves ou fatales pourraient survenir. ATTENTION: Signifie que si les informations de sécurité ne sont pas suivies, des blessures pourraient survenir. 1.
INTRODUCTION Votre humidificateur par évaporation ajoute une humidité invisible dans la maison en faisant passer de l'air sec à travers un filtre à mèche saturé. Au fur et à mesure que l'air passe au travers du filtre à mèche, l'eau s'évapore dans l'air en laissant derrière elle toutes poussières blanches, minéraux et solides dissous ou en suspensio en mèches. Puisque l'eau est évaporée, il n'y a ni brume ni brouillard irritants, mais rien que de l'air humidifié, propre et invisible.
REMARQUES SUR L'EMPLACEMENT: Afin de tirer le meilleur parti de votre humidificateur, il est important de placer l'appareil à un endroit où le plus d'humidité est nécessaire ou là où l'air humide circulera 5 cm dans toute la maison comme à proximité d'un retour d'air froid. Si l'appareil est placé près d'une fenêtre, de la condensation peut se former sur la vitre. Si cela se produit, il faut déplacer l'appareil. Ne placez PAS l'appareil directement devant une bouche d'air chaud ou un radiateur.
COMMANDES ET FONCTIONNEMENT Cet appareil a un panneau de commande numérique qui vous permet d'ajuster la vitesse du ventilateur et le niveau d'humidité. Il vous permet aussi de visualiser des informations sur l'état de l'appareil. AFFICHAGE NUMÉRIQUE VITESSE DE VENTILATEUR CONTRÔLE DE L’HUMIDITÉ BOUTON MARCHE/ARRÊT L'affichage indiquera également si la Télécommande facultative (EP9R serie unimiento) est utilisée au moment.
INSTRUCTIONS DE TELECOMMANDE (EP9R Série) Si votre appareil a la télécommande, ou si vous avez acheté la télécommande, Modèle 1999, vous avez la possibilité de contrôler les fonctions de votre humidificateur à distance. Pour Activer la Télécommande : AFFICHAGE TEMPÉRATURE Avec l'humidificateur et la télécommande éteints, Appuyez une fois sur le bouton E/S sur la télécommande. Cela allume l'humidificateur et permet à la ° télécommande de faire fonctionner toutes les fonctions de l'humidificateur.
REMPLACEMENT DE MÈCHE Le EP9 (R) série utilise 1043 Super Wick (Super Mèche 1043). Utilisez toujours la mèche de marque Essick originale pour maintenir votre appareil et pour maintenir votre garantie. 1. Tout d'abord, supprimez n'importe quels éléments sur le dessus du piédestal. 2. Soulevez le châssis de l'embase pour révéler la mèche, le dispositif de retenue de mèche et le flotteur. 3. Retirez la mèche et l'assemblage de retenue. Séparez le dispositif de retenue de mèche en deux parties. 4.
SOINS ET ENTRETIEN ATTENTION : Débranchez l'alimentation avant de remplir, de nettoyer ou d'entretenir. Gardez toujours la grille au sec en tout temps. Le nettoyage régulier de votre humidificateur aide à éliminer les odeurs et la croissance bactérienne et fongique. De l'eau de javel ordinaire est un bon désinfectant et peut être utilisé pour désinfecter l'embase de l'humidificateur après le nettoyage. Nous recommandons de nettoyer votre humidificateur à chaque remplacement de filtre à mèche.
LISTE DE PIÈCES POUR SÉRIE DE LA EP9/EP9R TEMPERATURE HUMIDITY ® 9 Pièces de Remplacement Disponibles Pour Achat Numéro de Pièce Num. Clé Description EP9(R) 500 EP9(R) 800 1 Déflecteur 1B71973 1B72218 2 Entonnoir 1B72282 1B72282 3 Flotteur 1B71971 1B71971 4 Retenue de Flotteur 1B71972 1B71972 5 Roulettes (4) 1B5460070 1B5460070 6 Ensemble de support de mèche 1B72081 1B72081 7 Mèche No.1043 No.
DÉPANNAGE PROBLÈME CAUSE PROBABLE Pas d’alimentation à l’unité L’unité ne fonctionne à aucune vitesse établie SOLUTION Assurez-vous que la fiche polarisée soit entièrement insérée dans la prise murale. Manque d'eau – le ventilateur Remplissez la bouteille d’eau. ne fonctionne pas sans eau. Fonctionnement de l'interrupteur de remplissage / mauvais positionnement du montage flottant.
GARANTIE LIMITÉE À DEUX ANS FACTURE REQUISE COMME PREUVE D'ACHAT POUR TOUTE RÉCLAMATION VISANT À FAIRE VALOIR LA GARANTIE.
--- Blanc intentionnellement laissé ----- Dejó en blanco intencionalmente----- Intentionally left blank --- 24
LEA Y GUARDE ESTAS INSTRUCCIONES ® PEDESTAL HUMIDIFICADOR POR EVAPORACIÓN SERIE EP9 (R) SERIE GUÍA DE USO Y CUIDADO Humidistato ajustable Ventilador de variable velocidades Fácil llenado delantero EP9(R) 800; EP9(R) 500 Anglais ………….. 1 Français ………... 13 PARA ADQUIRIR PIEZAS Y ACCESORIOS LLAME AL 1.800.547.
INSTRUCCIONES GENERALES DE SEGURIDAD LEER ANTES DE USAR SU HUMIDIFICADOR PELIGRO: significa que si no se respeta la información de seguridad, alguien puede resultar seriamente herido o muerto. ADVERTENCIA: significa que si no se respeta la información de seguridad, alguien podría resultar seriamente herido o muerto. PRECAUCIÓN: significa que si no se respeta la información de seguridad, alguien puede resultar herido. 1.
INTRODUCCIÓN Su humidificador por evaporación añade humedad invisible a su hogar desplazando aire seco a través de una mecha saturada. A medida que el aire atraviesa la mecha, el agua se evapora en el aire, dejando atrás polvo blanco, minerales o sólidos disueltos o suspendidos. Dado que el agua se evapora, no hay niebla o rocío problemáticos, simplemente aire húmedo limpio e invisible.
NOTA SOBRE LA UBICACIÓN: NO dejar la unidad directamente en frente a tuberías de aire caliente o radiadores. s NO ubicarlo sobre moquettes blandas.Orientar la lgada 2 pu cm) (5 dirección del aire lejos del termostato y de las rejillas de aire caliente y colocar el humidificador cerca de una pared interna. No se debe situar la unidad donde reciba directamente el aire frío de las paredes externas o el aire cálido de una rejilla de aire caliente.
7. Conecte el enchufe en un tomacorriente de pared. Su humidificador ya está listo para ser utilizado. El humidificador no debe estar cerca de ninguna rejilla de calor. Coloque la unidad a CINCO centímetros, como mínimo, de cualquier pared o cortinas. Con la libre circulación de aire en la unidad, se obtendrá el mejor rendimiento y funcionamiento.
VELOCIDAD DEL VENTILADOR El botón Speed (Velocidad) controla el motor de velocidad variable. Las nueve velocidades proporcionan un control preciso sobre el ventilador. Presione el botón de encendido y seleccione la velocidad del ventilador: desde F1 (velocidad baja) hasta F9 (velocidad alta). La velocidad del ventilador se visualizará en el panel de control a medida que se aumente o se disminuya. NOTA: Se recomienda disminuir la velocidad del ventilador cuando exista una condensación excesiva.
Instrucciones de Control Remote (EP9R Serie) Si su unidad posee el control remoto o si usted ha adquirido el control remoto Modelo 1999, tiene la opción de controlar las funciones del humidificador desde cierta distancia. Activación del control remoto: Estando el humidificador y el control remoto apagados, Presione una vez el botón I/O del control remoto. Esto enciende el humidificador y permite que el control remoto controle todas las funciones del humidificador.
REEMPLAZO DE MECHA La Serie EP9 / EP9R utiliza la mecha Super Wick 1043. Siempre utilice la mecha ® ® original de marca AIRCARE o Essick para mantener su unidad y conservar su garantía. 1. Primero, quite cualquier objeto que se encuentre sobre la unidad. 2. Levante y separe el armazón de la base para que la mecha, el retenedor de mecha y el flotador queden a la vista. 3. Retire el ensamblaje del retenedor y la mecha. Separe el retenedor de mecha de dos partes. 4.
CUIDADO Y MANTENIMIENTO ADVERTENCIA: Desconecte el suministro de energía antes de realizar el llenado, limpieza o mantenimiento de la unidad. Mantenga la rejilla seca en todo momento. Limpiar frecuentemente su humidificador ayuda a eliminar los olores y el desarrollo de hongos y bacterias. El blanqueador doméstico común es un buen desinfectante y puede utilizarse para repasar la base del humidificador luego de la limpieza.
LISTADO DE PIEZAS PARA EP9(R) SERIE TEMPERATURE HUMIDITY ® 9 Piezas de repuesto disponibles en el mercado N.
PROBLEMA La unidad no funciona en ninguno de los ajustes de velocidad. La luz permanece encendida en el chasis de la unidad después de haberlo apagado. CAUSA PROBABLE No hay corriente eléctrica en la unidad. Asegúrese de que el enchufe polarizado está completamente insertado en el tomacorriente de la pared. La unidad se quedó sin agua (el ventilador no funcionará si no hay presencia de agua). Rellene el envase de agua.
POLÍTICA DE GARANTÍA LIMITADA DE DOS AÑOS PARA CUALQUIER RECLAMO RELACIONADO CON LA GARANTÍA ES NECESARIO PRESENTAR EL RECIBO COMO PRUEBA DE COMPRA Esta garantía se extiende solo al comprador original de este humidificador, siempre y cuando la unidad sea instalada y utilizada en condiciones normales, contra defectos de fabricación y materiales como se detalla a continuación: Dos (2) años a partir de la fecha de la venta de la unidad y Treinta (30) días para mechas y filtros, que se consideran componente