Ibis 3 Owners Guide Revision V1 Page 1 of 19 IBIS 3 OWNERS MANUAL Contents WARRANTY OF REFRIGERATED AIRCONDITIONING ________________________________________________ 2 GENERAL UNIT INFORMATION __________________________________________________________________ 4 PACKING LIST ________________________________________________________________________________ 5 BEFORE INSTALLATION YOU MUST COMPLETE THE FOLLOWING STEPS _____________________________ 6 INSTALLATION _________________________________________________
Ibis 3 Owners Guide Revision V1 Page 2 of 19 WARRANTY OF REFRIGERATED AIRCONDITIONING Warranty within Australia We undertake by this warranty to rectify, free of charge, at our nearest authorised service agent, any fault due to faulty workmanship or replacement of any faulty components within 12 months from the date of the first retail purchase thereof.
Ibis 3 Owners Guide Revision V1 Page 3 of 19 INSTALLATION & OPERATING INSTRUCTIONS FOR IBIS 3 HEAD OFFICE Aircommand Australia Pty Ltd 954-956 Port Road Albert Park, SA 5014 ACN 164 415 445 AIRCONDITIONER For warranty claims, sales enquires or customer service Call: (08) 8345 8444 Fax: (08) 8243 0628 Email: service@aircommand.com.au Model Number: 8100001 Serial Number: . Date Purchased: . WARNING It is important that this installation manual is properly read and understood before installation.
Ibis 3 Owners Guide Revision V1 Page 4 of 19 GENERAL UNIT INFORMATION I. PURPOSE The Aircommand Ibis 3 air conditioning unit was designed for installation on the roof of a caravan or recreational vehicle to provide reverse cycle heating and cooling. The unit is intended for vehicles with roofs that are from 25 to 85mm thick. The unit must be installed so that it is within ±5° of the horizontal plane. It is important that the unit is installed properly according to the recommended guidelines. II.
Ibis 3 Owners Guide Revision V1 Page 5 of 19 PACKING LIST The components of your Ibis 3 will be contained in 2 cartons. Unpack the carton when you are ready to install and check that the contents are as below: Main Carton - 1160 x 890 x 250mm Weight 47kg Contents: 1. Ibis 3 Roof top air conditioner – 1 only IMPORTANT – Pay attention to the orientation of the ‘This Way UP ‘ arrows on the carton. If the unit has been upside-down for any period of time then DO NOT install.
Ibis 3 Owners Guide Revision V1 Page 6 of 19 BEFORE INSTALLATION YOU MUST COMPLETE THE FOLLOWING STEPS Checked that roof thickness is between 25 – 85mm. If roof is greater than 85mm thick you will need an Ibis 3 Thick roof adapter (Part No 8102007) from Aircommand. Note that this measurement must include any ‘H-Frames’ used. Confirmed that the unit will be within ±5° of the horizontal plane. The installation instruction sections (pages 7 - 10) have been read. Roof strength has been assessed.
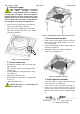
Ibis 3 Owners Guide INSTALLATION Revision V1 Page 7 of 19 INTERNAL CLEARANCE The inside plenum has a foot print of 535 x 535 mm centered around the installation hole. Figure 2 Mark out the position of the unit based on the following important requirements: Before cutting holes through the roof ensure that mains power or battery driven inverters are disconnected The unit requires a 360 x 360mm square hole for installation.
Ibis 3 Owners Guide Revision V1 Page 8 of 19 2. Attach weather collar to roof Locate the weather collar (Item #1). The collar has one side marked “THIS SIDE UP”. This top side will point to the sky. Figure 3 Flip the collar over and firmly press the sealant side to the roof of the caravan. Apply a circle of sealant around each of the four bolt holes.
Ibis 3 Owners Guide Revision V1 Page 9 of 19 4. Electrical supply This unit MUST be installed in accordance with AS/NZ 3001:2008 “Electrical installations – transportable structures & vehicles including their site supplies’. Ensure that power is properly disconnected at the supply (mains and/or battery). Failure to do so may result in personal injury or death. This connection can only be done by a suitably licensed electrical tradesperson.
Ibis 3 Owners Guide Revision V1 Page 10 of 19 Attach plenum assembly cont. 8. Install return air filter Raise the plenum assembly towards the roof top installation. Engage a counter sunk screw into one of the 4 holes in the corner of the filter recess. Raise the plenum and engage the screw into its mating hole on the diagonal arm of the brace. Locate the return air filter. (Item #5). Align the tabs on one side of the filter body with matching slots in the plenum.
Ibis 3 Owners Guide Revision V1 COMMISSIONING OF THE UNIT Page 11 of 19 Press MODE button until COOL is selected. Figure 20 Turn the power on at the circuit breaker. Using the remote control (Item #6) press the ON/OFF button. Figure 17. Each command from the remote control should be answered by a ‘beep’ from the receiver in the plenum. Figure 20 - Select COOL mode Figure 17 - Turn unit on Press the MODE button until FAN mode is selected.
Ibis 3 Owners Guide Revision V1 Page 12 of 19 Replacement return air filters can be ordered directly from Aircommand. (Part No. 8102044) Note: In heating mode the fan will not begin blowing air until the inside coil has reached a temperature of at least 30⁰C. This is to prevent cold draughts. Fan speed will increase to the set speed as the coil temperature increases. Press ON/OFF button once more to turn the unit off.
Ibis 3 Owners Guide Revision V1 Page 13 of 19 GENERAL SPECIFICATIONS Model 8100001 Height (mm) Width (mm) Length (mm) Weight (kg) Roof top Unit 222 848 1120 45.4 Inside Plenum 32 535 535 2.7 AIRCOMMAND AUSTRALIA PTY LTD IBIS 3 MODEL NO. 8100001 230V AC 50Hz REFRIGERANT 407C 870 G RATED CAPACITY COOLING 3100 W HEATING 2700 W POWER INPUT COOLING 1300 W HEATING 1210 W RATED CURRENT COOLING 5.8 A HEATING 5.5 A MAX INPUT 1700 W MAX CURRENT 7.5 A MAX.
Ibis 3 Owners Guide Revision V1 Page 14 of 19 OPERATING INSTRUCTIONS WARNING This appliance is not intended for use by persons (including children) with reduced physical, sensory or mental capabilities, or lack of experience and knowledge, unless they have been given supervision or instruction concerning use of the appliance by a person responsible for their safety. Remote Control Operation The remote control is used to control all functions of the air conditioner. Figure 25.
Ibis 3 Owners Guide Revision V1 Page 15 of 19 Plenum Status Display (Figure 26) In addition to the remote control there is a status display on the corner of the inside plenum. This row of lights indicates the mode that the air conditioner is operating in. The MANUAL OPERATION BUTTON can be used to access basic functions without the remote. Mode indicator lights A coloured LED illuminates above mode that the unit is operating in.
Ibis 3 Owners Guide Revision V1 IBIS 3 COMPONENTS & SPARE PARTS Page 16 of 19
Ibis 3 Owners Guide Revision V1 # Part Description Page 17 of 19 Part # QTY 1 Screw M5x12 - White 8101001 13 2 Canopy - Ibis 3 8101020 1 3 Speed clip - M5 8101002 13 4 Base - Ibis 3 8101030 1 5 Evaporator housing 8101005 1 6 Evaporator fan deck 8101006 1 7 Compressor, horizontal 240V AC R407C 0018260 1 8 Fan mounting plate 8101007 2 9 Lead through clip - LHS 8101003 2 10 Lead through clip - RHS 8101004 2 11 Inside fan stud 8101008 4 12 Accumulator holder
Ibis 3 Owners Guide IBIS 3 WIRING DIAGRAM Revision V1 Page 18 of 19
Ibis 3 Owners Guide Revision V1 Page 19 of 19 TROUBLE SHOOTING GUIDE Symptom Unit does not operate Cause No power supply to unit Remote control is not operating Fault condition rapid flashes of ‘Fan’ indicator light on plenum Poor cooling or heating performance Return air filter is blocked Air outlets are closed Outside fan air intake is blocked High outside air temperatures in cooling Low outside air temperatures in heating Intermittent operation during very hot & very cold days Water coming fro