
Instructions / Assembly
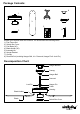


Fig.8.
Fig.9.
Fig.7.
Step 8: Tighten blades to blade holders
by using blade screws and washers.
NOTE:
Before installing blade holders
to the motor, please remove the
plastic inserts. (See fig.7)
Step 7: Remove the canopy from the
hook, then attach the canopy to the
mounting plate and then secure with
four screws and washers.
Plastic
Insert
Blade Screw
Washer
Blade
Blade Holder
PAGE: 2 / 3
Fig.10.
Switch Box
Step 9: Secure blade holders to the
motor with motor screws and washers.
Step 10: Secure the switch box cover
upward to the switch box with the
switch box screws.
060210
TM
Blue
Green (Gound)
Fig.6.
Step 6 (for downrod & ceiling mount).
Make wires connections:
Measure the length of wire that you need.
1). The motor white wire to the white wire from the outlet box with a wire nut.
2). The motor black wire and blue wire to the black wire from the outlet box with
a wire nut.
3). The ground wire from the outlet box to the ground wire from the motor
with a wire nut.
*** After making the wire connections, the wires should be spread apart with the
grounded conductor and the equipment-grounding conductor on one side and
the underground conductor on the other side of the outlet box.
*** After the splices have been made, they should be turned upward and pushed
carefully up into the outlet box.
Fig.11.
Step 11: Turn on the electric power
at the main fuse or circuit breaker
box. Use pull chain to control the
fan speed.