
User's Manual


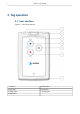
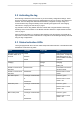
Table Of Contents

2.2 Activating the tag
When the tag is delivered it does not have any of the necessary configuration settings. These
environment specific settings need to be applied before the tag can connect to the network and
the EPE. The T301-B tags are delivered with the battery charged to a storage charge, it is
recommended to fully charge the battery, before activating the tags first time. See charging
instructions in Charging the T301-B tag on page 7
Tag activation is done using Ekahau Activator software that configures Ekahau T301-B tags
wirelessly. See more information on the Ekahau Activator software in chapter Ekahau Activator
T301 on page 9.
After successful Activation you will see the MAC address of the tag appears on the EPE list of
tags. After successful connection with EPE the configurations can be managed directly from EPE
using the Tag Configurations.
2.3 Status Indication LEDs
The tag is equipped with two multi-color LEDs that provide status indication. The table below lists
the different modes of the tag LEDs:
StatusRight LEDLeft LEDAction
Both LEDs blink Red after
button press. . Finally Left
LED blinks green or red.
Green indicates successful
activation.
1xRed1xRed
2xGreen
2xRed
Activation. Press and hold
the Menu button for 3
seconds.
Charging
Battery full
Orange
Green
-Charging
Successful scan and res-
ults sent to EPE.
-2xGreen blinkPeriodic or motion activ-
ated scan
Failed to scan or send
results .
-2xRed blinkPeriodic or motion activ-
ated scan.
Success - green.
Failed to scan or send
results - red.
-1xOrange + 2xGreen blink
or
2xRed blink
Blue button press
Success - green.
Failed to scan or send
results - red.
1xOrange + 2xGreen blink
or
2xRed blink
Red button press.
Success - green.
Failed to scan or send
results - red.
1xOrange + 2xGreen blink
or
2xRed blink
Menu button press
4
Chapter 2. Tag operation