W4 User
Ekahau, the Ekahau logo, Ekahau Site Survey, Ekahau Mobile Survey, Ekahau Location Survey, Ekahau HeatMapper, Ekahau Engine, Ekahau RTLS Controller, Ekahau Positioning Engine, Ekahau RTLS Controller, Ekahau Manager, Ekahau Activator, Ekahau Finder, Ekahau Vision, Ekahau Tracker, Ekahau Logger, Ekahau T201, Ekahau T301, Ekahau NIC-54, Ekahau NIC-300, Ekahau Client, and Ekahau Positioning Client are trademarks or registered trademarks of Ekahau.
iii W4 Table of Contents 1 Introduction ....................................................................................................................... 1 1.1 Software Release Level ........................................................................................... 1 1.2 Features of W4 ........................................................................................................ 1 1.3 User Interface ..................................................................................
iv W4
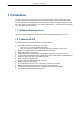
Chapter 1. Introduction 1 1 Introduction The Ekahau W4 Wi-Fi tag is part of Ekahau RTLS (Ekahau Real-Time Location System) that consists of Ekahau tags, Ekahau RTLS Controller (ERC) software platform and Ekahau Vision end-user application. It is designed to be worn by patients, employees, children and other individuals, and it enables real-time visibility into a person’s exact location – enterprise-wide, with reliable room- and sub-room level accuracy. 1.
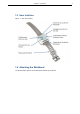
Chapter 1. Introduction 1.3 User Interface Figure 1.1. W4 user interface 1.
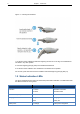
Chapter 1. Introduction 3 Figure 1.2. Inserting the wristband 1. Lift the end of the wristband to slide the beginning into the bar on the tag. The wristband will not attach in any other position 2. Push the beginning part (tag side) of the wristband downwards 3. Lift the end of the wristband. The wristband is now locked onto its position. For removal, push down the end of the wristband and lift the beginning part (tag side) up. 1.
Chapter 1.
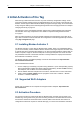
Chapter 2. Initial Activation of the Tag 5 2 Initial Activation of the Tag When the tag is delivered it does not have any of the necessary configuration settings. These environment specific settings need to be applied before the tag can connect to the network and the ERC. The W4 tags are delivered with the battery charged to a storage charge, it is recommended to fully charge the battery, before activating the tags first time. See charging instructions in chapter Charging the W4 tag on page 22.
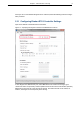
Chapter 2. Initial Activation of the Tag 6 which you can run from Ekahau Programs menu. After that, follow the following Activator configuration procedure. 2.3.1 Configuring Ekahau RTLS Controller Settings Input the IP address of the Ekahau RTLS Controller. Figure 2.1. Specifying the Engine IP address and Maintenance interval In case Engine Port, Maintenance port, and/or Maintenance IP needs to be changed, go to "Advanced" mode.
Chapter 2. Initial Activation of the Tag 7 Figure 2.2. Specifying advanced Positioning Engine settings Note When activating the W4 tags, only an initial setup is required for the tag to associate with the network. All settings can be set and changed from the Ekahau RTLS Controller. Ekahau Activator 3 only provides a set of basic settings. 2.3.2 Configuring WLAN Settings Input the Wi-Fi Network SSID and select the Encryption method used. If WEP 64/128 or WPA2PSK is used type in the network key as well.
Chapter 2. Initial Activation of the Tag 8 Figure 2.3. Specifying Wi-Fi network settings Tip If WEP encryption is used the Activator automatically determines the key type and length from what you type. WEP 64 require 5 Ascii characters or 10 hex digits, respectively WEP 128 requires 13 Ascii characters or 26 hex digits. 2.3.3 Configuring Wi-Fi Channels in Use It is recommended to only select the channels used in you network.
Chapter 2. Initial Activation of the Tag 9 Figure 2.4. Specifying the channels used in the network Warning Only use channels that really exists in your Wi-Fi network. Activating unnecessary channels will reduce the tag's battery lifetime! 2.3.4 Configuring IP Settings Check the IP settings. If DHCP is used nothing needs to be done. In case your network uses static IP addressing, type in the IP address range to be used for the W4 tags, Netmask and Gateway addresses.
Chapter 2. Initial Activation of the Tag Tip If you only activate a single tag and wish to use static IP setting, enter same IP address in 'Start IP Address' and 'End IP Address'. Figure 2.5. Specifying IP settings 2.3.5 Activation Press 'Continue' button when all settings are ready.
11 Chapter 2. Initial Activation of the Tag Figure 2.6. When all the settings are done, you can start activating the tags The Activation process has now started. The list of the activated tags will appead on the area below.
Chapter 2. Initial Activation of the Tag 12 Figure 2.7. The Activator is ready to start activating the tags Put the tag in charger and while in charger, within three seconds press and hold the tag's button at least five seconds to activate it. During this time tag's LED is red. If activation was successful the tag will vibrate and the green LED will blink, with unsuccessful activation the LED blinks red. After successful activation, the tag MAC address appears on the activation window, showing Ok status.
Chapter 2. Initial Activation of the Tag 13 Figure 2.8. The Activator has activated one tag After completing activating the tags, click the 'Stop Activation' button and exit the activation window. Tip After you have finished the activation, you can save the configuration for future use from the file menu. If you save the settings with 'Save As Default' the setup will be the default every time the Activator is started.
Chapter 2. Initial Activation of the Tag 14 Figure 2.9. Saving the configuration for later use 2.3.6 List of Available Settings in the Activator The list of available settings in the Activator: Setting Description Values Default Value Positioning Engine settings Engine IP IP Address Ekahau RTLS Controller IP Address 0.0.0.0 Engine Port (UDP) Port number of location protocol port of ERC Port Number 8552 Maintenance IP IP Address of Ekahau RTLS Controller, from where TAG gets the settings.
15 Chapter 2.
Chapter 2.
Chapter 3. Configuration After Initial Activation 17 3 Configuration After Initial Activation The tag can be adjusted for each application and network settings by adjusting a set of parameters. The parameters can be changed wirelessly after resetting the tag by using the Ekahau Activator software or through Tag Configurations in Ekahau RTLS Controller. Ekahau Activator is used for configuring the initial configuration settings that allows connecting the tag to ERC over the network.
Chapter 3. Configuration After Initial Activation 18 Description Values (Default underlined) IP Address Sets the ERC IP Address. IP Address Location update Port (UDP) Port number of location protocol port of ERC Port Number Maintenance port (UDP) Port number of maintenance protocol port of EPE. Port Number Name Name for the configuration set. Free text Description Description for the configuration set. Free text Sets the channels scanned during a location scan.
Chapter 3. Configuration After Initial Activation 19 Setting Location Beacon Sensor Description Values (Default underlined) Enable or disable the location beacon sensor . In active mode a location update is done immediately when the tag notices a location beacon. In passive mode the recent observed location beacon ID is sent to EPE only when location update is initiated by other stimuli such as periodic or motion wakeup.
Chapter 3. Configuration After Initial Activation 20 Setting Description Values LED / Vibration Launches the alarm at the tag with LEDs only or with vibration and LEDs. The alarm duration can be set. LED; LED and Vibration Manual Commands Manual command or a list of commands can be sent to a tag. - Set Config A pre-defined config can be selected and sent to tag(s) A list of available configs. Go to configs page to create tag configurations. Tag firmware can be updated.
Chapter 4. Tag Operation 21 4 Tag Operation 4.1 Button Activated Location Update In addition to periodic location updates, the tag can also be set to scan and update it's location when any of the buttons is pressed. After a button press the tag scans immediately and sends the results to ERC. The LEDs indicate the scan success or failure similarly as in the scan activated by the wake up interval. 4.2 Maintenance Call The W4 performs normal periodict Maintenance Calls.
Chapter 4. Tag Operation 22 4.5 Optimizing Battery Life The W4 Wi-Fi tag uses an ultra-low power system-on-chip architecture that lowers the power consumption to minimal. This enables running tags with same batteries for several years. However, to get the maximum lifetime from your tags you should take care that your network and tag configuration supports all possible power save features.
23 Chapter 4. Tag Operation Figure 4.1. W4 insertion in the Single Charger. 1. Slide the tag with the connectors downward to the charging slot. 2. Press the top of the tag towards the clip until it clicks in the charging position and the charging light turns on (under the button of the tag). Note that if the battery is fully discharged, it may take up to 15 minutes for the charging light to turn on.
Chapter 4. Tag Operation 24 Figure 4.2. W4 insertion in the Multi Charger. 1. Slide the tag with the connectors downward to the charging slot. 2. Press the top of the tag towards the clip until it clicks in the charging position and the charging light turns on (under the button of the tag). Note that if the battery is fully discharged, it may take up to 15 minutes for the charging light to turn on.
Chapter 4. Tag Operation 25 Only use Ekahau supported adapters for charging the tags. Warning Recharge the tag only in room temperature conditions, 0 °C - 40°C (32 °F - 104 °F). Recharging the tag in too cold or too hot conditions may damage the tag.
Chapter 4.
Chapter 5. Technical specifications 27 5 Technical specifications 5.1 General ● ● ● ● ● ● ● ● ● ● ● ● Outside Dimensions: 51.5 x 50 x 17.5mm, 2 x 1.9 x 0.7in Weight: 31g / 1.
Chapter 5. Technical specifications ● ● ● ● ● 28 Do not drop, knock or shake the tag. Rough handling can break internal circuit boards. Do not use harsh chemicals, cleaning solvents, or strong detergents to clean the tag. Do not paint the tag. Paint can clog the moving parts, affect the radio communication and prevent proper operation. Use a soft, clean and dry cloth to clean the tag. Use only the supplied antenna.
Chapter 6. Certifications 29 6 Certifications 6.1 FCC Rules This device complies with Part 15 of the FCC Rules. Operation is subject to the following two conditions: (1) device may not cause harmful interference, and (2) device must accept any interference received, including interference that may cause undesired operation. FCC ID of this device is: TA7-T301-W1 Note: This equipment has been tested and found to comply with the limits for a Class B digital device, pursuant to part 15 of the FCC Rules.
9 Chapter 5. Certifications 6.3 Industry Canada Statements for Portable Devices Section 7.1.3 of RSS-GEN Operation is subject to the following two conditions: 1) this device may not cause interference, and 2) this device must accept any interference, including interference that may cause undesired operation of the device.
Chapter 6.
Chapter 7. Limited Warranty 31 7 Limited Warranty Ekahau warrants that the Tags will operate in accordance with and substantially conform to their published specifications when shipped or otherwise delivered to the end user and for a period of 1 year thereafter, provided, however, that Ekahau does not warrant any claim or damage under this Warranty if such claim or damage results from: 1. 2. 3. 4.
Chapter 8.