Model # ATVUSB05 Quick Installation Guide
Section 1 Getting Started Please review the following package contents and minimum system requirements before proceeding to install the TV box. If your computer does not meet the minimum system requirements, the TV box may not work properly. 1.1 Package Contents Unpack your Airlink101 TV box and make sure that all the items are intact.
Section 2 Installing Hardware Before you plug the Airlink101 video capture adapter into your computer’s USB 2.0 port, please check your USB 2.0 device driver first. If your USB 2.0 host controller driver is not the latest version or provided by Microsoft, we strongly recommend you use our “USB 2.0 Updater” utility from the autorun page on the CD. It will help you to upgrade your USB 2.0 driver to the latest version released by Microsoft in order to avoid some compatibility issues.
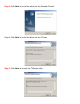
Section 3 Installing TV Box Driver Before installing the driver, it is highly recommended that all background applications such as antivirus software and system monitoring programs be disabled first. Step 1 When you plug in the USB 2.0 connector to the USB 2.0 port of your computer, the Found New Hardware Wizard will appear. Click Cancel to quit the wizard and insert the provided Installation CD. Step 2 The setup menu will automatically appear. Select Driver Install to start the driver installation.
Step 3 Click Next to install the driver for the Remote Control. Step 4 Click Next to install the driver for the TV box. Step 5 Click Next to launch the TVSetup utility.
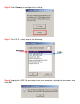
Step 6 Click Country to configure the setting. Step 7 For U.S.A., select one of the following Step 8 Unplug the USB 2.0 connector from your computer, re-plug the connector, and click OK.
Step 9 Select Yes, I want to restart my computer now and click Finish to restart your computer. Note: If you want to re-configure the TV system, you can run the “TVSetup” utility to change the setting. Click Start, Programs, Airlink101, ATVUSB05 Utilities, TVSetup to execute the program. Section 4 Installing PVR PLUS PVR PLUS is a set of utilities that allow you to watch TV on your computer, edit video clips, burn DVDs, and more.
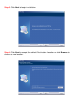
Step 3 Click Next to begin installation. Step 4 Click Next to accept the default Destination Location or click Browse to choose a new location.
Step 5 Click Next to accept the default Program Folder. Step 6 Click Finish to complete the installation.
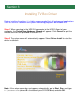
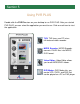
Section 5 Using PVR PLUS Double-click the PVR Plus icon on your desktop to run PVR PLUS. After you started PVR PLUS, you can select the application you want to use. Click on each icon to start the application. TVR: TVR turns your PC into a full-featured video recorder. MPEG Encoder: MPEG Encoder converts DV/AVI files into MPEG/ DVD format. Video Editor: Video Editor allows you to edit MPEG/DVD videos. DVD Maker: DVD Maker lets you create VCD, SVCD, and DVD that can be played on a PC or DVD player.
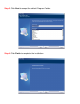
Section 6 Configuring TVR TVR is a powerful and easy-to-use TV application that provides feature-rich video/ audio entertainment. TVR allows you to watch and record TV or video on your computer and playback the recordings as well. Click the TVR icon on the PVR PLUS console to start TVR. Note: The first time you start TVR, it will run the TV Frequency Table Setup Wizard. Step 1 For U.S.A.
Step 3 Click Start to auto-scan for all available channels. Step 4 Click Finish to complete the TV Frequency Table Setup Wizard.
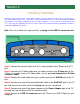
Step 5 Select your video source (Antenna, Cable, Composite, S-Video, or Memory) by clicking on the Input Source Switch. Input Source Switch Step 6 Click on the numeric keys or the up and down arrows to change your channels. Congratulations! You have successfully configured the TVR program. You can enjoy watching TV on your computer now. For more detailed information on how to use TVR and other applications, please refer to the User’s Manual in the provided Installation CD.