Quick Installation Guide 16-Port 10/100Mbps Fast Ethernet Switch Model# ASW316 Ver.
Trademarks Copyright © 2009 Airlink101® Airlink101® is a registered trademark. All other trademarks belong to their respective proprietors. Copyright Statement No part of this publication may be reproduced in any form or by any means or used to make any derivative such as translation, transformation, or adaptation without permission from Airlink101®. Preface FCC Warning This device has been tested and found to comply with limits for a Class a digital device, pursuant to Part 15 of the FCC Rules.
1 Introduction Congratulations on your purchase of the 16-Port 10/100Mbps Fast Ethernet Switch! It is an easy-to-install network switch which helps you to extend your network structure quickly and reliably. Purpose This Quick Installation Guide tells you how to install your Switch and how to connect it to your Ethernet network.
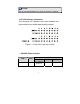
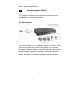
1.2 Panels 1.2.1 Front Panel The front panel of the Switch consists of LED indicators, and 16 10/100Mbps ports. The figure below shows the front panel of the Switch. Figure 1-1 Front Panel view of the Switch • • 10/100Mbps Ports (Port 1~16): These ports support 10/ 100Mbps, and can operate in Half/Full Duplex transfer modes. These ports also support automatic MDI/MDI-X crossover detection, giving true “plug and play” capability.
NOTICE: Do not envelop Radiator Fan while the Switch is working. 1.2.3 LED Indicators information The front panel LEDs provide instant status feedback and help monitoring and troubleshooting when needed.
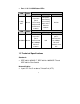
• Port 1~16 10/100M Status LEDs LED Color LINK/ ACT Green LED Color 10/100M Green Solid The respective port is successfully connected to an Ethernet network. Solid The respective port is connected to the 100Mbps Ethernet network. Status Blinking Off The port is transmitting or receiving data on the Ethernet network. Status Blinking N/A No link Off The respective port is connected to the 10Mbps Ethernet network, or no link. 1.3 Technical Specifications Standards • IEEE 802.
Ports • 16 x 10/100Mbps TX Auto-Negotiation RJ45 Port Access Method • CSMA/CD Transmission Method • Store and Forward MAC Address Table • 8K Built-in Buffer • 1.
performance. When installing, take the following into your consideration. 2.1 Installation Follow the guidelines below to install the Switch: Install the Switch in a fairly cool and dry place. See the Technical Specifications for the acceptable temperature and humidity operating ranges. Install the Switch on a sturdy, level surface that can support its weight. Connect the power cord to the Switch and the power outlet. The distance is no more than 182cm.
power source automatically. 3 Connecting the Switch This section describes how to connect the Switch to your 10/100Mbps Fast Ethernet network. 3.1 Connection Your network device (i.e. computer, switch, IP Camera, VoIP) can be connected to any port of the Switch via a two-pair Category 5 Cable or above. If the LED indicators do not light up after making a proper connection, check your network device, the cable, the Switch conditions and connections.
4 Technical Support E-mail: support@airlink101.com Toll-Free: 1-888-746-3238 Web Site: www.airlink101.com *Actual throughput varies. Network conditions and environmental factors as well as network overhead lower actual data throughput rate. Copyright © 2009 AirLink101. All rights reserved.