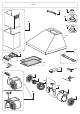
XHD541 80 654 695 30 458 167 454 110 29 12 554 492 455 38 37 609 441 130 39 140 38
XHD541A COD. DESCRIPTION POSITION Z00SP0012000 CAP WARNING GEM 12 Z00SP002960D ALUMINIUM PANEL DECOR 60-LUXOR 60-ISOLA-ZENITH 60- 29 Z00SP046400B "WHITE CHIMNEY TYPE ""LUXOR"" WITH BRACKETS 30 Z00SP0037000 MOTOR 37 Z00SP0038000 MOTOR SUPPORT STANDARD 38 Z00SP0039000 TANGENTIAL CONVEYOR 39 ZSPK0179 CONTROL 110 ZSPK0629 MOTOR GROUP 140 BODY DECOR PUSH B. 60 WHITE TRADIT. LAMPS 167 Z00SP0441000 NR.
XHD541C COD. DESCRIPTION POSITION Z00SP0012000 CAP WARNING GEM 12 Z00SP002960D ALUMINIUM PANEL DECOR 60-LUXOR 60-ISOLA-ZENITH 60- 29 ZSPK0806 CHIMNEY 30 Z00SP0037000 MOTOR 37 Z00SP0038000 MOTOR SUPPORT STANDARD 38 Z00SP0039000 TANGENTIAL CONVEYOR 39 ZSPK0179 CONTROL 110 ZSPK0629 MOTOR GROUP 140 Z00SP01676PIX BODY DECOR PUSH B. 60 INOX TRADIT. LAMPS 167 Z00SP0441000 NR.
XHD541H COD. DESCRIPTION POSITION Z00SP0012000 CAP WARNING GEM 12 Z00SP002960D ALUMINIUM PANEL DECOR 60-LUXOR 60-ISOLA-ZENITH 60- 29 Z00SP046400N "BLACK CHIMNEY TYPE ""LUXOR"" WITH BRACKETS 30 Z00SP0037000 MOTOR 37 Z00SP0038000 MOTOR SUPPORT STANDARD 38 Z00SP0039000 TANGENTIAL CONVEYOR 39 ZSPK0179 CONTROL 110 ZSPK0629 MOTOR GROUP 140 BODY DECOR PUSH B. 60 BLACK TRADIT. LAMPS 167 Z00SP0441000 NR.
3 White 2 Black 1 C Blue Brown Brown MOTOR Brown Blue L N V.A.C.
XHD541 I CAPPA ASPIRANTE - Istruzioni per l'uso D DUNSTABZUGSHAUBE - Gebrauchsanweisung E CAMPANA EXTRACTORA - Manual de utilización F HOTTE DE CUISINE - Notice d'utilisation GB COOKER HOOD - User instructions NL AFZUIGKAP - Gebruiksaanwijzing P COIFA ASPIRANTE - Manual do usuário
B A M C 20 Fig.1 A B 235 A Fig.2 Fig.3 C A A Fig.4 -3- Fig.
90° Fig.7 Fig.6 A A B C G A1 A2 C1 C2 C4 C3 B Fig.8 Fig.
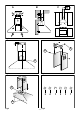
ITALIANO GENERALITA' Leggere attentamente il contenuto del presente libretto in quanto fornisce importanti indicazioni riguardanti la sicurezza di installazione, d'uso e di manutenzione. Conservare il libretto per ogni ulteriore consultazione. L'apparecchio è stato progettato per uso in versione aspirante (evacuazione aria all'esterno - Fig.1B), filtrante (riciclo aria all'interno - Fig.1A) o con motore esterno (Fig.1C). AVVERTENZE PER LA SICUREZZA 1.
attivo e seguire le istruzioni di montaggio. rale dell’ambiente. L’uso prolungato dell’illuminazione diminuisce notevolmete la durata media delle lampade. • VERSIONE FILTRANTE Installare la cappa e i due raccordi come indicato nel paragrafo riguardante il montaggio della cappa nella versione aspirante. Per il montaggio del deviatore aria filtrante fare riferimento alle istruzioni contenute nel kit. Se il kit non è in dotazione, ordinarlo al Vs. rivenditore come accessorio.
DEUTSCH ALLGEMEINES Diese Anleitung bitte aufmerksam durchlesen, da sie wichtige Sicherheitshinweise zur Installation, zum Gebrauch und zur Wartung enthält. Die Anleitung für eventuelle zukünftige Konsultationen aufbewahren. Das Gerät wurde zum Gebrauch in Aspirationsversion (Luftausscheidung nach außen - Abb.1B), Fitrationsversion (innerer Luftumlauf - Abb.1A) oder mit äußerem Motor (Abb.1C) entworfen. SICHERHEITSHINWEISE 1.
schlußstück in das untere Anschlußstück stecken und auf den Aufbau legen Das obere Anschlußstück bis zum Bügel ausziehen und anhand der Schrauben B (Abb.3) befestigen. Zur Verwandlung der Abzugshaube von der Aspirationsversion in die Filtrationsversion, beim Händler die Aktivkohlenfilter besorgen und die Montageanleitung befolgen. • FILTRATIONSVERSION Die Abzugshaube und die zwei Anschlußstücke laut den Anweisungen des Abschnitts über die Montage der Abzugshaube in Aspirationsversion befolgen.
ESPAÑOL E GENERALIDADES AZUL = N neutro. Lea atentamente el contenido del presente libro de instrucciones pues contiene indicaciones importantes para la seguridad en la instalación, el uso y el mantenimiento (Consérvelo para un posible consulta posterior). El aparato ha sido diseñado para el uso en versión aspiradora (evacuación de aire hacia el exterior – Fig.1B), filtrante (reciclaje del aire en el interior – Fig.1A) o con motor exterior (Fig.1C).
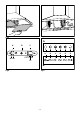
en línea con su campana mediante los tornillos A (Fig.3) y respetando la distancia del techo indicada en la Fig.2. Conecte, mediante un tubo de empalme, la brida C al agujero para la evacuación del aire (Fig.4). Insertar el racor superior al interior del racor inferior y apoyar sobre la caja Extraiga el racor superior hasta el estribo y fíjelo mediante los tornillos B (Fig.3).
FRANÇAIS GÉNERALITÉS Lire attentivement le contenu du mode d'emploi puisqu'il fournit des indications importantes concernant la sécurité d'installation, d'emploi et d'entretien. Le conserver pour d' ultérieures consultations. L’appareil a été conçu pour être utilisé dans le modèle aspirant (évacuation de l’air à l’extérieur – Fig.1B), filtrant (retour de l’air à l’intérieur – Fig.1A) ou doté d’un moteur externe (Fig.1C). CONSEILS POUR LA SÉCURITÉ 1.
soit sur l’axe de votre hotte au moyen des vis A (Fig.3), tout en respectant la distance depuis le plafond indiquée à la Fig.2. Raccorder la bride C au trou d’évacuation de l’air au moyen d’un tube de raccordement (Fig.4). Introduire le raccord supérieur à l’intérieur du raccord inférieur et appuyer sur la coque. . Retirer le raccord supérieur jusqu’à la bride et le fixer au moyen des vis B (Fig.3).
ENGLISH GENERAL Carefully read the following important information regarding installation safety and maintenance. Keep this information booklet accessible for further consultations. The appliance has been designed for use in the ducting version (air exhaust to the outside – Fig.1B), filtering version (air circulation on the inside – Fig.1A) or with external motor (Fig.1C). SAFETY PRECAUTION 1.
the distance from the ceiling indicated in Fig.2. Connect the flange C to the air exhaust hole using a connection pipe (Fig.4). Insert the upper flue into the lower flue and rest above the frame. Extract the upper flue up to the bracket and fix it with the screws B (Fig.3). To transform the hood from a ducting version into a filtering version, ask your dealer for the charcoal filters and follow the installation instructions. • COMMANDS: (Fig.
NEDERLANDS ALGEMEEN De inhoud van dit boekje grondig doorlezen, daar het belangrijke informatie bevat voor veilige installatie, gebruik en onderhoud.Het boekje bewaren voor verdere raadpleging.Het apparaat is ontworpen als afzuigkap (Iuchtafvoer naar buiten, waarbij gezorgd moet worden voor voldoende luchttoevoer naar de keuken) of als filter (Iuchtrecirculatie binnen). Het apparaat is ontworpen om gebruikt te worden in de afzuigversie (externe afvoer van de lucht - Afb.
Vervolgens bevestigt u deze met de schroeven A (Afb.3) zo aan het plafond dat het in lijn staat met uw kap. Neem hierbij de afstand vanaf het plafond in acht die aangegeven wordt in Afb. 2. Bevestig, met behulp van een verbindingsbuis, flens C op het gat van de luchtafvoer (Afb.4). Plaats het bovenste verbindingsstuk in het onderste En plaats het op de behuizing. Trek het bovenste verbindingsstuk naar buiten tot aan de beugel en zet het vast met de schroeven B (Afb.3).
PORTUGUÊS GENERALIDADES Ler cuidadosamente o conteúdo do presente manual já que este fornece indicações importantes referentes à segurança de instalação, de uso e de manutenção. Conservar o manual para qualquer ulterior consulta. O aparelho foi projectado para utilização em versão aspirante (evacuação de ar para o exterior - Fig.1B), filtrante (circulação de ar no interior - Fig.1A) ou com motor exterior (Fig.1C). ADVERTÊNCIAS PARA A SEGURANÇA 1.
ante os parafusos B (Fig.3). Para transformar a campânula da versão aspirante para versão filtrante, solicite ao seu revendedor os filtros de carbono activo e siga as instruções de montagem. • VERSÃO FILTRANTE Instalar a campânula e as duas junções como indicado no parágrafo relativo à montagem da campânula na versão aspirante. Para a montagem da junção filtrante consultar as instruções contidas no kit. Se o kit não tiver sido fornecido, solicite-o ao seu revendedor como acessório.