E L E V AT E Y O U R P L AY BEYOND THE BOARD Wireless Effects Pedal Controller Guide
What’s Included Controller + Attachment System Dock Charging Cable
Table of Contents 01 TA B L E O F CO N T E N T S 02 A I R PATC H D O C K 03 PA I R I N G YO U R A I R PATC H 04 A I R PATC H CO N T R O L L E R 05 C H A R G I N G YO U R CO N T R O L L E R 06 CO N T R O L L E R AT TA C H M E N T 07 M A K I N G I T YO U R O W N 08 M O D E S E L EC T I O N 09 P R E PA R E FO R L A U N C H 10 & 11 FLIGHT MODES 12 A I R PATC H S P EC I F I C AT I O N S 13 S TAY PATC H E D I N 01
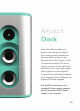
Airpatch Dock Select the effects pedals you want to use with your Airpatch and connect them between the Send and Return jacks on the Airpatch Dock. (See Figure A.1 for connection example.) The audio source connects to the Input jack while the rest of your audio signal chain connects to the Airpatch Output. Ensure all pedals between your Airpatch Send and Return are powered ON and engaged. For the 9V connection, use a standard 2.1mm center negative barrel connector ONLY. Power supply is not included.
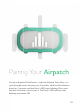
Pairing Your irpatch Use your Airpatch Dock Button—with the Airpatch Sonic Bars—to cycle through modes and pair your Controller. Hold the Dock Button down for 3 seconds until the Dock’s LED starts blinking. Press your Airpatch Controller once to pair it. The Dock’s LED will then stop blinking and remain ON.
Airpatch Controller When you press your Airpatch Controller, the surface will flash white. When the LED flashes red, your battery is low (~1 hour remaining). If the light does not flash at all, your battery is depleted and your Controller must be charged.
Charging Your Controller Charge your Airpatch Controller with the magnetic USB cable provided and a standard 5V USB power supply. The magnetic charging connector is designed to fit one way only so look for the light to appear red indicating your Controller is charging. It will turn white once it’s complete (~45 minutes). Remove the charging cable once your battery is full.
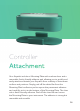
Controller ttachment Your Airpatch includes a Mounting Plate with a release lever and a removable, finish-friendly adhesive pad, allowing you to quickly and easily attach and detach your Airpatch from a variety of instrument surfaces and positions. Simply peel off the white film from the Mounting Plate’s adhesive pad to expose the permanent adhesive and carefully stick it to the bottom of the Mounting Plate. The clear side is finish-friendly adhesive.
Making It Your Own When connecting your effects pedals, Airpatch enables endless combinations. Ever wish you could control your favorite effects right on your instrument? What about getting more out of your go-to pedals? Your Airpatch makes it possible. Airpatch encourages freedom of movement and expression. Experiment by placing the Airpatch Controller in different locations on your instrument until you find the position that’s most comfortable and best suited to your playing style.
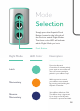
Mode Selection Simply press the Airpatch Dock Button located in the left side of the Dock to switch Flight Modes. The three-color LED will indicate which Flight Mode you’re in. Dock Button Flight Mode LED Color Description Latch Press the Airpatch Controller to activate pedals; press again to turn them off. You can connect multiple pedals in your effects loop! Momentary With responsive control, your effects are activated by pressing and holding the Airpatch Controller.
Prepare for Launch Figure A.
Flight Modes Tone Tacks Get more out of your pedals with wireless control and unique switching features. Lead Button Distortion/Boost + Latch Mode — Use your Airpatch to launch into your lead section. Add a modulation to your effects loop and activate multiple pedals at once. Tremolo/Stutter Button Tremolo Pedal + Momentary Mode — Press and hold Tremolo/Stutter for accents and dramatic note and chord holds. This is a great modulation when combined with distortion outside of your effects loop.
Pitch Button Pitch Shifter + Latch/Momentary Mode — Incorporate new and unprecedented harmonies and octaves into your soundscapes. Your Airpatch’s Momentary Mode acts like new notes for your instrument when combined with pitch effects. Three-way Killswitch Momentary Mode — Leave your effects loop blank or directly connect your effects Send to the Return with just one patch cable. No pedals necessary. This provides you with two killswitch options.
Airpatch Specifications • 2.4 GHz wireless signal, similar to other low latency wireless guitar transmitters. • Noiseless switching circuit. • 9V center negative barrel connector — compatible with standard pedal board power systems. (Power supply not included.) • Over 50 feet of range (line of sight). • Long-lasting battery life Controller that lasts for multiple performances on a single charge. • USB charging cable for Airpatch Controller with magnetic connection.
Stay Patched In aviateaudio.com contactus@aviateaudio.com @aviateaudio @aviate_audio Disclaimer FCC STATEMENT 1. This device complies with Part 15 of the FCC Rules. Operation is subject to the following two conditions: (1) This device may not cause harmful interference. (2) This device must accept any interference received, including interference that may cause undesired operation. 2.