
User's Instructions


UNPACKING
Unpack and check that all items have been enclosed.
Packing contents: 1. Radio/Antenna, 2. Battery, 3. Belt
clip, 4. Hand strap, 5. Charger, 6.
User’s manual
GETTING READY
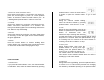
1. Installation, Removal the Belt Clip
Installation: align the belt clip with the plastic slots of
backside of unit. Slide the belt clip onto the unit,
pushing firmly until a click heard.
Removal: hold up the belt clip release tab with fingernail or
coin (or like instrument). While holding up the release
tab, slide the belt clip out and away from the unit.
2. Installation the Battery Pack
Installation: turn off the radio. Unscrew the battery pack
cover lock screw by rotating counterclockwise with
coin (or like instrument). Open the cover and insert the
battery pack in right position. Close the cover and
screw the cover lock screw.
3. Charging the Battery
Before your starting operation, make sure the battery
is fully charged. (Refer to charging method next page)
DESCRIPTION
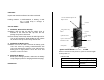
•
power on/off button and indicate LED
Push 0.5 second to turn power on, push 0.5 second again
to turn power off.
Indicate LED
Red on Transmitting, charging
Blinking Low battery alert
Green on Receiving, recharging
finished
Blinking Different sub-tone when
•
external audio/microphone and
adapter socket
•
antenna
•
speaker
•
PTT(push to talk)
button
•
up/down button
•
function button
•
monitor button
•
LCD display
panel
•
enter button
•
power on/off button
and indicate LED
•
microphone