
Specifications


17730-248 51 Component Replacement
AIRTEK
®
•
SOFTEK
®
for Blue Bird Buses
ASSEMBLY
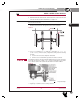
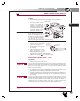
1. Attach the height control valve on the vehicle frame as shown in Figure 9-1.
FIGURE 9-2 10K
2. Attach the ¼" washers and the
locknuts. Do not tighten the
locknuts to specified torque
until after the proper ride height
is attained. Mount the height
control valve parallel to flange
of the frame, see Figure 9-2.
SERVICE HINT When replacing or installing nylon
air line tubing into quick-connect
fittings, it is critical that the end of
the air line is cut square. Improper
cut of the end of the air line tubing
can cause the air line to seat
improperly in the quick connect fitting causing air leakage.
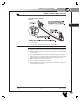
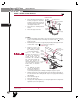
FIGURE 9-3 10K
3. Attach the air lines to the height
control valve, see Figure 9-3.
4. Install the height control valve link-
age assembly.
5. Adjust the height control valve to
proper specifications. See the
Align ment & Adjustments Section of
this publication for proper ride height adjustment.
6. Tighten the ¼" locknuts to 8-10 foot pounds torque.
AIRTEK HEIGHT CONTROL VALVE – 14.6K
DISASSEMBLY
1. Drain the air from the secondary air tank.
PRIOR TO AND DURING DEFLATION AND INFLATION OF THE FRONT AIR SUSPENSION SYSTEM,
ENSURE THAT ALL PERSONNEL AND EQUIPMENT ARE CLEAR FROM UNDER THE VEHICLE AND
AROUND THE SERVICE AREA, FAILURE TO DO SO CAN CAUSE SERIOUS PERSONAL INJURY,
DEATH, OR PROPERTY DAMAGE.
2. See additional Air Spring Cautions and Warnings in the Important Safety Notice Section
of this publication prior to inflating or deflating the suspension system.
3. Deflate the air springs by removing the height control valve linkage at the rubber grom-
met and lowering the height control linkage arm. This will exhaust the air pressure in
the air springs.
THE PUSH-TO-CONNECT FITTINGS ARE NON-SERVICEABLE. IT IS NECESSARY TO CLEAN THE
DIRT AND DEBRIS AWAY FROM THE PUSH-TO-CONNECT FITTINGS AND THE AIR LINES TO HELP
PREVENT ANY FOREIGN MATERIAL FROM ENTERING THE AIR SPRING, AIR SYSTEM OR
DAMAGING THE PUSH-TO-CONNECT FITTINGS. CLEAN PUSH-TO-CONNECT FITTINGS USING
SOAPY WATER AND A SOFT BRISTLED BRUSH AND DRY WITH COMPRESSED AIR.
To Left Hand
Air Spring
To Right Hand
Air Spring
“In” Port
“Exhaust” Port
C1
C2
SERVICE MANUAL
L
93
FRONT AXLE & SUSPENSION
1
APPENDIX