
Specifications


17730-248 71 Component Replacement
AIRTEK
®
•
SOFTEK
®
for Blue Bird Buses
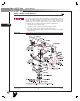
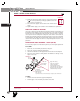
3. Install new ¾" clamp group bolts, washers and locknuts. Ensure that the clamp group
is properly aligned and the hex bolts are seated in the top pad, and the bottom axle
wrap is centered on the top axle wrap, see Figure 9-27.
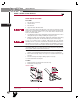
FIGURE 9-28
4. Tighten locknuts evenly to 285-305 foot pounds torque, see Figure
9-28 for proper torque sequence.
5. Install Air spring. See Air Spring assembly in this section.
6. Remove the wheel chocks.
SOFTEK BOTTOM AXLE WRAP
DISASSEMBLY
1. Place the vehicle on level floor.
2. Chock the wheels.
3. Raise the frame.
4. Support the vehicle with frame stands.
DO NOT USE A CUTTING TORCH TO REMOVE CLAMP GROUP BOLTS OR ATTACHING
FASTENERS. THE USE OF SUCH HEAT ON SUSPENSION COMPONENTS CAN ADVERSELY AFFECT
THE STRENGTH OF THESE PARTS. A COMPONENT DAMAGED IN THIS MANNER CAN RESULT IN
THE LOSS OF VEHICLE CONTROL AND POSSIBLE PERSONAL INJURY OR PROPERTY DAMAGE.
SERVICE HINT If a clamp group nut fails to come off bolt, cut half way through the bolt with an abrasive
cut off wheel, taking care not to contact axle beam or other components. Using an impact
wrench, spin the locknut to fracture the bolt and remove.
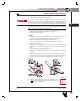
5. Remove ¾" U-bolts, washers and locknuts. Discard fasteners.
6. Remove bottom axle wrap. It may be necessary to use a dead blow mallet to dislodge
axle wrap.
7. Once removed inspect axle wrap for damage. Replace if necessary.
8. Discard used bottom axle wrap liner.
ASSEMBLY
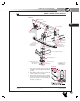
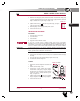
FIGURE 9-29 SOFTEK
1. Install new bottom axle wrap liner into bottom axle
wrap.
2. Install bottom axle wrap on axle.
3. Install new ¾" U-bolts, washers and locknuts.
Ensure that the clamp group is properly aligned
and the U-bolts are seated in the top pad, and the
bottom axle wrap is centered with the top axle
wrap, see Figure 9-29.
4. Tighten locknuts evenly to 285-305 foot pounds
torque, see Figure 9-28 for proper torque sequence.
5. Remove the wheel chocks.
SERVICE MANUAL
L
113
FRONT AXLE & SUSPENSION
1
APPENDIX