AirTek Dehumidifiers AT90/AT120 User Manual 1
1. Important safety instruction ★ Do not turn on/off the unit constantly by pulling out/inserting in the plug. It may cause outlet damage or electric shock or fire. ★ Do not put spray canister near air outlet (within 1M) since the warm wind could cause the spray canister explode. ★ The plug should be inserted completely. Remove dirt from the power plug and securely insert into the outlet. If dirt adheres to the plug or insertion is incomplete, it may cause a fire or electric shock.
2. Product introduction AirTek Dehumidifiers are capable of solving a wide variety of moisture problems. These workhorses can be placed in indoor swimming pool/spa areas, locker or laundry rooms, harsh marine environments or industrial environments where moisture control is required. Quiet operation, digital display, auto defrost, charming appearance and a design which allows you to place it right next to a wall and you have a dehumidifier that stands out amongst its peers. Introduction of configuration 3.
1. Start on (1) Plug on, the unit gives off a sound like “di”. The “humidity ico” shows the current humidity. (2) Press ‘On/Off’ Both the ‘Dehumidify Ico’ and ‘Humidity Ico’ lights on, the ‘Humidity Ico’ display the previous set humidity, the initial setting humidity is 60% and 3 seconds later the ‘Humidity Ico’ display current humidity. (3) Press humidity up or down button to adjust the humidity if needed .
B. Remote controller Instruction Press any key of the remote controller with the “signal ico” bright to send a signal, the unit gives off a sound like “di” to receive the signal. 1. Start on (1).Press “ON/OFF”, the “dehumidify ico” “humidity ico” and “set humidity ico” lights on, display the previous set humidity. The initial setting humidity is 60%. 2. Shut off Press “ON/OFF”, when the unit is running; when all the indicators turn off, the unit stops running. 3.
unit will run under previous mode after power supplied again. Please make sure it is unplug before you leaving. 2. The computer controller has a protective function which can keeping for 3 minutes. The compressor cannot be restart in 3 minutes since it was been shut off last time, as it cannot be shut off in3 minutes when it started work. 3. Working in comparative low temperature, defrost system will startup automatically, with the “defrost ico” lights on. A fan starts working and compressor stop.
1. Air Filter---- unload and leaning Air Filter is located at back of air-absorb grille and should be leaned at least two weeks interval. Unload steps: A. Unload screws. B. Take off and pull out air-absorb grille by hand. C. Pull up the air filter D. Tap the air filter lightly or clean the dirt from it using a vacuum cleaner. if dirt is conspicuous, wash with a solution of detergent in lukewarm water. Dry well in the shade and replace the air filter. Installation steps: Please see above steps: from D to A.
6. Support Malfunctions Does not work Analysis 1. Power cut 2. Switch off 3. Unplugged 4. Fuse melted 1. Filter choked by dirt 2. Some barrier in air inter or outlet 3. Door or windows open 4. Refrigerant leak Solution 1. Power on 2. Switch on 3. Plug on 4. Exchange fuse Dehumidify in low 1. Clean the filter efficiency 2. Remove the barrier 3. Close the door and windows and shadow the sunshine 4. Contact the manufacturer or seller Water leak 1. Unit instable 1. Adjust the unit to be stable 2.
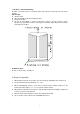
8. Electric Principle Chart 9. Installation Instruction Notice: 1. Transport The appliance must stand upright .When moving should not decline over 45 degree. 2. Installation The appliance should be located on a steady and firm stand. Installation: 1. Place the dehumidifier on a smooth level floor. 2. Drill a hole through the wall with a diameter of 65mm .
for the smooth flowing of freezing water. WARING: Checked carefully before drilling .To make sure there is nothing like the wire and the pipe behind this position. 3. Connect the drain hose pipe .Look at the diagram Notice: Please to make sure there is no water with the joining between the drain hose pipes. Any piece of the drain hose pipe should not be higher than the joining between the inflowing fence and the front board. 4. The wall sleeve of flange should be installed in the hole of indoor .