802.11g WLAN USB Stick WN-250gc, WN-251gc User Manual Version 1.
1
No part of this documentation may be reproduced in any form or by any means or used to make any derivative work (such as translation, transformation, or adaptation) without written permission from the copyright owner. All the other trademarks and registered trademarks are the property of their respective owners. Statement of Conditions We may make improvements or changes in the product described in this documentation at any time.
R&TTE Compliance Statement This equipment complies with all the requirements of the Directive 1999/5/EC of the European parliament and the council of 9 March 1999 on radio equipment and telecommunication terminal Equipment and the mutual recognition of their conformity(R&TTE). The R&TTE Directive repeals and replaces in the directive 98/13/EEC. As of April 8, 2000. Canada IC Compliance Statement Low Power License-Exempt Radio communication Devices (RSS-210) 1.
Table of Contents INTRODUCTION ...........................................................................................................................................1 1.1 Features.................................................................................................................................. 1 1.2 Package Contents .................................................................................................................. 1 1.3 System Requirements .................................
Use WEP Key.....................................................................................................................................17 Create Keys with Passphrase..............................................................................................................17 The Site Survey Tab.................................................................................................................................17 The IBSS Tab..............................................................
List of Figures FIGURE 1.4-1: 802.11g WLAN USB STICK.....................................................................................................2 FIGURE 1.4-2: ROTATE THE USB CONNECTOR ..................................................................................................2 FIGURE 2.1-1: THE FOUND NEW HARDWARE WIZARD DIALOG BOX .............................................................3 FIGURE 2.1-2: THE STARTUP WINDOW ...................................................................
INTRODUCTION Being five times faster than the speed of IEEE802.11b compliant devices, the innovative 802.11g standard lets the wireless network become incredibly easier and faster (up to 54Mbps) than ever. Your 802.11g WLAN USB STICK will bring you into such a high-speed network sphere. This document describes how to install your 802.11g WLAN USB STICK, which aims to let your computer communicate with 802.11 networks quickly and seamlessly.
* 32 MB RAM or above * One CD-ROM drive * 300 MHz processor or higher * Microsoft Windows 98/98se ME, 2000 or XP operating system * One USB 2.0 port 1.4 Your 802.11g WLAN USB STICK Your 802.11g WLAN USB STICK should be located in the USB 2.0 port of your computer, and it looks like the following picture: WN-250gc WN-251gc Figure 1.4-1: 802.11g WLAN USB STICK To improve the signal transmitting quality and to overcome certain space limitations, 802.
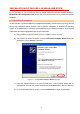
INSTALLATION OF THE 802.11G WLAN USB STICK It’s free and easy for you to install your 802.11g WLAN USB STICK and the attached software – WLAN-54G USB Configuration Tool. Simply with a few clicks of the mouse, you will succeed the installation. 2.1 Installation Procedures To have the 802.11g WLAN USB STICK operated appropriately, please read and go along with the step-by-step instructions below carefully. Here we take the installation on Windows XP operating system as the standard flow.
Figure 2.1-2: The Startup Window e) Click Next in the Welcome to the InstallShield Wizard window to proceed. The system will start to copy the drivers found. Figure 2.1-3: The Welcome to the InstallShield Wizard Window f) Windows will notify you with message box below that the driver has not passed the Windows Logo testing. Because the USB Stick has been tested to work with Windows XP, please choose Continue Anyway to ignore it.
Figure 2.1-4: The Windows XP System Compatibility Testing Warning Message Box g) On the Install Finished screen, click Finish to complete the installation. Note that when you are running Win98/98SE/ME, the computer will restart automatically after you click the Finish button. Figure 2.1-5: The Install Finished Screen Note: It is necessary for Win98/98se/ME users to restart your computer for completing the installation before starting operating the device.
Figure 2.1-6: The Message Box of Insert Disk in Windows 98 System Now you shall find the WLAN-54G USB Configuration Tool tray icon, tray. The installation is entirely finished at the moment. , appeared in the system Double-click the icon is able to launch the application and open the Wireless Settings dialog box, in which you may freely arrange your network connection afterwards. For more details about WLAN-54G USB Configuration Tool, please refer to WLAN-54G USB Configuration Tool Basics in this manual.
a) Double-click the Network Connections icon at the task bar to open the Wireless Network Connection Status dialog box, and then select Properties. Figure 2.2-3: The Wireless Network Connection Status Dialog Box b) Open the Wireless Networks menu, and remove the tick from the Use Windows to configure my wireless network settings checkbox. Figure 2.2-4: The Wireless Network Connection Properties Dialog Box c) Click OK. Now, you have successfully disabled the Wireless Zero Configuration.
For more information on WLAN-54G USB Configuration Tool, please refer to the chapter: WLAN-54G USB Configuration Tool Basics below. Note: If you wish to configure networks through Windows XP’s built-in configuration tools – Wireless Zero Configuration, please refer to the Windows XP Wireless Zero Configuration Tool chapter. 2.3 Verifying a Successful Installation To confirm that the 802.11g WLAN USB STICK is properly installed, please follow the procedures below. 1.
Figure 2.
WLAN-54G USB CONFIGURATION TOOL BASICS After successfully installing the drivers and utility for your 802.11g WLAN USB STICK on your computer, you may see the WLAN-54G USB Configuration Tool icon, , displayed in the system tray. To configure your USB Stick, double-click the icon to open the Wireless Settings dialog box, in which six tabs are contained. Each of them proffers different functions.
Choose Wireless Radio On command to receive the radio frequency signals. Wireless Radio Off Choosing Wireless Radio Off command will stop receiving the radio frequency signals. Remove Status Icon If you do not wish to have the WLAN-54G USB Configuration Tool icon displayed in the system tray, please choose this command. Therefore, once the computer is rebooted, the icon will reappear.
The application is a window-based program, which is consisted of six tabs, including Status, Configuration, Encryption, Site Survey, IBSS, and About. The following figure displays the Wireless Settings dialog box. Figure 3.3-1: The Wireless Settings Configuration Interface Check the desired items below to obtain more details about these tabs. The Status Tab In the Wireless Settings dialog box, click the Status tab to appear the following display. Here presents the status of your current connection.
picture, the associated profile is named “Wireless”. For more information about profiles, please refer to the “The Configuration Tab” section in the manual. The general information on the status of currently connected entry is presented. You may want to click the Rescan button to reinitiate the scanning process and update the status. Later the information displayed in the window will be renewed. If you wish to stop the networking connection, click the Disable Radio button to stop scanning.
associated access point beacon within a limited period. The higher the percentage, the better the link quality. The bar graph beside also provides a visual interpretation of the current link quality. It is noted that the Link Quality and Signal Strength features only apply to the Infrastructure mode. They are inapplicable in the Ad-Hoc mode since data will be transferred from many different computers.
the arrow button at the right of the Profile Name field to open the pull-down menu and then select an intended one from it. Note: You will have at least one profile named Default. When selecting any link from the list under the Site Survey tab, you have already automatically established a new profile for it under the Configuration tab.
Click the Encryption tab to define the encryption settings for a specific profile. It offers you various options concerning the so-called WEP (Wired Equivalent Privacy) to maintain the secure management in a wireless LAN environment. See the explanations below for more details, and click Apply to activate the new settings. To leave the window, click OK. To undo the new settings, select the Cancel button.
Use WEP Key Indicate which WEP key you intend to apply to activate the WEP encryption from the pull-down menu. Make sure that the intended access point on the wireless network shares the same keys. By default, Key 1 will be used. Create Keys with Passphrase Choose this command when the associated wireless network uses a passphrase to create WEP keys. Enter the passphrase string in the Passphrase filed to generate four encryption keys in the Key fields above.
Note: Choosing the IBSS Channel command from the right-click menu of WLAN-54G USB Configuration Tool tray icon will launch this tab too. Note that the available channels differ from country to country, and the channel number must be the same between the entries/stations within the range, so that they can communicate with each other. Or you may simply click Defaults to automatically determine it with proper channel number. When done, click Apply to activate the new configuration.
Network Driver Displays the current version and released date of the 802.11g WLAN USB STICK’s driver. Configuration Utility Displays the current version and released date of WLAN-54G USB Configuration Tool. NIC Firmware Displays the current NIC card firmware version and the MAC (Media Access Control) address of your wireless USB Stick. It is consisted of 12-digit hexadecimal numbers (48 bits in length) to identify your computer's physical address on the local area network. 3.
Figure 3.4-1: The Device Manager Dialog Box 4. When you click on the Advanced tab in the opened dialog box, a display similar to the following figure appears. Figure 3.4-2: The Advanced Tab You shall see the value for any of these properties by clicking over an item displayed in the Property field. If a value has been set for the property, it appears in the Value field on the right of the list. You may click to specify the Value settings from the offered drop-down list.
Present under the Value field will disable the value options of specified property. The following texts explains the four properties in the Property list displayed by this tab, which are important and effective when operating the stick. Authentication TYPE Specify a pre-defined profile with standard parameters from here.
Note: Auto Dynamic and Auto Maximum require NDIS 5.1 or later, typically available only on Windows XP. Disabled – specifies continuous access mode and is the default Dynamic – specifies a fast power saving mode that provides the best combination of performance and power usage Maximum – specifies the greatest power saving mode As to the values of Compression, Concatenation, Direct Link and PiggyBack properties are only applying for engineering testing requirements.
WINDOWS XP WIRELESS ZERO CONFIGURATION TOOL As you have already known, Windows XP has its built-in configuration tools – Windows XP Zero Configuration, to assist you in some basic configurations of wireless network connection. The service starts right after the completion of the installation of 802.11g WLAN USB STICK, and you will find the icon automatically appears in your system tray like the following picture shows.
Figure 4.2-1: The Connect to Wireless Network Dialog Box After clicking Advanced, you will enter into the Wireless Networks tab of the Wireless Network Connection Properties dialog box, in which three other tabs are found, including General, Authentication, and Advanced. The Wireless Networks tab includes almost the main settings for the networking connection. Thus, please check the descriptions below to learn more about the tab. Figure 4.
In the Preferred networks area, you could add any displayed networks to the list by clicking over the intended item from Available networks and then selecting the Add button. After clicking Add, the Wireless Network Properties dialog box will appear as Figure 3.2-3 displays. Note that to delete any item under the Preferred networks area, simply click on it and then select the Remove button.
Figure 4.2-4: WEP Settings Note: For more details of this tab, you may click the link: setting up wireless network configuration at the bottom of the Wireless networks tab to launch the Windows XP Online-Help. Figure 4.2-5: Setting up Wireless Network Configuration 4.3 To Access to Certain Wireless Network Type The default network type of Windows XP Zero Configuration is any available access points (Access Point mode) or WLAN Card equipped computers (Ad-Hoc mode) within the range at the given time.
Figure 4.3-1 The Advanced Dialog Box: The Advanced dialog box provides three options, Any available network, Access point networks only, and Computer-to-computer networks only. Choose one of them according to your need and click Close to finish. Then you will find under the Available networks area in the Wireless Network Connection Properties dialog box, only the specified networks are displayed. Note: If you wish to use the attached application – WLAN-54G USB Configuration Tool of the 802.
APPENDIX A: TROUBLESHOOTING This section provides solutions to problems that you might encounter during the installation and operation of your 802.11g WLAN USB STICK. Please refer to the desired topics below and read the description to solve your problems. The 802.11g WLAN USB STICK Does Not Work Properly If this happens, follow the guidelines below. 1. Right-click the My Computer desktop icon and choose Properties to open the System Properties dialog box. 2.
1. Execute the uninstall function through the WLAN-54G USB Uninstall command of WLAN-G TOOLS in the Program menu provoked by clicking the Start button on the task bar. Figure 5-1: The WLAN-54G USB Configuration Tool Uninstall Command 2. Choose OK when the following message box appears. Figure 5-2: The WLAN-54G USB Configuration Tool Removal Warning Message 3. Click Finish in the Uninstall Finished dialog box.
Figure 5-3: The Uninstall Finished Screen 30
APPENDIX B: SPECIFICATIONS Product Name 802.11g WLAN USB STICK Host Interface USB2.0 Standards IEEE 802.11, IEEE 802.11b, IEEE 802.11g Frequency Band 2.4GHz – ISM Band (subject to local regulations) Current Drain Transmit mode=430mA, Receive mode=465mA, Standby mode=67mA Spreading DSSS (11b), OFDM (11g) Operating Voltage 5.0 V ± 5% Data Rate 1Mpbs, 2Mbps, 5.5Mbps, 6Mbps, 9Mbps, 11Mbps, 12Mbps, 18Mbps, 24Mbps, 36Mbps, 48Mbps, 54Mbps Transmit Power 802.11b≧18.5dBm 802.11g 6/9Mbps≧17.
Temperature Range 0~65°C (Operating) Humidity Max. 95% Non-condensing Operating Range Open Space: up to 400meters; Indoor: up to 100meters The transmission speed varies in the surrounding environment.