
User's Manual


3
INSTALLATION OF THE 802.11G WLAN USB STICK
It’s free and easy for you to install your 802.11g WLAN USB STICK and the attached software –
WLAN-54G USB Configuration Tool. Simply with a few clicks of the mouse, you will succeed the
installation.
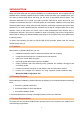
2.1 Installation Procedures
To have the 802.11g WLAN USB STICK operated appropriately, please read and go along with the
step-by-step instructions below carefully. Here we take the installation on Windows XP operating
system as the standard flow. Therefore, the flow differences of installing the stick on other versions
of Windows have been highlighted under the specified steps.
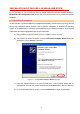
a) Plug your 802.11g WLAN USB STICK into a USB 2.0 port on your PC.
b) Your system will detect the device, and the Found New Hardware Wizard dialog box
will appear. Choose Cancel to proceed.
Figure 2.1-1: The Found New Hardware Wizard Dialog Box
c) Insert the supplied Setup CD to your CD-ROM drive, and the Setup Wizard will run
automatically. If it does not, please manually execute Autorun.exe in the CD’s directory.
d) From the prompted start-up screen, choose Install Driver to begin the installation.