Deutsch d Français n MINIDISC RECORDER AM-F75 AM-C75 OPERATING INSTRUCTIONS BEDIENUNGSANLEITUNG MODE D’EMPLOI WARNING A 8A-HM2-901-11 991223BAS-P-0 TO REDUCE THE RISK OF FIRE OR ELECTRIC SHOCK, DO NOT EXPOSE THIS APPLIANCE TO RAIN OR MOISTURE.
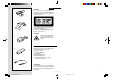
English 1 CAUTION Use of controls or adjustments or performance of procedures other than those specified herein may result in hazardous radiation exposure. 2 This minidisc recorder is classified as a CLASS 1 LASER product. The CLASS 1 LASER PRODUCT label is located on the exterior. CAUTION! Invisible laser radiation when open and interlocks are defeated. Avoid exposure to beam. 3 Accessories 4 Following accessories are supplied with this unit. Check them before use.
SPECIFICATIONS Français Appareil Système de lecture Système audio numérique MiniDisc Bloc de lecture laser Laser semi-conducteur Système d’enregistrement Système de recouvrement par modulation de polarité magnétique Vitesse de rotation Env. 400 à 900 tr/min.
TABLE OF CONTENTS English PRECAUTIONS .................................... 6 USING ON THE RECHARGEABLE BATTERY ......................................... 10 USING ON AC HOUSE CURRENT .... 12 PREPARATIONS ................................ 14 RECORDING Recording methods and connections ... 18 Basic operation ................................... 24 Adjusting the recording level ............... 28 USABLE FUNCTIONS FOR RECORDING Registering the index mark ................. Selecting a marker function ............
SPECIFICATIONS English Main unit Playback system MiniDisc digital audio system Laser pickup Semiconductor laser Recording system Magnetic polarity modulation overwrite system Revolutions Approx. 400 to 900 rpm (CLV) Sampling Frequency 44.
PRECAUTIONS English To maintain good performance • Do not use the unit in places which are extremely hot, cold, dusty or humid. In particular, do not use or keep the unit in the following places.
WHAT IS A MINIDISC? English The remaining time on a disc is not increased even after some short tracks have been erased. When the remaining time on a disc is displayed, it may not be increased even after erasing short tracks because the sections less than 12 seconds are not counted. Tracks cannot be joined (the COMBINE function does not function). Tracks created by editing may not be joined.
A PRECAUTIONS English Hohe Aufzeichnungsdichte dank ATRAC* Listening to headphone stereo at full power for extended periods of time can result in hearing damage. ATRAC ist ein neues Verfahren der Datenreduktion, bei dem nur die vom menschlichen Gehör wahrgenommenen Frequenzen aufgezeichnet werden, so daß auf die wesentlich kleinere Minidisc genauso viel Musik paßt wie auf eine Compact-Disc.
WHAT IS A MINIDISC? English Ultra compact size made possible by ATRAC* technology A newly developed digital audio compression technology called the ATRAC system automatically extracts only the frequencies that are actually audible to the human ear and cuts the frequencies which are inaudible. This compresses the amount of information to be recorded to 1/5 of the normal amount.
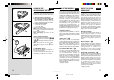
English USING ON THE RECHARGEABLE BATTERY 1 When using on the rechargeable battery for the first time, charge it for more than 1 hour. 1 Open the battery compartment. 2 Insert the rechargeable battery with the step marks a correctly aligned. After inserting the battery, close the battery compartment and the disc holder. 3 Connect the AC adaptor. 1 to the DC 4.5 V jack 2 to a wall outlet b in the display blinks. Recharging a fully used battery takes about 2 hours.
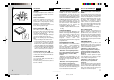
A WHAT IS A MINIDISC? English A Mini Disc is only 64 mm (2 5/8 inches) in diameter, about half the size of a conventional CD. But Mini Discs can be used to store and play back a full 80 minutes of information. Unlike a CD, a Mini Disc comes in a plastic cartridge, so that it can be handled with ease. The cartridge also protects the disc inside from shocks, dust and scratches. Unlike cassette tapes, which can become stretched or tangled, a MiniDisc is an excellent durable media.
USING ON THE RECHARGEABLE BATTERY English Note on the rechargeable battery • Use only the supplied AC adaptor to recharge the battery. • Do not carry the battery in a pocket or handbag together with metal objects such as pendants or key holders. • Do not short-circuit the terminals. • Do not disassemble the battery, heat it or put it in water. • To prolong the performance of the battery, recharge it in an ambient temperature of 10°C to 30°C and keep it in a cool location when not using.
FEHLERSUCHE Deutsch Wenn das Gerät nicht wie in dieser Bedienungsanleitung beschrieben funktioniert, überprüfen Sie es bitte anhand der folgenden Liste. Gerät schaltet nicht ein. • Den Netzstecker fest einstecken. • Die Batterien richtig einlegen. • Laden Sie die aufladbare Batterie. Betrieb beginnt nicht. • • • • Den Disc-Halter vollständig schließen. Eine Disc einlegen. Den HOLD-Schalter freigeben. Die Fernbedienung vollständig anschließen.
A PREPARATIONS English Connecting the headphones → A Connect the supplied headphones to the remote control and connect the remote control to the OUTPUT jack of the main unit. HOLD switches → B When operating with the main unit, release HOLD on the main unit. → a When operating with the remote control, release HOLD on the remote control. → b When not using the unit, set both to the HOLD position. → c Accidentally pressed buttons will not function.
MESSAGES GUIDE DU MD Français BLANK Ear GRD! • Rien n’est enregistré sur le disque. • Vous ne pouvez plus augmenter le volume avec la fonction EAR GUARD. Prohibit • L’enregistrement numérique est interdit par la norme SCMS. → Voir “A propos de la norme SCMS (Serial Copy Management System)”, page 21. HOLD Can’t ED NoSignal • Les pistes sont trop courtes pour être combinées. → Voir “LIMITATIONS DU MD ”, page 77. • La fonction Combinaison a été utilisée pendant la lecture de la première piste.
5 2,4 3,4 1 PREPARATIONS English Setting the clock BLANK • If you set the clock before use, the date will be recorded automatically every time a recording is done. • Before setting the clock, make sure that enough battery power remains. • Auf der Disc aufgezeichnet. Operate when the power is off. 1 Keep DISP pressed for about 3 seconds. “CLOCKSET” is displayed. 2 Turn MULTI JOG to set the year. 3 Press h. The month starts flashing. 4 Repeat the steps 2 and 3 to set the month, day, hour and minute.
MD GUIDE MESSAGES English VORBEREITUNGEN Deutsch PREPARATIFS Français BLANK NO DISC Einstellen der Uhrzeit Réglage de l’horloge • Nothing is recorded on the disc. • No disc is inside the unit. Prohibit NoSignal • Digital recording is prohibited by the SCMS standard. → See “About the Serial Copy Management System (SCMS)” on page 20. • Playback of the connected unit has not started yet. • Optical digital cable is not connected completely.
A RECORDING OPTICAL OUT OPTICAL OUT English ANDERE EINSTELLUNGEN AUTRES REGLAGES Français Recording methods and connections So lassen Sie die Restdauer bis zur Alarmzeit anzeigen Pour afficher le temps restant à partir du réglage de l’alarme The INPUT jack of this unit can accept digital signals, analog signals (line output), and sound signal from the microphone. According to the source signal and output jack of the connected unit, make connections properly as follows.
OTHER SETTINGS English To display the remaining time from the alarm set Press DISP repeatedly until “ALM” is displayed. To cancel the alarm function Press s twice. “ALRM OFF” is displayed and the alarm function is canceled. It is also canceled by opening the disc holder. Note • When the time is reached, beep sounds can be stopped by pressing any buttons. • If you press s during playback, playback stops and the unit continues count down. At this time, you can do recording.
B RECORDING English About the Serial Copy Management System (SCMS) → B To protect the copyrights of the recorded material, digital dubbing cannot be done because of the built-in record restriction function complying with the SCMS standard.
D OTHER SETTINGS 1,3 2 To set the alarm → D You can set the unit to alert you after a specified time. Operate during playback or in playback pause mode. 1 Press DISP while pressing ENTER. “ALRM SET” is displayed and followed by “ALM 0:10”. When operating with the remote control, press DISP/SEARCH and MODE. 2 Press r or t to specify the duration until the unit alerts you. The time changes between 10 minutes and 3 hours in 10-minute steps. If r or t is kept pressed, the time will change in 1-minute steps.
D RECORDING Microphone recording → D INPUT SELECT R LINE English LOW HIGH MIC L INPUT ANDERE EINSTELLUNGEN Deutsch Set INPUT SELECT at the side of the unit to MIC HIGH or MIC LOW . To increase the microphone sensitivity, set to HIGH. To decrease the microphone sensitivity, set to LOW. Löschen des Pieptons (Signaltonfunktion) → A Connect an optional microphone and orient to the sound source with correct direction. a Optional microphone Aiwa CM-TS22 etc. Bedienung im Stoppbetrieb.
A 2 1 OTHER SETTINGS English 3 To cancel the beep sound (Signal sound function) → A 4 Beep sounds are heard when you press an operation button. You can cancel this beep sound. Operate in stop mode. 1 Keep DISP pressed for about 3 seconds. “CLOCKSET” is displayed. 2 Press MODE. “ BEEP ON” is displayed. 3 Press ENTER. “BEEP OFF” is displayed and beep sounds are canceled. 4 Press a. 1 2 3 Deutsch AUFNAHME Mikrofonaufnahme → D Stellen Sie INPUT SELECT an der Seite des Geräts auf MIC HIGH oder MIC LOW.
Record indicator REC-Anzeige Indicateur REC 5 3 5 MODE 1 2 1 2 55 3 6 REC AUTO MARK ALC TRACK NO. TRACK NO. TRACK NO. English RECORDING Basic operation 1 Release HOLD. 2 Insert a recordable disc with the label side a up and in the direction of the arrow b. 3 Slide REC/EDIT while pressing the red button. The REC indicator lights and recording starts.
EDITING 3 4,5 2 1 3 1 2 4 English Deutsch AUFNAHME AM-F75 AEZ EGF Bklet Grundlegende Bedienung Opérations de base You can erase one track or all tracks on a disc. 1 Lassen Sie HOLD los. 2 Setzen Sie eine bespielbare Disc mit der Beschriftungsseite a nach oben weisend in Pfeilrichtung b ein. 3 Schieben Sie REC/EDIT, während die rote Taste gedrückt gehalten wird. Die REC-Anzeige leuchtet, und die Aufnahme beginnt.
A RECORDING English Note • You cannot record on the disc for playback only. • Do not remove the batteries or disconnect the AC adaptor while the unit is registering the TOC data.The data will not be registered correctly and the disc cannot be played back. About the recording level The recording level is adjusted automatically. You can adjust the recording level during analog recording and microphone recording. To record the sound source better, adjust the recording level referring to page 28.
3 4 5 EDITING English Changing the order of the tracks You can change the order of tracks after completing a recording. 2 4 6 1 3 4 Operate during playback or in playback pause mode. 1 Play the track that you want to move. Example: To move the 3rd track, play the 3rd track. 2 Slide REC/EDIT while pressing the red button. 3 Press MODE repeatedly until “RENUMBER” is displayed. The display changes to “MOVE”. 4 Turn MULTI JOG to select the desired track number a to move the track to.
4 1,3 2,4 5 1 REC AUTO MARK ALC TRACK NO. 2 RECORDING English Teilen einer Spur Division d’une piste Sie können eine Spur in 2 Teile teilen, indem Sie eine Indexmarkierung registrieren. Vous pouvez diviser une piste en deux parties en consignant une marque index. Operate in the recording pause mode. 1 Press MODE repeatedly until “A.L.C.” is displayed. A.L.C. : Automatic Level control 2 Press ENTER. “MANUAL” is displayed. 3 Press MODE three times.
EDITING 3 7 1 5 4,6 2 5 3 4 English Deutsch AUFNAHME Dividing a track Einstellen des Aufnahmepegels You can divide a track into 2 parts by registering an index mark. • Starten Sie die Wiedergabe auf dem angeschlossenen Gerät oder schließen Sie das Mikrofon an. 1 Press ` during playback at the point to be divided. Playback is paused. 2 Slide REC/EDIT while pressing the red button. 3 Press MODE repeatedly until “DIVIDE” is displayed. 4 Press ENTER.
A USABLE FUNCTIONS FOR RECORDING English Registering the index mark • To search for a desired passage quickly, you can register up to 254 index marks. • This unit has three functions for registering the index marks. Auto marker function “AUTO MARK ” appears in the display and index mark information is registered automatically as follows. B During digital recording from a CD or MD → A The index mark information recorded on the CD or MD is copied as it is.
EDITING 4 3 2 5 1 English Combining two tracks You can combine two tracks by erasing the index mark in between. Example: The 2nd track and the 3rd track can be combined by erasing the index mark at the beginning of the 3rd track. Operate during playback or in playback pause mode. 1 Play the latter track of the two tracks that you want to combine. Example: To combine the 2nd track and 3rd track, play the 3rd track. 2 Slide REC/EDIT while pressing the red button.
1 2 USABLE FUNCTIONS FOR RECORDING English Manual marker function 3 1 You can register an index mark by pressing h during recording even if the Marker function is set to OFF. This function is activated when the Auto marker or Time marker function is set. Note • The index mark may not be registered correctly even if the Auto marker function is set. • You cannot register index marks without registering the track number. • You cannot register any index mark on a disc with 254 tracks already recorded.
EDITING English Note When recording is stopped or playback moves on to the next track while editing, the characters already entered are memorized automatically. To cancel entering Press `. To change a character Press g or h repeatedly until the character to be changed flashes. Then enter the desired character again. To delete the character Press g or h repeatedly until the character to be deleted flashes. When the character is flashing, press DISP/INS, then press g.
1 2 USABLE FUNCTIONS FOR RECORDING English Extended recording (Monaural recording) 3 1 2 REC The available time printed on the disc can be doubled when the sound is recorded in monaural. Operate while in recording pause mode. 1 Press MODE repeatedly until “STEREO” is displayed. 2 Press ENTER. “MONO” is displayed. 3 Press ` to start recording. MONO To resume stereo recording Display “MONO” in step 1 and display “STEREO” in step 2. TRACK NO.
6,7 4,7 8 5,7 3 1 2 9 3 1 TRACK NO. 2 TRACK NO. 4 5 6 EDITING English Registering the disc name and track title A total of 1700 characters can be registered in one disc. Operate during playback or in playback pause mode. 1 Play a track to be assigned a title. The name of the disc can be registered while any track is in play. 2 Slide REC/EDIT while pressing the red button. 3 To register a title of a track, press MODE repeatedly until “TRCKNAME” is displayed.
1 USABLE FUNCTIONS FOR RECORDING English Synchronized analog recording 2 1 1 Set SYNCHRO to ON. 2 Start recording. The recording pauses when the sound source is below a certain level for 4 seconds and resumes when the sound begins. You can restart recording by pressing ` while in recording pause mode. After recording, press a. SYNCHRO OFF 2 Recording pauses when there is no sound, and resumes automatically when the sound begins again.
PLAYBACK 1 3,4 2,4 5 1 PRGM DSL TRACK NO. English Programmed play • You can memorize up to 25 tracks in a desired order. Operate during playback or in playback pause mode. 1 Press MODE repeatedly until “PRGM” is displayed. 2 Press g or h to select a track. a Selected track number b Playing time of the selected track 3 Press ENTER to program the track. 4 Repeat steps 2 and 3 to program other tracks. 5 Press ` to start programmed play.
Deutsch WIEDERGABE DSL 4 4 2 1 3 OUTPUT DSL 3 1 2 3 4 DSL TRACK NO. PLAYBACK English Basic operation 1 Release HOLD. 2 Insert a disc with the label side up a and in the direction of the arrow b. 3 Press `. c Current track number d Elapsed time of the current track 4 Adjust the VOLUME with MULTI JOG. When operating with the remote control, press VOL 6/7. To stop playback, press a. When playing the disc the next time, playback will start from that point.
PLAYBACK MODE English Other playback modes This unit has 4 play modes other than normal play. Press MODE repeatedly during playback to select the desired play mode. Each time the button is pressed, the play mode changes in the following order. a All-repeat play All tracks are played repeatedly. V b One-track repeat play Current track is played repeatedly. V c Random play All tracks are played in random order. V d Programmed play The programmed tracks are played in programmed order.
PLAYBACK DSL English Français Titelsuchfunktion Fonction recherche de titre Press DSL repeatedly. DSL 1 : Low frequency is emphasized. DSL 2 : Low and high frequencies are more emphasized than in DSL 1. DSL 3 : Low and high frequencies are more emphasized than in DSL 2. DSL OFF: Normal sound • Sie können einen gewünschten Titel aufsuchen und den Titel bei der Wiedergabe bestätigen. • Vous pouvez chercher la piste souhaitée en confirmant le titre pendant la lecture.
PLAYBACK 1 3 2 2 3 2 3 3 1 1 English 2 LECTURE Français Title search function Zum Einstellen des Tons Pour ajuster le son • You can search for a desired track confirming the title during playback. Drücken Sie DSL wiederholt. DSL 1: Niedrige Frequenzen werden betont. DSL 2: Hohe und niedrige Frequenzen werden mehr betont als bei DSL1. DSL 3: Hohe und niedrige Frequenzen werden stärker betont als bei DSL 2. DSL OFF: Normaler Ton Appuyez plusieurs fois sur DSL.
Deutsch WIEDERGABE LECTURE Français DISP DISP/ SEARCH TRACK NO. TRACK NO. TRACK NO. Pour changer l’affichage Drücken Sie DISP wiederholt während der Wiedergabe. Bei jedem Tastendruck schaltet das Display in der folgenden Reihenfolge um: Appuyez plusieurs fois sur DISP pendant la lecture. A chaque pression, l’affichage change dans l’ordre suivant.