STEREO RECEIVER RECEPTOR ESTEREO AMPLI-TUNER STÉRÉO AV-X100 AV-X200 OPERATING INSTRUQIONS MANUAL DE INSTRUCCIONES MODE D'EMPLOI En (English) E (Español) F (Français) For Assistance And Information Call Toll Free 1-800-BUY-AIWA (United States and Puerto Rico) 86-AR5-901-219 960422ACK-Y
ENGLISH TVeiamtc ^ TABLE OF CONTENTS /4t€i/^St&teo^ ^ecU(/^ Congratulations on your purchase of an Aiwa Stereo Receiver. To optimize the performance of this system, please take the time to read through these Operating Instructions and become familiar with the operating procedures. PREPARATIONS____________________________ Check your unit and accessories PRECAUTIONS................................................................. 2 CONNECTIONS.............................................................
PREPARATIONS PRECAUTIONS Read the Operating Instructions carefully and completely before operating the unit. Be sure to keep the Operating Instructions for future reference. All warnings and cautions in the Operating Instructions and on the unit should be strictly followed, as well as the safety suggestions below. Installation 1 Water and moisture — Do not use this unit near water, such as near a bathtub, washbowl, swimming pool, or the like.
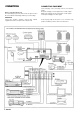
CONNECTIONS CONNECTING EQUIPMENT Before connecting the AC cord The rated voltage of your unit shown on the rear panel is 120 V AC. Check that the rated voltage matches your local voltage. Jacks and plugs of the connecting cord are color-coded as follows: Red jacks and plugs : For the right channel of audio signals White jacks and plugs: For the left channel of audio signals Yellow jacks and plugs: For video signals IMPORTANT Connect the speakers, antennas, and all other external equipment first.
CONNECTING SPEAKERS 0 POSITIONING THE SPEAKERS Connect front speakers (system A and B), a center speaker and surround speakers to the unit. Position the speakers to make the most of the Dolby Pro Logic or DSP effect (see “DOLBY PRO LOGIC”). O tr s lU cc Q. (a) Front speakers (g) Center speaker Position in the center of the two front speakers. In addition, position on or below the TV set, if connecting a TV set to the unit.
CONNECTING THE SUPPLIED ANTENNAS (2) CONNECTING THE SUPPLIED REMOTE CONTROL EXTENDER (D (AV-X200 only) Connect the FM antenna to the FM 75 Q terminals and the AM antenna to the AM LOOP terminals. Connect the HT-M301 remote control extender to the TO REMOTE CONTROL EXTENDER jack on the rear panel.
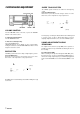
BEFORE OPERATION SEHING THE CLOCK U) z CLOCK o d) d) c D cd OO O’C 50 ooo$o o oooA ooooo ooooo oQ oo 1,3,5 cc lU cc a. apD oo ou oo ooooo 'o^(0 PHONES FRONT SPEAKERS A, B To turn the unit on Press one of the FUNCTION buttons (TUNER, PHONO, AUX/ TV, CD, VIDEO 1, VIDEO 2 , VIDEO 3) or the TAPE MONITOR button. When pressing the TUNER button, the previously tuned station is received (Direct Piay Function). The POWER button is aiso avaiiabie.
CUSTOM AUDIO ADJUSTMENT MUTING VOLUME SUPER T-BASS SYSTEM The T-BASS system enhances the realism of low-frequency sound. Press the T-BASS button. Each time it is pressed, the level changes. Select one of the three levels, or the off position to suit your preference. DAfJCE :.... T: HALL ARENA Í......................... ¡J ;/ rid ROCK POP ¡JAZZ CLASSiG BGM ml (cancel) VOLUME CONTROL Turn the VOLUME control on the unit, or press the VOLUME buttons on the remote control.
ELECTRONIC EQUALIZER DSP SURROUND GRAPHIC oo ooooo ooooo GEQ Ci) Ci) Cb)*0 DSP DOWNV UPA oo ooooo ooooo ooooo o qQ This unit provides the following five different equalization modes. ROCK: Powerful sound emphasizing treble and bass POP: More presence in the vocals and midrange JAZZ: Accented lower frequencies for jazz-type music CLASSIC: Enriched sound with heavy bass and fine treble BGM: Calm tone with suppressed bass and treble Press one of the GEQ (Graphic Equalizer) buttons.
BASIC OPERATIONS SELECTION OF AUDIO/VIDEO SOURCE RECORDING AN AUDIO SOURCE o p=i=. F C59> TAPE MONITOR 1 Select the program source to be recorded. Press one of the FUNCTION buttons. 1 Select the speaker system with the FRONT SPEAKERS A and B buttons. Press one of the FRONT SPEAKERS buttons. 2 Select the program source. Press one of the FUNCTION buttons or the TAPE MONITOR button. To listen to or watch The button pressed Tape TAPE MONiTOR Radio TUNER Record PHONO Television, etc.
RADIO RECEPTION MANUAL TUNING DIRECT TUNING »z MONO TUNER bOL oo ooood) ooooo ooooo 4gs qD oooo oooo#> ooooo oQ oo COD oo ou oo ooooo When you know the frequency of the desired station, you can tune in directly to the station. 1 Press the TUNER button to select a band. 1 Press the TUNER button repeatedly to select the desired band. 2 Press the TUNER button and hold it down until flashes on the display (Direct Tuning Mode).
PRESET NUMBER TUNING PRESEniNG STATIONS 1 Press the TUNER button to select a band. 2 Press the numeric buttons to Sjelect a preset number. Example: To select preset number 25, press 2 and 5. To select preset number 7, press 0 and 7. The unit can store a total of 32 preset stations. When a station is stored, a preset number is assigned to the station. Use the preset number to tune in to a preset station directly.
DOLBY PRO LOGIC The Dolby Pro Logic feature and the center and surround speakers (standard) assure full-scale home theater sound. When playing back laser discs or video software that have been specially recorded with four-channel sound (left, right, center, surround) and steering logic (for directing sound), astonishingly realistic sound surrounds the listener to create a new level of audio/visual entertainment.
ADJUSTING SPEAKER LEVEL BALANCE 4 Press the MANUAL SELECT button again to stop the noise signai. If the surround speakers volume of the DSP is changed (see page 8), the Dolby Pro Logic surround speakers level is also changed. About the channels The left and right speakers create the stereo effect. The center speaker helps achieve precise sound positioning over a broad sound field. The rear-mounted surround speakers enhance the “depth” of the sound field.
REMOTE CONTROL MEMORIZING SIGNAL CODES To stop storing Press the LEARN button.
SEniNG THE SLEEP TIMER CARE AND MAINTENANCE Occasional care and maintenance of the unit is needed to optimize the performance of your unit. To clean the cabinet Use a soft dry cloth. If the surfaces are extremely dirty, use a soft cloth lightly moistened with mild detergent solution. Do not use strong solvents, such as alcohol, benzine or thinner as these could damage the finish of the unit. The unit can be automatically turned off at a specified time. Use the remote control. 1 Press the SLEEP button.
SPECIFICATIONS Outputs FM tuner section Tuning range 87.5 MHz to 108MHz Usable sensitivity 13.2 dBf (IMF) Antenna terminals 75 ohms (unbalanced) AM tuner section Tuning range Usable sensitivity Antenna 530 kHz to 1710 kHz (10 kHz step), 531 kHz to 1602kHz (9 kHz step) 350 pV/m Loop antenna Muting AUDIO OUT (REC OUT): 200 mV (2 kohms) VIDEO OUT (MONITOR): 1 Vp-p (75 ohms) SUPER WOOFER: 3.1 V (AV-X200)/ 2.
TROUBLESHOOTING GUIDE PARTS INDEX If the unit fails to perform as described in these Operating Instructions, check the following guide. Instructions about each part on the unit or remote control are indicated on the pages listed bellow.
ESPAÑOL e^tén^/4Uí(a^ INDICE ^¿e^oi€(i¿cCa> Enhorabuena por la adquisición de este receptor estéreo Aiwa. Para sacar el máximo rendimiento de este sistema, lea detenidamente este Manual de instrucciones y familiarícese con ios procedimientos de operación. Compruebe su unidad y accesorios. Receptor estéreo AV-X100/AV-X200 =■ ooo c o PREPARATIONS____________________________ PRECAUCiONES............................................................. 2 CONEXiONES..............................................
REPARATIVOS PRECAUCIONES Antes de utilizar la unidad, lea cuidadosa y completamente este manual instrucciones. Guarde el manual de instrucciones para futuras referencias. Todos los avisos y precauciones del manual de instrucciones y de la unidad deberán seguirse estrictamente, así como las sugerencias de seguridad indicadas a continuación. Instalación 1 Agua y humedad — No utilice esta unidad cerca del agua, como al lado de una bañera, un lavabo, una piscina, etc.
CONEXION DE EQUIPOS CONEXIONES Antes de conectar el cable de alimentación de CA La tensión nominal de su unidad indicada en el panel posterior de su unidad es de 120 V CA, Compruebe si esta tensión coincide con la de la red local.
CONEXION DE LOS ALTAVOCES © UBICACION DE LOS ALTAVOCES Conecte altavoces delanteros (sistemas A y B), un altavoz central, y altavoces perimétricos a la unidad. Coloque los altavoces de forma que obtenga el máximo efecto del sistema Dolby Pro Logic o del procesador de señal digital (DSP) (consulte “DOLBY PRO LOGIC”).
CONEXION DE LAS ANTENAS SUMINISTRADAS (2) Conecte la antena de FM a los terminales FM 75 £2 y la antena de AM a los terminales AM LOOP. CONEXION DEL PROLONGADOR PARA EL CONTROLADOR REMOTO SUMINISTRADO (D (AV-X200 solamente) Conecte el prolongador para el controlador remoto HT-M301 en la toma TO REMOTE CONTROL EXTENDER del panel posterior.
ANTES DE LA OPERACION PUESTA EN HORA DEL RELOJ CLOCK TAPE MONITOR (/) 1,3,5 oo OOOíbO ooot; >o oooc >o ooo® ooooo ooooo oQ oo OQD oo ou oo ooooo Para conectar la alimentación de la unidad Presione uno de los botones FUNCTION (TUNER, PHONO, AUX/TV, CD, VIDEO 1, VIDEO 2, VIDEO 3) o el botón TAPE MONITOR. Cuando presione el botón TUNER, se recibirá la emisora previamente sintonizada (función de reproducción directa). También podrá utilizarse el botón POWER.
AJUSTE DEL SONIDO A SU GUSTO___________________ MUTING VOLUME SISTEMA SUPER T-BASS El sistema T-BASS realza el realismo del sonido de baja frecuencia. Presione el botón T-BASS. Cada vez que presione el botón, el nivel cambiará. Seleccione a su gusto uno de los tres niveles o la posición de cancelación lililí ROCK HALL ARENA BALANCE T-BASS BBE /í í i.....U 1/ SI (cancelación) Gire el control VOLUME de la unidad o presione los botones VOLUME del controlador remoto.
ECUALIZADOR ELECTRONICO GRAFICO SONIDO PERIMETRICO DEL PROCESADOR DE SEÑAL DIGITAL O o z oo ooooo oaooo o ooooo o (/} oooo ooooo oQ oo oo OfJOOO o co GEQ Esta unidad dispone de ios cinco modos de ecuaiización siguientes. ROCK: Acentúa ei sonido de graves y agudos. POP: Ofrece más presencia a ias voces y a ia gama media. JAZZ: Acentúa ias frecuencias bajas para música de tipo jazz. CLASSIC: Ofrece sonido rico con graves profundos y agudos deiicados.
OPERACIONES BASICAS SELECCION DE UNA FUENTE DE AUDIO/VIDEO GRABACION DE UNA FUENTE DE AUDIO 1 Seleccione el sistema de altavoces con los botones FRONT SPEAKERS A y B. 1 Seleccione la fuente de programas que desee grabar. Presione uno de los botones FRONT SPEAKERS. 2 Seleccione la fuente de programas. Presione uno de los botones FUNCTION o el botón TAPE MONITOR. Para escuchar o contemplar Botón presionado Cintas TAPE MONITOR La radio TUNER Discos analógicos PHONO Televisión, etc.
ESCUCHA DE LA RADIO SINTONIA DIRECTA SINTONIA MANUAL MONO TUNER CQ< íSm ZQ o<
MEMORIZACION DE EMISORAS SINTONIA DE EMISORAS POR SU NUMERO DE MEMORIZACION 1 Presione el botón TUNER para seleccionar una banda. 2 Presione los botones numéricos para introducir el número de memorización. Ejemplo; Para introducir el número de memorización 25, presione 2 y 5. Para introducir el número de memorización 7, presione 0 y 7. La unidad podrá almacenar un total de 32 emisoras. Cuando almacene una emisora, se le asignará un número de memorización.
DOLBY PRO LOGIC La función Dolby Pro Logic y los altavoces central y perimétricos (estándar) aseguran sonido de teatro a plena para el hogar. Cuando reproduzca discos láser o software de vídeo especialmente grabados con sonido de cuatro canales (izquierdo, derecho, central, y perimétricos) y lógica de dirección (para dirigir el sonido), un sonido sorprendentemente realista rodeará al oyente para crear un nuevo nivel de entretenimiento audiovisual.
4 Para parar la señal de ruido, vuelva a presionar el botón MANUAL SELECT. AJUSTE DEL EQUILIBRIO DEL NIVEL ENTRE ALTAVDCES NOTA Si cambia el volumen de los altavoces perimétricos del DSP (consulte la página 8), cambiará también el nivel de los altavoces perimétricos Dolby Pro Logic. 1 Información sobre los canales Los altavoces Izquierdo y derecho crean el efecto estéreo. El altavoz central ayuda a ubicar con precisión el sonido en un campo acústico amplio.
CONTROLADOR REMOTO MEMORIZACION DE CODIGOS DE SEÑAL (AV-X200 solamente) Para parar el almacenamiento Presione el botón LEARN. NOTA ' El código de señal del controlador remoto externo puede no recibirse: - cuando el código de señal a almacenarse no sea estándar. - cuando encienda una lámpara fluorescente cerca del sensor de control remoto del visualizador.
TEMPORIZADOR PROGRAMACION OEL TEMPORIZADOR CRONODESCONECTADOR GENERALIDADES CUIDADOS Y MANTENIMIENTO El mantenimiento y el cuidado ocasionales de la unidad serán necesarios para sacar el máximo partido de ella. Para limpiar el exterior Utilice un paño suave y seco. Si la superficie está extremadamente sucia, utilice un paño ligeramente humedecido en una solución poco concentrada de detergente.
ESPECIFICACIONES Salidas Sección del sintonizador de FM Gama de sintonía 87,5 a 108 MHz Sensibilidad útil 13,2 dBf Terminales de antena 75 ohmios (desequilibrados) Sección del sintonizador de AM Gama de sintonía 530 a 1710 kHz (intervaio de 10 kHz), 531 a 1602 kHz (intervalo de 9 kHz) Sensibilidad útil 350 tJV/m Antena Antena de cuadro Sección del amplificador Salida de potencia [Modo estéreo] Altavoces delanteros AV-X200: 120 vatios por canai como mín.
GUIA PARA LA SOLUCION DE PROBLEIVIAS INDICE DE LAS PARTES Las instrucciones sobre cada parte de la unidad o del controlador remoto se indican en las páginas mostradas a continuación. Si la unidad no funciona como se describe en este Manual de instrucciones, compruebe la guía siguiente. SECCION GENERAL No hay sonido. • ¿Está adecuadamente conectado el cable de alimentación de CA? • ¿Hay alguna conexión incorrecta? (-♦ página 3) • Es posible que los terminales de los altavoces estén cortocircuitados.
FRANÇAIS Ste^e^eà^i'a»H^-tcMen>^tënéa^/4c6m^ TABLE DES IVIATIÈRES Félicitations pour l’achat de cet ampli-tuner stéréo Aiwa. Pour utiliser de manière optimale ce système, prenez le temps de lire ce mode d’emploi et de vous familiariser avec les différentes opérations. Vérifiez votre appareii et ies accessoires Ampli-tuner stéréo AV-X100/AV-X200 P = REGLAGE PERSONNEL DU SON....................................7 EGALISEUR GRAPHIQUE ELECTRONIQUE...................8 PROCESSEUR D'AMBIANCE.....................
PREPARATIFS PRECAUTIONS Lisez attentivement et complètement le mode d’emploi avant d’utiliser l’ampli-tuner et conservez-le pour toute référence future. Respectez tous les avertissements et consignes mentionnés dans le mode d’emploi, ainsi que les conseils concernant la sécurité. Installation 1 Eau et humidité — Ne pas utiliser l’ampi-tuner près d’une baignoire, d’un lavabo, d’une piscine ou de tout autre endroit similaire.
RACCORDEMENTS RACCORDEMENT DE TOUT L'EQUIPEMENT Avant de raccorder le cordon secteur La tension nominale de l’ampli-tuner indiquée sur le panneau arrière est de 120 V. Vérifiez si elle correspond à la tension locale.
RACCORDEMENT DES ENCEINTES © POSITIONNEMENT DES ENCEINTES Raccordez des enceintes avant (paires A et B), une enceinte centrale et des enceintes surround à l’ampli-tuner. Positionnez les enceintes de manière à tirer le meilleur parti des effets Dolby Pro Logic ou DSP (voir “DOLBY PRO LOGIC”). Raccordez les cordons d’enceintes avant aux bornes FRONT SPEAKERS, les cordons d’enceinte centrale à la borne CENTER SPEAKER et les cordons d’enceintes surround aux bornes SURROUND SPEAKERS.
RACCORDEMENT DES ANTENNES FOURNIES (g) RACCORDEMENT DE L'EXPANSEUR DE TELECOMMANDE (D (AV-X200 seulement) Raccordez l’antenne FM aux bornes FM 75 £2 et l’antenne AM aux bornes AM LOOP Raccordez l’expanseur de télécommande HT-M301 à la prise TO REMOTE CONTROL EXTENDER sur le panneau arrière. TO REMOTE CONTROL EXTENDER REMARQUE Positionnez l’expanseur de télécommande fourni de sorte qu’aucun obstacle, meuble ou verre opaque ne se trouve entre l’expanseur de télécommande et l’appareil raccordé.
AVANT DE COMMENCER REGLAGE DE L’HORLOGE CLOCK (/) TAPE MONITOR < cc 2 m oc Q. fMSSBîBii Pour mettre l’ampli-tuner sous tension Appuyez sur une des touches FUNCTION (TUNER, PHONO, AUX/TV, CD, VIDEO 1, VIDEO 2, VIDEO 3) ou sur la touche TAPE MONITOR. Quand vous appuyez sur la touche TUNER, la station accordée en dernier iieu est reçue (Mise en service directe). Vous pouvez aussi utiliser i’interrupteur POWER.
REGLAGE PERSONNEL DU SON MUTING VOLUME SYSTEME SUPER T-BASS Le système T-BASS sert à renforcer le réalisme des basses fréquences. Appuyez sur la touche T-BASS. A chaque pression, le niveau change. Sélectionnez un des trois niveaux, ou la position d'annulation si vous préférez. i// Í..... U Tournez ia commande de volume sur l’ampli-tuner ou appuyez sur ies touches VOLUME de ia télécommande. Pour ajuster la balance gauche/droite Tournez la commande BALANCE.
PROCESSEUR D’AMBIANCE EGALISEUR GRAPHIQUE ELECTRONIQUE oo CZ) Ci) occ C^ C) ooooo GEQ S O O O oo ooooo O O O oo oQ oo OQD oo ou oo O® ooo GEQ L’ampli-tuner présente les cinq modes d’égalisation suivants.
OPERATIONS DE BASE SELECTION D'UNE SOURCE AUDIO OU VIDEO ENREGISTREMENT SOURCE AUDIO D’UNE CD O ___ c=D eoo @ ..^ 1 Sélectionnez la paire d’enceintes avec les touches FRONT SPEAKERS A et B. Appuyez sur une des touches FRONT SPEAKERS. 2 Sélectionnez la source de programme. Appuyez sur une des touches FUNCTION ou la touche TAPE MONITOR. Pour écouter ou regarder Appuyez sur la touche une cassette TAPE MONITOR la radio TUNER un disque analogique PHONO la télévision, etc.
RECEPTION RADIO ACCORD DIRECT ACCORD MANUEL MONO TUNER âs ëS (/)Z oo oooocb oocDoc :> OOOOC 3 zO s LU oooo OOOO«*) ooooo uju aDC O oo oo oo ooooo Si vous connaissez la fréquence de la station souhaitée, vous pouvez l’accorder directement. 1 Appuyez de façon répétée sur la touche TUNER pour sélectionner la gamme souhaitée. □ FM-------► AM • 1 Appuyez sur la touche TUNER pour sélectionner une gamme.
PREREGLAGE DES STATIONS ACCORD DES STATIONS PREREGLEES 1 Appuyez sur la touche TUNER pour sélectionner une gamme. 2 Appuyez sur les touches numériques pour sélectionner une station préréglée. Par exemple: Pour sélectionner le numéro de préréglage 25, appuyez sur 2 et 5. Pour sélectionner le numéro de préréglage 7, appuyez sur 0 et 7. L’ampli-tuner peut mémoriser en tout 32 stations. Quand une station est mémorisée, un numéro de prérégiage est affecté à cette station.
DOLBY PRO LOGIC Le Dolby Pro Logic combiné avec des enceintes surround et centrale (standard) permettent de bénéficier d'un véritable son de cinéma domestique. Quand vous reproduisez des disques laser ou des cassettes vidéo qui ont été spécialement enregistrés avec quatre canaux (gauche, droit, centre, surround) et une logique directionnelle (pour la directivité du son), un son d’un réalisme étonnant enveloppe l’auditeur et assure un divertissement audio/vidéo d’un nouveau genre.
4 Appuyez une nouvelle fois sur la touche MANUAL SELECT pour arrêter le signal. REGLAGE DE LA BALANCE DU NIVEAU DES ENCEINTES REMARQUE Si vous changez le volume des enceintes surround du mode DSP (voir page 8), celui des enceintes surround dans le mode Dolby Pro Logic change aussi. 1 A propos des canaux Les enceintes gauche et droite créent l’effet stéréo. L’enceinte centraie permet d’obtenir un positionnement plus précis du son sur un large champs sonore.
TELECOMMANDE MEMORISATION DE CODES DE TELECOMMANDE (AV-X200 seulement) Quand vous avez fini Appuyez sur la touche LEARN.
GENERALTES REGLAGE DE LA MINUTERIE D’ARRET SOIN ET ENTRETIEN Un entretien occasionnel de l’ampii-tuner est indispensabie pour garantir des performances optimales. Pour nettoyer le coffret Utilisez un chiffon doux et sec. Si la surface est extrêmement sale, utilisez un chiffon légèrement imprégné d’une solution détergente neutre. Ne pas utiliser de soivants puissants, tels que l’alcool, la benzine et du diluant, car ils pourraient abîmer la finition.
SPECIFICATIONS Sorties Section Tuner FM Plage d’accord 87,5 MHz à 108 MHz Sensibilité utilisable 13,2dBf (IHF) Bornes d’antenne 75 ohms (asymétrique) Section Tuner AM Plage d’accord Sensibilité utilisable Antenne 530 kHz à 1710 kHz (intervalle de 10 kHz), 531 kHz à 1602 kHz (Intervalle de 9 kHz) 350 qV/m Antenne cadre Coupure du son Section Ampiificateur Puissance de sortie [Mode stéréo] Avant AV-X200: 120 watts par canal, minimum RMS à 8 ohms, de 40 Hz à 20 kHz, avec moins de 0,8 % de distorsion harm
EN CAS DE PANNE NOMENCLATURE Si l’ampli-tuner ne fonctionne pas comme décrit dans le mode d’emploi, vérifiez ies points suivants. Les instructions concernant chaque touche de l’ampli-tuner ou la télécommande se trouvent aux pages indiquées ci-dessous.
AIWA CO., LTD.