4-253-925-13(1) Operating Instructions Owner’s Record The model and serial numbers are located on the rear of the unit. Record the serial number in the space provided below. Refer to them whenever you call upon your Aiwa dealer regarding this product. Model No. ______________ Serial No.
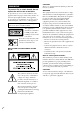
CAUTION WARNING The use of optical instruments with this product will increase eye hazard. To prevent fire or shock hazard, do not expose the unit to rain or moisture. To prevent fire, do not cover the ventilation of the apparatus with news papers, table-cloths, curtains, etc. And don’t place lighted candles on the apparatus. To prevent fire or shock hazard, do not place objects filled with liquids, such as vases, on the apparatus.
NOTICE FOR THE CUSTOMERS IN THE U.S.A. If you have any questions about this product, you may call; Aiwa Customer Information Service Center 1-800-289-2492 or http://www.us.aiwa.com/ The Number below is for the FCC related matters only. Regulatory Information Declaration of Conformity Trade name: Model No.: Responsible Party: Address: AIWA CX-LZP5 Sony Electronics Inc. 16450 W. Bernardo Dr, San Diego, CA 92127 U.S.A. Telephone No.: 858-942-2230 This device complies with Part 15 of the FCC Rules.
Table of Contents How to use this manual........................... 5 Playable discs.......................................... 5 Getting Started Hooking up the system............................ 7 Setting the clock...................................... 9 CD/MP3 – Play Loading a disc ....................................... 10 Playing a disc ........................................ 10 — Normal Play/Shuffle Play Playing repeatedly................................. 12 — Repeat Play Creating your own program ..
How to use this manual This manual mainly explains operations using the remote, but the same operations can also be performed using the buttons on the system having the same or similar names. Playable discs You can play back the following discs on this system. Other discs cannot be played back.
Notes on CD-R and CD-RW • Some CD-Rs or CD-RWs cannot be played on this system depending upon the recording quality or physical condition of the disc, or the characteristics of the recording device. Furthermore, the disc will not play if it has not been correctly finalized. For more information, see the operating instructions for the recording device. • Discs recorded on CD-R/CD-RW drives may not be played back because of scratches, dirt, recording condition or the driver’s characteristics.
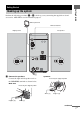
Getting Started Perform the following procedures 1 to 4 to hook up your system using the supplied cords and accessories. AWP-ZP5 is used for illustration purpose. Getting Started Hooking up the system AM loop antenna FM lead antenna Right speaker 1 Connect the speakers. Connect the right and left speaker cords to the SPEAKERS terminals as shown below.
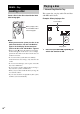
2 Connect the FM and AM antennas. Set up the AM loop antenna, then connect it. Inserting two R6 (size AA) batteries into the remote AM loop antenna AM LOO P FM 7 (COA 5 Ω XIAL ) Note If you do not use the remote for a long period of time, remove the batteries to avoid possible damage from battery leakage and corrosion. Tip Extend the FM lead antenna horizontally Note Keep the antennas away from the speaker cords.
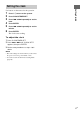
Setting the clock 1 2 3 4 5 6 Press ?/1 to turn on the system. Press CLOCK/TIMER SET. Press . or > repeatedly to set the hour. Getting Started Use buttons on the remote for the operation. Press ENTER. Press . or > repeatedly to set the minute. Press ENTER. The clock starts working. To adjust the clock 1 2 Press CLOCK/TIMER SET. 3 Do the same procedures as steps 3 to 6 above. Press . or > until “CLOCK SET?” appears, then press ENTER.
Playing a disc CD/MP3 – Play — Normal Play/Shuffle Play Loading a disc Insert a disc in the disc slot with the label side facing right. This system lets you play audio CDs and discs with MP3 audio tracks. Example: When playing a disc Track number When you play a disc, insert it with the label side facing right. Notes • When you turn on the system, the disc is not pulled into the disc slot until “CD No Disc” appears in the display. Do not attempt to push in the disc until “CD No Disc” appears.
2 Select To play No display (Normal Play) The tracks on the disc in original order. ALBM (Normal Play) All MP3 audio tracks in the album on the disc in original order. When playing a non-MP3 disc, Album Play performs the same operation as Normal Play (no display). SHUF (Shuffle Play) All tracks on the disc in random order. ALBM SHUF (Shuffle Play) The MP3 audio tracks in the album on the disc in random order. When playing a non-MP3 disc, Album Shuffle Play performs the same operation as SHUF Play.
Playing repeatedly — Repeat Play Creating your own program You can play all the tracks or a single track on a disc repeatedly. — Program Play Press REPEAT repeatedly during playback until “REP” or “REP1” appears. 1 REP: For all the tracks up to five times. REP1: For a single track only. 2 To cancel Repeat Play Press REPEAT repeatedly until both “REP” and “REP1” disappear. You can make a program of up to 25 steps. 3 Press CD (or FUNCTION repeatedly) to switch the function to CD.
Other operations To Do this Cancel Program Play Press PLAY MODE in stop mode repeatedly until “PGM” disappears. Clear a track from the end Press CLEAR in stop mode. • The program you made remains after Program Play finishes. To play the same program again, press N (or CD N on the unit). However, the program is cleared when you press Z on the unit. • “– –.
5 Press TUNER MEMORY. The preset number flashes. Perform steps 6 and 7 while the preset number flashes. Other operations To Do this Tune in a station with a weak signal Follow the procedure described in “Manual tuning preset” (page 14). Set another station to the existing preset number Start over from step 2. After step 5, press . or > repeatedly to select the preset number you want to store the station. To improve tuner reception Preset number 6 7 8 Press .
To change the AM tuning interval (except for European model) Note You cannot change the AM tuning interval in Power Saving Mode (page 20). Tips • The preset stations are retained for about a day even if you disconnect the power cord or if a power failure occurs. • To improve broadcast reception, adjust the supplied antennas, or connect a commercially available external antenna. You can listen to a radio station either by selecting a preset station, or by manually tuning in the station.
Tips • To improve broadcast reception, adjust the supplied antennas, or connect a commercially available external antenna. • When using a personal computer and listening to the radio, connecting a commercially available external antenna is recommended. • When an FM stereo program has static noise, press FM MODE repeatedly until “MONO” appears. There will be no stereo effect, but the reception will improve. • Press TUNING MODE repeatedly until “AUTO” appears in step 3 above, then press TUNING + or –.
Sound Adjustment Adjusting the sound Mixing the sound on a personal computer with another sound source You can reinforce the bass and create a more powerful sound. — PC Mixing (except for AWP-ZP1) Press i-Bass. You can mix the sound on a personal computer with another sound source. * The i-Bass indicator changes. Press PC MIXING. Each time you press the button, the mixing changes as follows: MIXING ON y MIXING OFF Notes .
Waking up to music Timer Falling asleep to music — Sleep Timer You can set the system to turn off after a certain time, so that you can fall asleep to music. Press SLEEP. — Play Timer You can wake up to music at a preset time. Make sure you have set the clock (see “Setting the clock” on page 9). Use buttons on the remote for the operation.
Other operations To Do this Activate the timer/ check the setting 1 Press CLOCK/TIMER SELECT. 2 Press . or > repeatedly until “SELECT TIMER ON?” appears, then press ENTER. Change the setting Start over from step 1. Cancel the timer 1 Press CLOCK/TIMER SELECT. 2 Press . or > Timer repeatedly until “SELECT TIMER OFF?” appears, then press ENTER. Notes • If you use the Play Timer and the Sleep Timer at the same time, the Sleep Timer has priority.
Viewing information about the disc in the display Display Turning off the display — Power Saving Mode The demonstration display (display window and buttons lighting and flashing even when the system power is off) and the clock display can be turned off to minimize the amount of power consumed during standby (Power Saving Mode). Press DISPLAY repeatedly while the system is off until the demonstration display or the clock display disappears.
Checking the total playing time and titles (CD/MP3) Checking the station name (TUNER) Press DISPLAY in stop mode. Press DISPLAY while listening to the radio.
Required system equipment Optional Personal Computer (except for AWP-ZP1) Connecting a personal computer to the system Use the supplied USB cable for the connection. You can listen to the audio recorded in the computer’s hard disk or on a CD-ROM loaded on the CD-ROM drive through the system’s speakers. Personal computer To the USB port on a computer USB cable (supplied) To the USB port 22GB The following environments are necessary for the computer to connect to the system.
Notes Installing the driver When first connecting the computer to the system’s USB port, you must install the driver. The driver is supplied as standard with the OS. The installation procedure differs according to the OS type. Also see the operation manual supplied with the computer. For Windows 98 Second Edition/Windows Millennium Edition To install the USB driver 1 Connect the system to the computer with the supplied USB cable (see page 22). 2 3 4 Start up the computer.
5 Follow the instructions appearing on the monitor. 3 Click the [Device Manager] tab. Make sure that “View devices by type” is selected. 4 Make sure that the following items are listed in the “Device Manager” dialog box. • “USB Audio Device” under “Sound, video and game controllers” • “USB Composite Device” under “Universal Serial Bus controllers” The illustration above shows an example Windows Millennium Edition screen. The illustrations above show an example Windows Millennium Edition screen.
For Windows 2000 Professional or Windows XP Professional/Home Edition To install the USB driver 1 Connect the system to the computer with the supplied USB cable (see page 22). 2 3 4 Start up the computer. 5 Make sure that the following items are listed in the “Device Manager” dialog box. • “USB Audio Device” under “Sound, video and game controllers” • “USB Composite Device” under “Universal Serial Bus controllers” Press ?/1 to turn on the system.
For Mac OS 9.0 to 9.2 To install the USB driver 1 2 3 4 Connect the system to the computer with the supplied USB cable (see page 22). 1 Start up the computer. Press ?/1 to turn on the system. Press PC (or FUNCTION repeatedly) to switch the function to PC. For Mac OS X 10.1 to 10.3 To install the USB driver 26GB Listening to audio files on a personal computer 1 Connect the system to the computer with the supplied USB cable (see page 22). 2 3 4 Start up the computer.
Connecting an optional USB component (AWP-ZP5 only) This system has two USB hub ports. By using this system’s USB hub ports, you can operate USB components from a computer through this system. You can connect an optional USB component with a maximum current consumption of 100 mA or less to each port. For details on compatible USB components, refer to the operating instructions “USB Hub Port Information” provided with this system. 1 When the system power is turned on, the USB indicator lights up.
Optional Components Hooking up optional components To enhance your system, you can connect optional components. Refer to the operating instructions provided with each component. AWP-ZP5 is used for illustration purpose. Optional analog component From the audio output jacks of an optional analog component Optional USB component A MD jacks C USB hub ports (AWP-ZP5 only) Use audio cords (not supplied) to connect an optional analog component (MD deck or VCR, etc.) to these jacks.
Listening to audio from a connected component 1 Connect audio cords. See “Hooking up optional components” on page 28. 2 Press FUNCTION repeatedly (or MD* on the unit) until “MD” appears. Start playing the connected component.
General Troubleshooting Problems and remedies Should you encounter a problem with your system, do the following: 1 Make sure the power cord and speaker cords are correctly and firmly connected. 2 Find your problem in the troubleshooting checklist below and take the indicated corrective action. If the problem persists after doing all of the above, consult your nearest Aiwa dealer. When the ?/1 indicator flashes Immediately unplug the power cord and check the following items.
The remote does not function. • Remove the obstacle. • Move the remote closer to the system. • Point the remote at the system’s sensor. • Replace the batteries (R6/size AA). • Locate the system away from the fluorescent light. The system does not turn off. • Press DISPLAY repeatedly until the demonstration display disappears. Speakers Sound comes from only one channel, or the left and right volumes are unbalanced. • Check the speaker connections and placement. CD/MP3 player “LOCKED” appears.
Tuner Optional components Severe hum or noise/stations cannot be received. • Set the proper band and frequency (page 13). • Connect the antenna properly (page 8). • Find a place and an orientation that provide good reception, then set up the antenna again. If you cannot obtain good reception, we recommend you connect a commercially available external antenna. • The supplied FM lead antenna receives signals along its entire length, so make sure you extend it fully.
Messages One of the following messages may appear or flash in the display during operation. CD/MP3 CD No Disc There is no disc in the player. CD NO STEP All of the programed tracks have been erased. OVER You have reached the end of the disc while pressing M during playback or pause. Push STOP! You pressed PLAY MODE during playback. Reading The system is reading TOC information of the disc. Some buttons are not available. Step Full! You tried to program 25 or more tracks (steps).
On heat buildup Additional Information Precautions On operating voltage Before operating the system, check that the operating voltage of your system is identical with the voltage of your local power supply. On safety • The unit is not disconnected from the AC power source (mains) as long as it is connected to the wall outlet, even if the unit itself has been turned off. • Unplug the system from the wall outlet (mains) if it is not to be used for an extended period of time.
Notes on discs • Before playing, clean the disc with a cleaning cloth. Wipe the disc from the center out. • Do not use solvents such as benzine, thinner, commercially available cleaners or anti-static spray intended for vinyl LPs. • Do not expose the disc to direct sunlight or heat sources such as hot air ducts, nor leave it in a car parked in direct sunlight. • Do not use discs encircled with a protection ring. This may cause a malfunction to the system.
Outputs PHONES (stereo mini jack): Accepts headphones with an impedance of 8 ohms or more SPEAKERS: Accepts impedance of 6 ohms USB hub ports (AWP-ZP5 only) Maximum current consumption: 100 mA per port CD player section System Laser Frequency response Compact disc and digital audio system Semiconductor laser (λ=780 nm) Emission duration: continuous 2 Hz – 20 kHz Tuner section FM stereo, FM/AM superheterodyne tuner FM tuner section Tuning range North American model: Other models: Antenna Antenna terminal
List of button locations and reference pages How to use this page Use this page to find the location of buttons and other parts of the system that are mentioned in the text.
Remote control ALPHABETICAL ORDER A–H BUTTON DESCRIPTIONS I–Z ALBUM +/– 8 (11, 12) CD qf (10, 12, 14, 15) CLEAR qh (13) CLOCK/TIMER SELECT ql (19) CLOCK/TIMER SET 2 (9, 18) DISPLAY qk (16, 20) ENTER 8 (9, 12, 14, 18) EQ 8 (17) FM MODE 6 (16) FUNCTION w; (10, 12, 13, 15, 23, 26, 29) i-Bass 8 (17) Number buttons qj (11) PC* qg (23, 26) PC MIXING* 4 (17) PLAY MODE 7 (11, 12) REPEAT 6 (12) SLEEP 3 (18) TUNER BAND qs (13, 15) TUNER MEMORY 5 (14) TUNING MODE 7 (13, 15) TUNING +/– 8 (13, 15) VOLUME +/– 0 (18, 2
Sony Corporation Printed in China