8Z-CHE-905-01 981 205 AA0-I-B I R!B (ilEiiE DIGITAL AUDIO
5 WARNING ‘TO REDUCE THE RISK OF FIRE OR ELECTRIC SHOCK, DO NOT EXPOSE THIS APPLIANCE TO RAIN OR MOISTURE. 6 7 I “CAUTION: TO REDUCE THE RISK OF ELECTRIC SHOCK, DO NOT REMOVE COVER (OR BACK). NO USER-SERVICEABLE PARTS INSIDE. REFER SERVICING TO QUALIFIED SERVICE PERSONNEL.
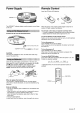
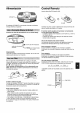
Remote Control Power Supply Insert two R6 (size AA) batteries. The OPE/BATT to the unit. indicator lights up while electric current flows Connect the AC cord as illustrated When the reach of the remote control signal is less than 5 meters (16 feet), replace the batteries. The remote control may not operate correctly when: - The unit is exposed to intense light, such as direct sunlight - Objects block the remote control signal to the unit below.
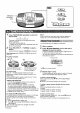
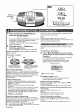
II STOPIMEMORY ~ Q@ - TUNING + POWER b STANDBY BAND TAPE Press *RADIO/BAND desired band. FM + repeatedly to select the AM The power is turned on and the previously tuned station is received. The RADIO indicator lights up. * or BAND on the remote control (applicable when the AC cord is connected) Press l++, station. -1 (+, - TUNING) During FM stereo reception, ~ to select a I19J You can preset up to 15 stations in each band. 1 Select a station.
o-9, +10 BAN D II PAUSE 1 Press CD. The power is turned on and the CD indicator lights up. 2 Press OPEN to open the disc compartment. Place a disc with the printed side up and close the disc compartment. ~~OPEN After listening, press POWER 6 STANDBY to turn the power off. NOTE Do not use irregular shape CDs (example: heart-shaped, octagonal ones). It may result in malfunctions. Do not place more than one disc in the disc compartment. Do not try to open the disc compartment during play.
VOLUME R’PEAT/ FM MODE/OSC 3-MODE EQUALIZER T-BASS WOUND Use Type I (normal) tapes only. Press ■ /A STOP/EJECT to open the cassette holder and insert a tape with the exposed side up and the side to be played facing out. Note that recording is done on only one side of the tape. 1 Insert a tape with the side to be recorded facing out. 2 Get ready to record from the source. To record from a CD, press CD and load the disc. To record from a radio broadcast, press RADIO/ BAND and tune to a station.
VOLUME Press VOLUME A or V. The volume level is displayed as a number from O to MAX (25). The volume level is automatically set to 14 if the power is turned off when the volume level is set to 15 or more. The unit can be turned off automatically at a specified time. While CD function is selected, operate the following procedures in stop mode. ● ● To display the volume level when a function other than TAPE function is selected The volume level is displayed Press VOLUME A or V. for 4 seconds.
ADVERTENCIA PARA REDUCIR EL RIESGO DE INCENDIOS O SACUDIDAS ELECTRICAS, NO EXPONGA ESTE APARATO A LA LLUVIA NI A LA HUMEDAD. 5 6 7 “CAUTION: TO REDUCE THE RISK OF ELECTRIC SHOCK, DO NOT REMOVE COVER (OR BACK). NO USER-SERVICEABLE PARTS INSIDE. REFER SERVICING TO QUALIFIED SERVICE PERSONNEL.
Alimentacion Control Remoto — Insertar dos pilas R6 (tamaho AA). OPE/BATT El indicador OPE/BATT se enciende mientras se alimenta energia electrica al aparato. Cambiar Ias pilas cuando la distancia de funcionamiento control remoto sea inferior a 5 metros. del El control remoto pudiera no funcionar correctamente en Ias situaciones siguientes: - Cuando el aparato esta expuesto a una fuerte Iuz, como la Iuz directs del sol.
, ‘ml f m PLAYIPAUSEIPRESET - REPEAT/ FM MODE/ Osc STOPIMEMORy~ (=JQ - TUNING+ POWER (!)STANDBY BAND TAPE n ~ Pulsar repetidamente *RADIO/BAND seleccionarla bandadeseada. FM 4 AM para Se enciende el aparato y se sintoniza la emisora que estaba sintonizada en el memento de apagarlo previamente. Se enciende el indicador RADIO. * o BAND en e! control remoto (cuando esta conectado el cable de alimentacion) z Pulsar H+, seleccionar Se indica~[ M (+, - TUNING) para una emisora.
MODE o-9, +1 o REPEAT BAND P PLAY II PAUSE H4, m ■ STOP 1 Pulsar CD. Se enciende el aparato y se ilumina el indicador CD. Despues de la escucha, pulsar POWER (!) STANDBY para apagar el aparato. 2 Pulsar OPEN para abrir el compartimiento del disco. Colocar un disco con el Iado impreso hacia arriba y cerrar el compartimiento. h NOTA No usar discos de formas irregulars (ejemplo: octogonales, en forma de corazon, etc.). Su uso puede producir errores de funcionamiento.
‘“w’’’”;:y~:y~ — l++, PFl VOLUME REPEAT/ FM MODE/OSC mzia 3-MODE EQUALIZER T-BASS QSOUND Jtilizar solamente cintas de tipo I (normales). %lsar WA STOP/EJECT para abrir el portacasete e nsertar una cinta con el Iado expuesto hacia arriba y ?1Iado que se desea reproducer hacia afuera. 1 Insertar una cinta con el Iado que se va a grabar encarado hacia afuera. 2 Preparar la grabacion desde la fuente de sonido. Para grabar desde un CD, pulsar CD y cargar un disco.
VOLUMEN Pulsar VOLUME A o V. El nivel de volumen se indica en la pantalla en forma numerics desde O hasta MAX (25). Cuando se apaga el aparato el nivel del volumen se ajusta automaticamente en 14 si se ajusto en 150 mas. ● Indication del nivel de volumen cuando se ha seleccionado una funcion distinta a la de TAPE Pulsar VOLUME A o V. Se indica el nivel de volumen durante 4 segundos. Tambien puede usarse DISPLAY en el control remoto.
5 ATTENTION POUR REDU’IRE LES RISQUES D’INCENDIE OU D’ELECTROCUTION, NE PAS EXPOSER CET APPAREIL A LA PLUIE OU A L’HUMIDITE. 6 7 ~pw!J!!!~ “CAUTION: TO REDUCE THE RISK OF ELECTRIC SHOCK, DO NOT REMOVE COVER (OR BACK). NO USER-SERVICEABLE PARTS INSIDE. REFER SERVICING TO QUALIFIED SERVICE PERSONNEL.
Telecommande Alimentation Inserer deux piles R6 (taille AA). OPE/BATT L’indicateur OPE/BATT s’allume Iorsque Ie courant electrique circule clans I’appareil. Raccorder le cordon secteur comme indique ci-dessous. ~+ I Cordon secteur fourni L ~ vers la prise AC de I’appareil +0 vers la prise secteuf’ ATTENTION Utiliser exclusivement Ie cordon secteur fourni. L’utilisation d’autres cordons risque de provoquer un feu.
‘cm m if F’LAYIPAUSEIPRESET STOPIMEMORY~ QQ POWER 6 STANDBY TAPE ~ Appuyer de fagonrepetee sur*RADIO/BAND pour selectionner la gamme. ~FM-+AMm L’appareil se met sous tension et la station prealablement accordee est re~ue. L’indicateur RADIO s’allume. * ou BAND sur la telecommande (applicable cordon secteur est raccorde) 2 Iorsque Ie BAND RADIO CD Appuyer sur ■ tout en appuyant sur RADIO/BAND pour afficher la frequence AM.
m00“ Iro 00 I Cl “ 3JI “(2 o-9, +10 ] BAND Ii 1 PAUSE *‘ REPEAT ‘LA’ ~k :;: IFI I Lorsque I’ecoute est terminee, appuyer sur POWER (!) STANDBY pour mettre I’appareil hors tension. Appuyer sur CD. L’appareil se met sous tension et I’indicateur CD s’allume. 2 MODE sur OPEN pour ouvrir Ie tiroir du disque. Mettre un disque avec la face imprimee orientee vers Ie haut et refermer Ie tiroir du disque.
VOLUME STOP/MEMORY ~-=@ R’PEAT/ FM MODE/OSC mm 3-MODE EQUALIZER T-BASS QSOUND Utiliser uniquement PAUSE STOP/EJECT F FWD REWIND PLAY REC des cassettes de type I (normales). Appuyer sur 9/A STOP/EJECT pour ouvrir Ie portecassette et inserer la cassette avec Ie cdte expose du ruban magnetique oriente vers Ie haut et la face de lecture orientee vers I’exterieur. 7 Inserer la cassette avec la face d’enregistrement vers I’exterieur. 2 Preparer I’appareil pour I’enregistrement de la source.
VOLUME Appuyer sur VOLUME A ou V. Le niveau du volume s’affiche sous forme de chiffre de O a Max. (25). Le volume se regle automatiquement au niveau 14 si I’on met I’appareil hors tension alors que Ie volume regle au niveau 15 ou plus. ● II est possible de mettre automatiquement I’appareil sous tension a une heure specifiee. Si la fonction CD est selectionnee, effectuer Ies operations suivantes en mode d’arrdt.
Specifications Specifications Tuner section Frequencyrange,antenna— FM: 87.5 -108.0 MHz Rod antenna, AM: Section 530/531 -1,71 0/1 ,602 kHz (10/9 kHz/step) Ferrite bar antenna tuner Plage de frequence, antenne — FM 87,5 MHz -108,0 MHz, antenne a tige. AM: 530/531 kHz - 1.710/1 .