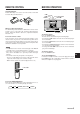
MD/CD STEREO RADIO CASSETTE RECORDER CSD-MD50 OPERATING INSTRUCTIONS EZ (English) MANUAL DE INSTRUCCIONES E (Español) MODE D’EMPLOI F (Français) BEDIENUNGSANLEITUNG D ISTRUZIONI PER L’USO 8Z-CK3-906-01 990420AYK-H-U-0 En I (Deutsch) (Italiano) GEBRUIKSAANWIJZING NL (Nederlands) NÁVOD K OBSLUZE Cz (Česky) HASZNÁLATI UTASÍTÁS M (Magyar) INSTRUKCJA OBSŁUGI Po (Polski)
ENGLISH PRECAUTIONS WARNING TO REDUCE THE RISK OF FIRE OR ELECTRIC SHOCK, DO NOT EXPOSE THIS APPLIANCE TO RAIN OR MOISTURE. CAUTION RISK OF ELECTRIC SHOCK DO NOT OPEN “CAUTION:TO REDUCE THE RISK OF ELECTRIC SHOCK, DO NOT REMOVE COVER (OR BACK). NO USER-SERVICEABLE PARTS INSIDE. REFER SERVICING TO QUALIFIED SERVICE PERSONNEL.” CAUTION Use of controls or adjustments or performance of procedures other than those specified herein may result in hazardous radiation exposure.
Maintenance Clean the unit only as recommended in the Operating Instructions. Damage Requiring Service Have the unit serviced by a qualified service technician if: - The AC power cord or plug has been damaged - Foreign objects or liquid have got inside the unit - The unit has been exposed to rain or water - The unit does not seem to operate normally - The unit exhibits a marked change in performance - The unit has been dropped, or the cabinet has been damaged DO NOT ATTEMPT TO SERVICE THE UNIT YOURSELF.
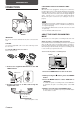
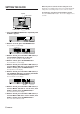
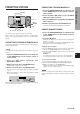
PREPARATIONS CONNECTIONS CONCERNING THE DISPLAY WINDOW’S DEMO DISPLAY 1 When the AC cord is plugged into an AC power socket for the first time after purchase, a demo display will appear in the display window. When the power is turned on, the demo display will end. When the power is turned off, the demo display will appear again. Until the clock is set, the demo display will appear whenever the power is turned off. (For setting the clock, see page 6.
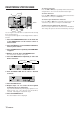
REMOTE CONTROL BEFORE OPERATION Detach the battery cover on the rear of the remote control and insert two R6 (size AA) batteries. CDc MDc POWER PREPARATIONS Inserting batteries TUNER/BAND TAPEd R6 (AA) When to replace the batteries The maximum operational distance between the remote control and the sensor on the main unit should be approximately 5 meters. When this distance decreases, replace the batteries with new ones.
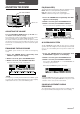
SETTING THE CLOCK MULTI JOG f,g 1 Press the TIMER/CLOCK button repeatedly until CLOCK ? appears. 2 Within 5 seconds, press the ENTER button. The year flashes on the display. 3 Within 1 minute, press the f or g button, or turn the MULTI JOG dial to set the year. The year can be set between 1999 and 2040. 4 Within 1 minute, press the ENTER button. The month flashes on the display.
SOUND ADJUSTING THE SOUND This unit provides the following three different equalization curves. ROCK: Powerful sound emphasizing treble and bass POP: More presence in the vocals and midrange JAZZ: Accented lower frequencies for jazz-type music VOLUME UP/DOWN 1 Press the SOUND button repeatedly until EQ ? appears on the display. 2 Within 5 seconds, press the ENTER button. VOLN/M PREPARATIONS SOUND EQ (EQUALIZER) 3 Within 5 seconds, turn the MULTI JOG dial.
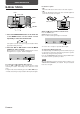
RADIO RECEPTION MANUAL TUNING For better reception • FM Extend the FM antenna and orient it for the best reception. • AM Keep the AM antenna away from other electrical appliances and orient it for the best reception. DISP MULTI JOG MODE FM antenna AM antenna BAND f,g MODE 1 2 When an FM stereo broadcast contains noise 1 Press the TUNER/BAND button on the main unit or the BAND button on the remote control repeatedly to select the desired band. FM Press the MODE button. MONO appears on the display.
PRESETTING STATIONS 1 Press the TUNER/BAND button on the main unit or the BAND button on the remote control to select a band. f,g a 2 Press the f or g button or turn the MULTI JOG dial to select a station. 0-9,+10 BAND f,g a 2 1 3,4 The unit can store 15 preset stations for each band. When a station is stored, a preset number is assigned to the station. Use the preset number to tune in to a preset station directly.
REGISTERING STATION NAME To change a character Press the f or g button repeatedly until the character to be changed flashes. Then enter the desired character again. 2 7 1 To delete characters Press the f or g button repeatedly until the character to be deleted flashes. Then press the a button. To insert a space between the characters BAND Press the f or g button repeatedly until the part to be entered as a space flashes. Then press the DISP button.
CD PLAYING OPERATION CDc MULTI JOG DISPLAY MODE 0-9,+10 Press the numbered buttons and the +10 button to select a track. Example: To select the 25th track, press the +10, +10 and 5 buttons. To select the 10th track, press the +10 and 0 buttons. The selected track starts to play and play continues to the end of that disc. Display in stop mode The display shows the following information.
CDc PROGRAMMED PLAY MULTI JOG s Up to 20 tracks can be programmed from the loaded disc. REPEAT c 1 In stop mode, press the MODE button on the main unit repeatedly until PROGRAM? appears on the display. 2 Within 5 seconds, press the ENTER button. g s MODE ENTER g RANDOM PLAY 3 Turn the MULTI JOG dial to select a track to be programmed, and press the ENTER button. All the tracks on the disc can be played randomly.
TAPE PLAYBACK OPERATION Press the s button in stop mode. The counter is also set to 0000 when the cassette holder is opened. ENTER PUSH OPEN Selecting a reverse mode In stop mode, press the MODE button repeatedly. Each time the button is pressed, the reverse mode changes. MODE CD PLAYING TAPE PLAYBACK a s To set the tape counter to 0000 c s a To play one side only, select p. To play from front side to rear side once only, select [. To play both sides repeatedly, select ].
MD PLAYING WHAT IS AN MD (MINI DISC)? An MD is only 64 mm in diameter, about half the size of a conventional CD. But MD can be used to store and play back a full 74 minutes of data such as a CD. Unlike a CD, MD comes in a plastic car tridge, so that it can be handled with ease. The cartridge also protects the disc inside from shocks, dust and scratches. Unlike cassette tapes, which can become stretched or tangled, an MD is an excellent durable media.
OPERATION MDc s f,g DISPLAY MODE c a DISP zMD EJECT f,g s a INSERTING AN MD Press the numbered buttons and the +10 button to select a track. Example: To select the 25th track, press the +10, +10 and 5 buttons. To select the 10th track, press the +10 and 0 buttons. The selected track starts to play and play continues to the end of that disc. To start play when the power is off (Direct Play Function) Press the MD c button. The power is turned on and play of the inserted disc begins.
PROGRAMMED PLAY s MDc MULTI JOG Up to 20 tracks can be programmed from the inserted disc. REPEAT 1 In stop mode, press the MODE button on the main unit repeatedly until PROGRAM? appears on the display. c 2 Within 5 seconds, press the ENTER button. g s MODE ENTER g RANDOM PLAY 3 Turn the MULTI JOG dial to select a track to be programmed, and press the ENTER button. All the tracks on the disc can be played randomly.
TAPE RECORDING OPERATION 1 s 3 2 s a a 5 CD/MDcTAPE f,g RECORDING A WHOLE CD OR MD ONTO A TAPE Use the CD/MDcTAPE button to record all the tracks of a CD or MD onto a tape from the beginning. If the tape reaches its end of the front side while a track is being played, recording of this track starts from the beginning on the opposite side of the tape. Prepare a tape having a length longer than the total playing time of the CD or MD to be recorded.
MD RECORDING ABOUT THE INDEX MARK The unit registers index marks while recording on an MD. Index marks allow you to easily locate the desired tracks. To record on a previously recorded MD If there is an unrecorded section left on the MD, the new recording automatically starts from where the previous recording finished. If you want to start recording from the beginning of a previously recorded MD, erase the previous recording completely. (See page 25.
RECORDING A WHOLE CD DISPLAY 1 Load a CD and press the FUNCTION button on the remote control to select CD. 2 Load a tape to be recorded, press the FUNCTION button on the remote control repeatedly until tape is selected, and press the MODE button on the remote control repeatedly to set the reverse mode to [. s 2 1 2 DISP 1 Insert a recordable MD into the disc drive with the label side up and in the direction of the arrow.
RECORDING ONLY ONE TRACK OF A CD 2 s PROGRAMMED RECORDING OF A CD Up to 20 tracks can be programmed and recorded on an MD. MULTI JOG s 3 4,5 5 0-9,+10 f,g 5 2 s 2 f,g 1 4 s 2 1 Insert a recordable MD into the disc drive with the label side up and in the direction of the arrow. 2 Load a CD and press the CD c button. Playback starts. 3 Select the desired track. Use the f or g button, the MULTI JOG dial, or the numbered buttons on the remote control to play back the desired track.
CDc MDc s EXTENDED (MONAURAL) RECORDING Twice as long as the time printed on the MD can be obtained if you select the monaural recording mode. Monaural recording mode is available when recording from the tape or the radio. TUNER/BAND TAPEd MULTI JOG f,g MDc s TUNER/BAND TAPEd MULTI JOG f,g MODE s a a 1 3 ENTER f,g f,g s a a 1 Insert a recordable MD into the disc drive with the label side up and in the direction of the arrow. 2 Prepare the source to be recorded.
MD EDITING REGISTERING THE DISC TITLE AND TRACK TITLE To change a character Press the f or g button repeatedly until the character to be changed flashes. Then enter the desired character again. To delete characters Press the f or g button repeatedly until the character to be deleted flashes. Then press the a button. You can register the titles of the discs and tracks. 3,8 5 f,g To insert a space between the characters Press the f or g button repeatedly until the part to be entered as a space flashes.
DIVIDING A TRACK You can divide a track into two tracks by registering an index mark. Example To divide the 3rd track into two tracks at 2 minutes 30 seconds: 2 minutes 30 seconds 2nd track MD EDITING NOTE • If the track had a title before the division, the title is assigned to the first of the two divided tracks. • A track cannot be divided when an inser ted disc already contains 254 tracks.
COMBINING TWO TRACKS You can combine two tracks by erasing the index mark in between. Example To combine the 2nd track and the 3rd track by erasing the index mark at the beginning of the 3rd track: 1st track 1st track 2 2nd track 3rd track CHANGING THE ORDER OF THE TRACKS You can change the order of tracks after completing a recording.
ERASING TRACKS ERASING A SINGLE TRACK MD EDITING ERASING ALL TRACKS ON A DISC s 2 1 s 2 1 3,4 1 3,4 1 Insert an MD and play back the track to be erased. 2 Press the EDIT button repeatedly until Track Erase ? appears on the display. 3 Within 10 seconds, press the ENTER button. The display changes to Erase ??. NOTE If you erase all the tracks, you cannot retrieve them again. 1 Insert an MD and press the FUNCTION button on the remote control to select the MD function.
TIMER 5 For timer play : select the source with the f or g button or the MULTI JOG dial, then press the ENTER button. For timer recording : select the destination (MD or TAPE) with the f or g button or the MULTI JOG dial, then press the ENTER button.
Press the TIMER/CLOCK button repeatedly until TIMER PLAY? or TIMER REC ? appears, then press the ENTER button within 5 seconds. Each time the ENTER button is pressed, each item is displayed. If you want to change the specific items, press the f or g button or turn the MULTI JOG dial.
GENERAL CARE AND MAINTENANCE Occasional care and maintenance of the unit and the software are needed to optimize the performance of your unit. To clean the cabinet Use a soft and dry cloth. If the surfaces are extremely dirty, use a soft cloth lightly moistened with mild detergent solution. Do not use strong solvents, such as alcohol, benzine or thinner as these could damage the finish of the unit.
Message Cause Solution Blank Disc Nothing is recorded on the disc. — Can't Edit Tracks are too short to be joined up. See "THE LIMITATIONS OF MD" on page 14. GENERAL MD GUIDE MESSAGES The combine function was used while playing back the first track. The divide function is used at the beginning of the track. The combine function was used to join a track recorded in monaural with a track recorded in stereo. Disc Error The disc is damaged by scratches. Replace the disc.
SPECIFICATIONS COPYRIGHT Please check the laws on copyright relating to recordings from discs, radio or external tape for the country in which the machine is being used. FM tuner section Tuning range Antenna 87.5 MHz to 108 MHz Rod antenna NOTE 522 kHz to 1611 kHz (9 kHz step) 530 kHz to 1600 kHz (10 kHz step) Loop antenna AIWA CO. LTD. - JAPAN - DECLARES UNDER ITS OWN RESPONSIBILITY THAT THE PRODUCT DESCRIBED IN THIS MANUAL IS IN COMPLIANCE WITH THE DIRECTIVES OF D.M 28.8.95 No.
If the unit fails to perform as described in these Operating Instructions, check the following guide. GENERAL There is no sound. • Is the AC cord connected properly? An erroneous display or a malfunction occurs. ➞ Reset the unit as stated below. TUNER SECTION There is constant, wave-like static. • Is the antenna connected properly? (➞ page 4) The reception contains noise interferences or the sound is distorted.
PARTS INDEX 1 2 3 4 5 6 7 8 1 Display 2 Function buttons MD c button CD c button TUNER/BAND button TAPE d button 3 POWER button 4 Operation buttons s STOP button f,g TUNING DOWN/UP buttons a PRESET CALL button 5 TIMER/CLOCK button 6 SOUND button 7 z CD EJECT button 8 CD tray 9 Recording buttons w MD REC button w TAPE REC button CD l MD SYNCHRO RECORDING button CD/MD c TAPE SYNCHRO RECORDING button 0 PUSH OPEN button ! VOLUME UP/DOWN buttons @ MULTI JOG dial # $ % ^ z MD EJECT button MD drive PHONES jack