OPERATING INSTRUCTIONS INSTRUCCIONES DE MANEJO MODE D’EMPLOI CSD-NS1 DIGITAL AUDIO SYSTEM SISTEMA DE AUDIO DIGITAL SYSTÈME AUDIO-NUMÉRIQUE English : See page 2. 8B-CH1-903-01 010325ACK-I-IN En Español : Ver la página 14. E Français : Voir page 26.
WARNING TO REDUCE THE RISK OF FIRE OR ELECTRIC SHOCK, DO NOT EXPOSE THIS APPLIANCE TO RAIN OR MOISTURE. 3 CAUTION 4 RISK OF ELECTRIC SHOCK DO NOT OPEN “CAUTION:TO REDUCE THE RISK OF ELECTRIC SHOCK, DO NOT REMOVE COVER (OR BACK). NO USER-SERVICEABLE PARTS INSIDE. REFER SERVICING TO QUALIFIED SERVICE PERSONNEL.
Specifications 4 Extension cord - To help prevent electric shock, do not use a polarized AC power plug with an extension cord, receptacle, or other outlet unless the polarized plug can be completely inserted to prevent exposure of the blades of the plug. 5 When not in use - Unplug the AC power cord from the AC outlet or remove all the batteries if the unit will not be used for several months or more.
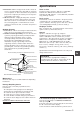
Power supply Using on AC house current Connecting antennas Connect the AM loop antenna to the AM LOOP terminals on the rear of the unit. Keep the antenna away from metallic objects, electrical equipment and cords. Connect the AC cord as illustrated below. supplied AC cord 1 to the AC inlet of the unit 2 to an AC outlet (AC 120 V, 60 Hz) The rated voltage of the unit is 120 V AC. CAUTION Use only the supplied AC cord. Use with other cords may result in the risk of fire.
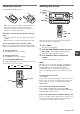
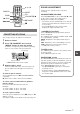
Remote control Setting the clock Insert two R6 (size AA) batteries. POWER 6STANDBY indicator 3 1 2 s 3 r, t R6 (AA) • When the reach of the remote control signal is less than 5 meters (16 feet), replace the batteries. • Remove the batteries if the remote control is not going to be used for a long time.
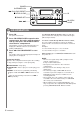
POWER 6STANDBY/ ON d PLAY / DIR / PRESET s VOLUME/ TIMER T-BASS, QSURROUND, 3-MODE EQ a PAUSE / SET r, t TUNER / BAND PHONES A 1 TUNER OPERATION Press * TUNER/BAND repeatedly to select the desired band. FM AM The power is turned on and the previously tuned station is received. * or BAND on the remote control Press MODE on the remote control so that “MONO” is displayed. Noise is reduced, although reception is monaural.
DISPLAY 0-9, +10 SOUND ADJUSTMENT MODE Volume or tone adjustment does not affect recording. EQ VOLUME k, i BAND c PLAY a PAUSE r, t s VOLUME/TIMER (VOLUME) Turn VOLUME/TIMER, or press VOLUME k or i on the remote control. The volume level is displayed as a number 0 to 25 (MAX). • The volume level is automatically set to 14 if the power is turned off when the volume level is set to 15 or more. • Pressing DISPLAY on the remote control displays the adjusted volume level.
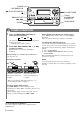
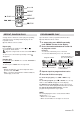
POWER 6STANDBY/ ON d PLAY / DIR / PRESET CD s STOP/ CLEAR a PAUSE / SET CD OPEN/ CLOSE r, t B 1 CD OPERATION Press CD. The power is turned on. 2 Press CD OPEN/CLOSE to open the disc compartment. Set a disc with the printed side up, then press CD OPEN/CLOSE to close the disc compartment. Total number of tracks and total playing time are displayed. It will take about 15 seconds when loading a CD-RW disc. 3 Press d PLAY/DIR/PRESET to start play.
0-9, +10 REPEAT c PLAY MODE a PAUSE r, t s STOP REPEAT, RANDOM PLAY PROGRAMMED PLAY A single track or all tracks can be played repeatedly, and all the tracks randomly. Random play can be repeated as well. Operate with the remote control. Up to 30 tracks can be programmed from the disc. Operate with the remote control. 1 In stop mode, press MODE repeatedly until “MEMO” flashes in the display. Repeat play 2 Press the numbered buttons 0-9 and +10 to program a track.
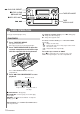
d PLAY / DIR / PRESET s STOP/ CLEAR TAPE / REV MODE a PAUSE / SET w REC / REC MUTE TAPE OPEN / CLOSE r, t C TAPE OPERATION To change the playback side, press d during play. x : Plays the side facing up. c : Plays the opposite side. Use Type I (normal) tapes only. PLAYBACK 1 Press TAPE/REV MODE. The power is turned on. If the tape has been inserted, play begins. 2 Press TAPE OPEN/CLOSE to open the cassette compartment and load a tape with the exposed side facing forward.
c PLAY a PAUSE r, t s STOP RECORDING 1 Load a tape with the side to be recorded on facing up and the exposed side facing forward. 2 Press TAPE/REV MODE to select the reverse mode. : Records on one side only. or : Records on both sides. Check that x is displayed, so as to start recording from the side facing up. 3 Get ready to record from the source. To record from a CD, press CD and load the disc. To record from a radio broadcast, press TUNER/ BAND and tune to a station.
VOLUME/ TIMER TAPE / REV MODE, TUNER/ BAND, CD ENTER a SLEEP TIMER r, t D TIMER OPERATION TIMER PLAYBACK/RECORDING NOTE The unit can be turned on at a specified time every day with the built-in timer. Make sure the clock is set correctly. • If you use the unit after setting the timer, repeat steps 6 and 7. • Timer recording is available only when the source is TUNER.
Maintenance To clean the cabinet a Use a soft cloth lightly moistened with mild detergent solution. Do not use strong solvents such as alcohol, benzine or thinner. To clean the heads r, t SETTING THE SLEEP TIMER The unit can be turned off automatically at a specified time. 1 2 Press SLEEP. Within 4 seconds, turn VOLUME/TIMER to specify the timer-activated period. The time changes between 5 and 180 minutes in 5-minute units. r or t is also available.
NOTE This equipment has been tested and found to comply with the limits for a Class B digital device, pursuant to Part 15 of the FCC Rules. These limits are designed to provide reasonable protection against harmful interference in a residential installation. This equipment generates, uses, and can radiate radio frequency energy and, if not installed and used in accordance with the instructions, may cause harmful interference to radio communications.