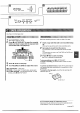
68-CD7-905-01 980210AA0-I-B m3iE DIGITAL AUDIO
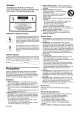
WARNING 5 TO REDUCE THE RISK OF FIRE OR ELECTRIC SHOCK, DO NOT EXPOSE THIS APPLIANCE TO RAIN OR MOISTURE. “CAUTION: TO REDUCE THE RISK OF ELECTRIC SHOCK, DO NOT REMOVE COVER (OR BACK). NO USER-SERVICEABLE PARTS INSIDE. REFER SERVICING TO QUALIFIED SERVICE PERSONNEL.
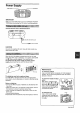
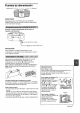
Power Supply IMPORTANT Make sure that FUNCTION is set tcl O STANDBY POWER/ TAPE before connecting the AC cord or inserting batteries. Connect the AC cord as illustrated below. I the AC inlet of the unit =-+ ~ to an AC outlet CAUTION Use only the supplied AC cord. Use with other cords may result in the risk of fire. Open the lid of the battery compartment on the rear and insert eight RI 4 (size C) batteries, not supplied, with the 0 and ~ marks correctly aligned. Then close the lid.
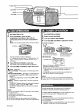
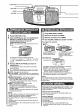
{: QSOUND BASS VOLUME 1 2 f Set FUNCTION to open the disc compartment and place a disc with the printed side down on the disc compartment lid. 2 Select a band with BAND. 3 Tune to a station with TUNING. ~ Turn VOLUME and BASS to adjust the sound. NOTE - Do not place smaller than 3-inch (8 cm) discs. For better reception 6. ‘F Set FUNCTION to CD. Press CD OPEN to RADIO. CD OPEN Extend the FM antenna and orient it for the best reception. The total number of tracks is displayed.
“El H a T] d(!l!l w “ REC A ~ TUNING - AM I 0 FM BAND PLAY E REW 114+ —— F FWD STOP/EJECT PAUSE E II m/* + 7 Note that recording is done on only one side of the tape. 1 Set FUNCTION to TAPE. 2 Press W= STOP/EJEClr to open the cassette holder and insert a tape with the exposed side out and the side to be played up. 1 Insert a tape with the side to be recorded facing up. Wind up the tape to the point where recording starts. 2 Get ready to record from the source.
ADVERTENCIA PARA REDUCIR EL RIESGO DE INCENDIOS O SACUDIDAS ELECTRICAS, NO EXPONGA ESTE APARATO A LA LLUVIA NI ALA HUMEDAD.
Fuentes de alimentacion OPE/BATT FUNCTION IMPORTANTE Cerciorese de que FUNCTION este en (!) STANDBY POWER/TAPE antes de conectar el cable de alimentacion de CA o de insertar Ias pilas. ,;=-~,’’’w’— ,,,, =,!!! .,,=, S-f,,t ?._* 72&j! #!! ’!’:W;,;,i~,,,,,l,f~H.w=%gll 11111,, l,,? .::T- ,@e?lf~,+”==”’y,!!’ ,&dlll*\, =p --..-!!l,,, 1, -,, --,!,!!!!!! ~ml@p*q-g*;~gl**:@@@$?*m@~# ,?!j!,\\lly+& :., ~~;,,,,, —#il,lilkkt# ‘W,bellill,fl ..-=’,4 ‘Idl,.
(] QSOUND BASS VOLUME ~ Ponga FUNCTION en RADIO. 1 Ponga FUNCTION en CD. 2 Seleccione la banda con BAND. 2 Pulse CD OPEN para abrir el compartimiento del disco y ponga un disco con la cara impress hacia abajo en la tapa del compartimiento del disco. 3 Sintonice la emisora con TUNING. 4 Gire VOLUME y BASS para ajustar el sonido. Para mejorar la recepcion NOTA – No ponga discos mas pequefios de “3-inch” (8 cm).
❑ “El A II* AM I Jtiiice solamente TUNING I FM cintas vb BAND d~~~‘i) REC __@__ PLAY E RFW 1144 F FWD STOP/EJECT PAUSE - 11m/A & de tipo I (Inormales). 1 Ponga FUNCTION en TAF’E. 2 Presione WA STOP/EJEICT para abrir el portacasete, e inserte un casete con la cinta al descubierto hacia fuera y la cara que desee reproducer hacia arriba. 1 lnserte un casete con la cara que desee grabar hacia arriba. Bobine la cinta hasta et punto en el que desee iniciar la grabacion.
5 ATTENTION POUR REDUIRE LES RISQUES D’INCENDIE OU D’ELECTROCUTION, NE PAS EXPOSER CET APPAREIL A LA PLUIE OU A L’HUMIDITE. 6 7 “CAUTION: TO REDUCE THE RISK OF ELECTRIC SHOCK, DO NOT REMOVE COVER (OR BACK).
Alimen~ation electrique OPE/BATT FUNCTION IMPORTANT Verifier que la commande FUNCTIC)N est reglee sur ~ STANDBY POWER/TAPE avant de raccorder Ie cable electrique ou d’inserer Ies piles. Flaccorder Ie ciible en procedant ~. comme illustre. _ 0 Prise electrique de I’appareil — L ~+ ~Vers une prise secteur ATTENTION N’utiliser que le cable electrique fourni. L’emploi de tout autre c%ble electrique presente un risque d’incendie.
FUNCTION Q QSOUND BASS VOLUME 1 2 Regler la commande FUNCTION sur CD. Appuyer sur CD OPEN pour ouvrir Ie compartment a disques et poser un disque etiquette en haut sur Ie plateau. REMARQUE – L’appareil n’accepte pas Ies disques de petit format (8 cm). 1 Regler la commande FUNCTION 2 Choisir une commande bande 4 Recder Ie son a I’aide des commandes de volume (V6LUME) et de tonalite (BASS) . *. 4 Realer Ie son a I’aide des commandes pour une station lecture.
@ ‘a Arvl 8 I FM PLAY 1 PAUSE BAND v STOf~ SKIP/SEARCH Regler la commande REPEAT Q ■ -II 1 2 T] A TUNING ww FUNCTION sur TAPE. Appuyer sur la touche WA STOP/EJECT ouvrir Ie porte-cassette et inserer une cassette c6te bande apparente vers [’exterieur et face a Iire en haut soi. pour 1 Inserer une cassette en plagant la face a enregistrer en haut. Bobiner la bande s’effectuer. 2 jusqu’au point ou I’enregistrement peut Preparer la source d’enregistrement.
I Specifications Fiche technique Tuner section Frequency range, antenna — FM: 87.5 -108.0 MHz Rod antenna, AM: 530-1,710 kHz Ferrite bar antenna Partie tuner Gamme de frequencies, antenne — FM: 87,5 -108,0 MHz. Antenne tige. AM: 530-1.710 kHz. Antenne barre de ferrite.