COMPACT DISC STEREO RADIO CASSETTE RECORDER CSD-TD20 CSD-TD21 OPERATING INSTRUCTIONS WARNING FOR USE IN THE UNITED KINGDOM IMPORTANT This appliance is supplied with a fitted three pin mains plug. A 3 amp fuse is fitted in the plug. Should the fuse need to be replaced, use a 3 amp fuse approved by ASTA or BSI to BS1362. When replacing the fuse, you must ensure that any removable fuse covers are correctly refitted. If you should lose the fuse cover, please contact your nearest AIWA dealer.
WARNING TO REDUCE THE RISK OF FIRE OR ELECTRIC SHOCK, DO NOT EXPOSE THIS APPLIANCE TO RAIN OR MOISTURE. CAUTION RISK OF ELECTRIC SHOCK DO NOT OPEN CAUTION TO REDUCE THE RISK OF ELECTRIC SHOCK, DO NOT REMOVE COVER (OR BACK). NO USER-SERVICEABLE PARTS INSIDE. REFER SERVICING TO QUALIFIED SERVICE PERSONNEL. CAUTION Use of controls or adjustments or performance of procedures other than those specified herein may result in hazardous radiation exposure.
Power Supply Specifications Tuner section Frequency range, antenna — FM: 87.5 - 108.
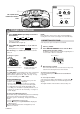
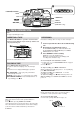
AB REPEAT SKIP /SEARCH FM MODE OSC SLEEP - TUNING + \ CD, RADIO/BAND, POWER6STANDBY/ TAPE STOP MEMORY PLAY /PAUSE PRESET A TUNER OPERATION 1 Press RADIO/BAND repeatedly to select the desired band. FM MW LW The power is turned on and the previously tuned station is received. The RADIO indicator lights up. 2 Press r, t (TUNING -, +) to select a station. During FM stereo reception, STEREO is displayed.
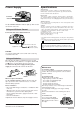
B CD OPERATION 1 Press CD. The power is turned on and the CD indicator lights up. 2 Press CD OPEN to open the disc compartment. Place a disc with the printed side up and close the disc compartment. CD OPEN Total number of tracks and total playing time are displayed. It will take about 15 seconds when loading a CD-RW disc. 3 Press e PLAY/PAUSE/PRESET to start play. The number of the track being played and elapsed playing time are displayed. s STOP/MEMORY – Stops play.
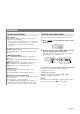
C POWER6STANDBY/ TAPE PAUSE STOP/EJECT F FWD REWIND PLAY REC VOL 3-MODE EQ SLEEP T-BASS r, t QSOUND (CSD-TD21 only) C TAPE OPERATION Use Type I (normal) tapes only. INSERTING A TAPE Press Z STOP/EJECT to open the cassette holder and insert a tape with the exposed side up and the side to be played facing out. RECORDING Note that recording is done on only one side of the tape. 1 Insert a tape with the side to be recorded facing out. 2 Get ready to record from the source.
GENERAL SOUND ADJUSTMENT VOL (volume) Press VOL i or k. The volume level is displayed as a number from 0 to MAX (25). • The volume level is automatically set to 14 if the power is turned off when the volume level is set to 15 or more. (except when turning the power back on within 4 seconds) To display the volume level when a function other than TAPE function is selected Press VOL i or k. The volume level is displayed for 4 seconds.