CFX409 ,“ STEREO CAR CASSEITE RECEIVER RADIO-CASSETTE ESTEREOFONICO PARA AUTOMOVIL OWNER’S RECORD For your convenience, record the model number and serial number (you will find them ontheright side of yourset) inthespace provided below. Please referto them when you contact your AIWA dealer in case of difficulty. Model No. ICT-X409 Serial No.
Welcome Thank you foryourpurchasing this AIWAproduct. To optimize the performance of this unit, please read through this manual carefully. In addition to this operating instructions manual, be sure to refer to the separate installation and connections manuals as well. PRECAUTIONS This unit is designed to be operated on a 12-volt DC negative-ground electrical system only. ●To prevent short-circuiting, disconnect the negative car battery terminal until the unit has been mounted and connected completely.
TABLE OF CONTENTS FRONT PANEL ................................................................................................................................... 3 DETACHING AND ATTACHING THE FRONT PANEL ...................................................................... 4 SETTING THE BEEP TONE .............................................................................. 5 SETTING THE CLOCK ..................................................................................................................
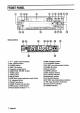
FRONTPANEL Display window @9 @+/(audio control) button @ SEL (select) button @ H-BASS button @EJECT h button @ Cassette compartment @ DIRECTION ++/~ button @ BAND button @TAPE button @ MUTE button @ A.ME (auto memory/preset scan) button @~ (release) button @TUNE 7/A buttons @CD/MD IN jack (3.5-mm dia.
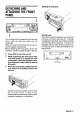
Attaching the front panel DETACHING AND ATTACHING THE FRONT PANEL 2 I 1 Swxrrity Lamp You can detach the front panel from the unit and carry it with you when you leave your car unattended. When you carry the front panel out of your car, use the supplied carrying case. Before detaching the front panel, remove the cassette to prevent possible damage to the unit. 1 Press PWR to turn the unit off. 2 While supporting the front panel with one hand, press & to release one side of the panel.
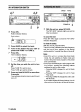
SETTING THE BEEP TONE SETTING THE CLOCK 3 The unit is preset at the factory to beep each time you press any button on the front panel except it, A, + and >. You can stop beeping by following the procedure below. 1 2 1 With the unit off, press 1 and 4 at the came time. The “BEEP indication appears. Each time you press them, this function turns on or off. The beep function is activated when the “BEEP indication appears with the audio control indicator lighting up and canceled without the indicator.
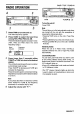
BAND TAPE CD/MD IN RADIO OPERATION 2 PWR 1 T 1 Press PWR to turn the unit on. The radio frequency appears. 2 Press BAND to select the band from among FM1, FM2, FM3 snd AM. The band indicators appear cyclically in order. (FM1, FM2 and FM3 share the same frequency range.) Band indicator LO To turn the unit off Press PWR. Note The unit turns on in the last selected mode when you turned off the unit with the exceptions of pressing the following buttons.
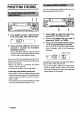
PRESETTING STATIONS You can manually preset stations that have not been selected by auto memory. 2 12 3 1 Press BAND to select a desired band from among FM1, FM2, FM3 and AM. L 2 J Press and hold A.ME for more than 2 seconds to activate the automatic presetting function. The six strongest available stations will be stored in memory on the preset station buttons 1 to 6 in order of their signal strength.
1 MY INFORMATION SWITCH You can timer-activate the radio for a daily radio program. The unit turns on and off in Radio mode at the preset time automatically. 2 1 Press BAND to select a desired band fromamong FM1, FM2, FM3 and AM. 2 Press the desired preset station button. The number of the pressed preset station button is displayed next to the frequency indication.
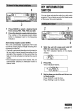
MY INFORMATION S WITCH 4f7 6f8 CD/MD IN 59 4 I Press SEL. Radio indication flashes. Band indicator 1 With the unit on, press MY INFO. The “MY INFO indicator lights up and the timer is activated. To cancel the timer Press MY INFO again so that the “MY INFO indicator disappears. To check the setting 5 6 7 Press BAND to select the band. Tune in the station that you wish preset with TUNE Y or TUNE A. to Press SEL. Timer indication flashes. With the unit off, press MY INFO.
Press the following transport. TAPE PLAYBACK 2 1 buttons Insert acassette tostart tape To do this Press this button Eject the cassette* B Change the playback side ~ to operate ‘~and~ simultaneously Fast-forward upper side of the tape Rewind lower side of the tape El Rewind upper side of the tape Fast-forward lower side of the tape El Stop fast winding and resume playback @or playback. If a cassette is already inserted, press TAPE to starl playback.
TAPE PLAYBACK Before turning the ignition off Be sure to eject any cassette from the unit before turning the ignition off. Otherwise, the unit maybe damaged when you detach the front panel. SOUNDADJUSTMENTS MUTE 21 Switching modes When the unit is in Radio mode, inserting a cassette switches the unit to Tape Play mode automatically. To prevent tape problems 1 Before inserting a cassette into the unit, make sure that there is no slack in the tape.
You can enjoy music with strong bass sound. H-BASS I CONNECTING A PORTABLE CD/MD PLAYER OR OTHER EQUIPMENT This unit is equipped with the line-level input (CD/ MD IN) jack enabling high quality of the sound. 1 Press H-BASS to obtain powerful bass. The” I-BASS” indicator lights up. Each time you press H-BASS, this function turns on or off. 23 4 I If a cassette is inserted, remove it to prevent possible damage to the unit. 2 Connect a portable CD/MD player, etc. via the CD/MD IN jack (3.5-mm dia.
MAINTENANCE SPECIFICATIONS Cleaning the front panel RADIO SECTION When the front panel is soiled, wipe the surface of the panel with a dry and soft cloth. (FM) Cleaning the tape head Use a cleaning cassette to clean the playback head and capstans approximately once a month. If the playback head is dirty, the high tones may not be reproduced properly. Cleaning the connector The connector on the reverse side of the front panel needs to be cleaned occasionally.
PRECAUTION Bienvenidos Muchas gracias por su compra de este producto AlWA. Para utilizar este aparato en Ias mejores condiciones posibles, lea cuidadosamente Ias instrucciones de este manual. Ademas de este manual de instrucciones, lea tambien Ios manuales de instalacion y de conexiones que vienen por separado. Las modificaclones y ajustes de este producto que no han sido autorizadas a titulo expreso por el fabricate pueden anularel derecho o autoridad del usuario para hater funcionar este producto.
INDICE PANEL DELANTERO ......................................................................................................................... 3 DESMONTAJE E INSTALACION DEL PANEL DELANrERO ........................................................... 4 AJUSTE DEL TONO DEL TIMBRE .............................. ..................................................................... 5 AJUSTE DEL RELOJ .................................................... ..........................................................
PANELDELANTERO Visualizador 29 c) 8 @) @ @ @ @ @ @ ~ @ @ Boton +/(control de audio) Boton SEL (seleccion) Boton H-BASS Boton EJECT 4 (expulsion) Compartimiento de cassettes Botones DIRECTION ++/W Boton BAND Boton TAPE Boton MUTE @ Boton A.ME (memoria automatic/ exploration de estaciones programedas) @ Boton & (soltar) @ Botonea TUNE VIA @Toma CD/MD IN (diam.
Instalacion dei panel deiantero DESMONTAJE INSTALACION DELANTERO E DEL PANEL 2 I Luz de seguridad (lrando se desmonta el panel delantero aparece i Se puede desmontar el panel delantero de aparato y Ilevarlo consigo cuando se deja el coche estacionado sin vigilancia. Cuando se Ileve el panel delantero dp su coche ahilice la cij de transport. Antes de soltarel panel delantero, expulse la cassette para evitar que se pueda dafiar el aparato. 1 Presione sparato.
AJUSTE DEL TONO DEL TIMBRE AJUSTE DEL RELOJ 3 Este aparato se ajusto en fabrica para que suene un timbre cada vez que presione uno de Ios botones en el panel delantero excepto ~, A, * y ~. Se puede cancelar el timbre con el siguiente procedimiento. 2;4 i Con el aparato desconectado, presione simulti%eamente 1 y 4. Aparece la indication “BEEP. Cada vez que Ios presione, esta funcion se activa o desactiva.
FUNCIONAMIENTO RADIO BAND DE LA TAPE CD/MD IN 2 PWR TUNEY/A LO Para desconectar el aparato Presione PWR. 3 i 1 Presione PWR para conectarel aparato. Aparece la frecuencia de la radio. 2 Preaione BAND para seleccionar la banda de entre FM1, FM2, FM3 y AM. Aparecen Ios indicadores de banda en ese orden yen ciclo. (FM1, FM2 y FM3comparten la misma gama de frecuencias.
PROGRAMACION ESTACIONES DE LAS Se pueden programar manualmente Ias estaciones que no han podido ser programadas automaticamente. 2 12 1 Presione BAND para seleccionar una banda deseada entre FM1, FM2, FM3 y ‘*3 2 Mantenqa presionado A.ME durante mas de-2 “segundos para activar la funcion de programacih autom~tica. Las seis estaciones con recepcion masfuerte se memorizaran en Ios botones de estaciones programadas 1 a 6 en el orden de la fuerza de Ias seiiales.
INTERRUPTOR INFORMATION DE PROPIA Se puede activar la radio con el temporizador de un programadiario de la radio. El aparatoconecta y desconecta automaticamente el modo de radio a la hors programada. 2 I Presione BAND para seleccionar la banda deseada entre FM1, FM2, FM3 y AM. 2 Presione el boton de la estacion programada deseada. El numero de boton de la estacion programada presionado aparece al Iado del indicador de frecuencia.
INTERRUPTOR PROPIA DEliVFORMACION BAND TAPE 6[8 4(7 CD/MD IN 59 4 Presione SEL. Destella la indication 1 de la radio. Indicador de banda 5 Presione banda. 6 Sintonice programar 7 Presione SEL. Destella la indication BAND 1 Con el aparato conectado, presione MY INFO. Se enciende el indicador “MY INFO y se activa el temporizador. Para cancelar 81temporizador Presione nuevamente MY INFO para que se apague el indicador “MY INFO.
REPRODUCTION CINTA 2 1 DE LA Presione Ios siguientes botones para controlarel movimiento de la cinta. I Presione Para este boton 1 Coloque unacassette paraempezara reproducer. Si ya habia una cassette colocada, presione TAPE para empezar a reproducer.
REPRODUCTION DE LA CIIVTA Antes de girar la Have de encendido a OFF Nose olvide de expulsar la cassette del aparato antes de girar la Have de encendido a OFF. De 10 contrario el aparato puede daharse al soltar el panel delantero. Conmutacion de modos Cuando el aparato esta en el modo de radio y se coloca unacassette seconmutaautomaticamente al modo de reproduction de cinta. Para evitar problemas con la cinta Antes de colocar una cassette en el aparato, verifique que no haya flojedad en la cinta.
Boton MUTE Presione este boton para bajartemporalmente et volumen. Vuelva a presionar para volver al volumen anterior. Se puede disfrutar de una mkica de graves fuertes. con un sonido H-BASS CONEXION DE UN TOCADISCOS DE DISCOS COMPACTOS/ MINIDISCOS PORTATIL U OTRO EQUIPO Este aparato tiene una toma entrada a nivel de Iinea (CD/MD IN) que permite una altacalidad de sonido. 1 Presione H-BASS para obtener graves mas potentes. Se enciende el indicador” wSS”.
MANTENIMIENTO ESPECIFICACIONES Limpieza del panel delantero Cuando el panel delantero esta sucio, Iimpie la superficie del panel con un paiio suave y seco. SECCION DE LA RADIO Limpieza de Ias cabezas de cintas Utilice una cassette de Iimpieza para Iimpiar la cabeza de reproduction y Ios cabrestantes aproximadamente una vez al roes. Si la cabeza de reproduction estuviera sucia, Ios tonos altos pueden no reproducirse correctamente.
Bienvenue Nous vous remercions d’avoir choisi ce produit AlWA. Pour optimiserses performances, veuillez hre attenhvement ce mode d’emploi. Outre ce mode d’emplol, veulllez~galement vous referer aux manuels d’installation et de connexion separes. PRECAUTIONS ATTENTION Les modifications ou ajustements a ce produit, non expressement approuvees par Ie fabricant, peuvent annulerledroit ou I’autoritede I’utilisateur a faire fonctionner ce produit.
TABLE DES MATIERES PANNEAU AVANT ........................................................ ...................................................................... 3 DETACHMENT ET FIXATION DU PANNEAU AVANT .................................................................... 4 REGLAGE DE LA TONALITE BIP ...................................................................................................... 5 REGLAGE DE L’HORLOGE .....................................................................................
PANNEAUAVANT Feni2!re d‘affichage b 8 @) Touche +/(contrijle audio) @ ToucfIe SEL (selection) @ Touche H-BASS @Touche EJECT 4 @ Logement de cassette @Touche DIRECTION 44/* @ Touche BAND @)Touche TAPE @Touche MUTE @TouchQ A-ME (m~merkation automatique/balayage de prereglage) @ Touche ~ (liberation) @Touche TUNE T/A @ Prise CD/MD IN (dis.
Fixation du panneau avant DETACHEMENTET FIXATION DU PANNEAU AVANT 2 1 T4moin de securite II est possible de detacher Ie panneau avant de I’appareil et de I’emporter quand on Iaisse la voiture saris surveillance. Utiliser Ie sac de transport fourni pour transporter Ie panneau avant hors de la voiture. Avant de detacher Ie panneau avant, retirer la cassette pour eviter tout dommage a I’appareil. 1 Presser PWR pour mettrel’appareil tension.
REGLAGE DE LA TONALITE BIP REGLAGE DE L’HORLOGE 3 Cet appareil est preregle A I’usine pour emettre un bip a chaque pression d’une touche sur Ie panneau avant, sauf ~, 4, ++ et W. Le bip peut &re supprime de la maniere suivante. 2,4 1 1 2 ~ L’appareil hors tension, presser simultanement 1 et 4. L’indication “BEEP apparalt. A chaque pression, cette fonction s’active ou se desactive.
BAND FUNCIONAMIENTO RADIO TAPE CD/MD IN DE LA 2 ,, Pwl TUNEVIA LO Para desconectar el aparato Presione PWR, 1 3 ~ PresionePWRpara conectarelaparato. Aparece la frecuencia de la radio. z Presione BAND para seleccionar la banda de entre FM1, FM2, FM3 y AM. Aparecen Ios indicadores de banda en ese orden y en ciclo. (FM1, FM2 y FM3 comparten la misma gama de frecuencias.
PREREGLAGEDES STATIONS II est possible de preregler manuellement des stations qui n’ont pas ete selectionnees pour la memorisation automatique. 2 12 3 1 2 Preseer BAND bande souhaitee et AM. Utiliser cette fonction pour preregler automatiquement jusqu’a 6 stations pourchacune des bandes FM1, FM2, FM3 et AM (total de 24 stations). ●Quand la memorisation automatique est terminee, la station prereglee clans 1CH est accordke. ● Presser une seconde fois A. ME pour arr&er la memorisation automatique.
1 FONCTION MES INFORMATIONS La radio peut 6tre activee par minuterie pour un programme radio par jour. L’appareil se met automatiquement sous et hors tension en mode radio aux heures prereglees. 2 1 Presser BAND pour selectionner la bande souhaitee parmi FM1, FM2, FM3 et AM. 2 Presser la touche de station prereglee souhaitee. Le numero de la touche de station prereglee s’affichera a cbte de I’indication de frequence.
F(NVC?WAIMES lNFORM/lT/OIVS BAND TAPE 6{8 4{7 CD/MDIN ~ 59 4 1 Presser SEL. L’indication radio clignote. lndicateur de bande 5 6 7 L’armareil sous tension, presser MY INFO. L’indicateur “MY INFO s’allume et la minuterie est activee. Pour annuler la minulerie Presser une seconde fois MY INFO de sorte que I’indicateur “MY INFO” s’eteigne. Preseer bande. Accorder preregler BAND pour la station avec TUNE selectionner la qu’on souhaite V ou TUNE A. Presser SEL.
Presser Ies touches suivantes transporl de la bande. LECTURE DE CASSETTE 2 I 1 Inserer une cassette pour demarrer la lecture. Si une cassette est deja inseree, presser TAPE pour demarrer la lecture.
LECTURED EC ASSETTE AJUSTEMENTS DU SON Avant la coupure du commutateur d’allumage Ejecter la cassette de I’appareil avant de couper Ie commutateur d’allumage. Sinon I’appareil pourra 6tre endommage au retrait du panneau avant. Commutation de modes Quandl’appareil esten mode radio, I’insertion d’une cassette commute automatiquement I’appareil au mode lecture de cassette. Pour r%iter Ies problemes de bande Avant d’inserer une cassette clans I’appareil, v~rifier que la bande est bien tendue.
II est possible dapprecier graves renforces. une musique avec des H-BASS RACCORDEMENT D’UN LECTEUR DE CD/MD PORTABLE OU D’UN AUTRE APPAREIL Cet appareil est equipe d’une prise d’entree (CD/ MD IN) de niveau de Iigne assurant un son de haute qualite. Presser H-BASS pour obtenir des graves puissants. L’indicateur” r-6A!3s” s’allume. La fonction est activee/desactivee a chaque pression de H-BASS. 4 23 1 Si une cassette est inseree, la retirer pour eviter tout dommage a I’appareil.
MAINTENANCE SPECIFICATIONS Nettoyagedu panneau avant SECTIONRADIO Quand la surface du panneau avant est sale, I’essuyer avec un chiffon doux et sec. (FM) Plage de frequencies: Nettoyagede la tr2tede lecture Utiliser une cassette de nettoyage pour nettoyer la t&e de lecture et Ies cabestans environ une fois par mois. Si la tete de lecture est sale, Ies tonalites aigues ne seront pas reproduites correctement.
8Z-KTG-903-01 981 OO9ATM-OX Printed in China AIWA CO,,LTD.