COMPACT dlll!m OIGITALAUDIO CT-X428M w sTEREo i2ARCASSEITE REf2EIVER RADIO-CASSEITE ESTEREOFONICO PARAAUTOMOVIL OWNER’S RECORD For your convenience, record the model number and serial number (you will rina ttiem on the right side of yourset) inthespace provided below. Please referto them when you contact your AIWA dealer in case of difficulty. Model No. ICT-X428M Serial No.
Welcome Thank you for your purchasing thisAIWA product. To optimize the performance of this unit, please read through this manual carefully. In addition to this operating instructions manual, be sure to refer to the separate installation and connections manuals as well. PRECAUTIONS This unit is designed to be operated on a 12-volt DC negative-ground electrical system only. ● To prevent short-circuiting, disconnect the negative car battery terminal until the unit has been mounted and connected completely.
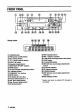
TABLE OF CONTENTS FRONT PANEL ................................................................................................................................... 3 DETACHING AND ATTACHING THE FRONT PANEL ...................................................................... 4 SElllNG THE CLOCK ....................................................................................................................... 5 RADIO OPERATION ...............................................................................
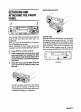
FRONTPANH. Display window OH-BASS button @ PWR (power onloff) button @)SEL (select) button @ +/(audio control) button @EJECT h button @Caeaette compartment @DIRECTION 44/> buttona @BAND button @)CD (CD Changer playlpauae) button* @~ (releaae) button @TtJNf2DIsC VIA buttons @MUTE button @CD IN jack (3.5-mm dia.) @Preset station buttons 1-6 @l 144 (back skip) button’ @WI (forward skip) button* @)lNT (intro) button’ 3 ENGLISH @REP (repeat) button* @REP 1 (repeat 1) button* @A.
Attachingthe trord panel DETACHING AND ATTACHING THE FRONT PANEL 2 You can detach the front panel from the unit and carry it with you when you leave your car unattended. When you carry the front panel out of your car, use the supplied earring case. Before detaching the front panel, remove the cassette to prevent possible damage to the unit. 1 Press PWR to turn the unit off. 2 While supporting the front panel with one hand, press $ to release one side of the panel.
RADIO OPERATION SETTING THE CLOCK 3 1,2 1 4 Switch the ignition to ACC. 2 With the unit off, press and hold down SELformorethan 1.5 seconds clock indication appears. ● until the If you do not proceed with step 3 within 5 seconds, the clock indication disappears. r ) TAPE CD You can turn the unit on by pressing any button except & =, + and ~ on the front panel. 1 Press BAND to turn the radio on. The radio frequency appears.
Note The unit turns on in the last selected mode when you turned off the unit with the exceptions of pressing the following buttons. ● Pressing TAPE turns on the unit in Tape Play mode. ● Pressing CD turns on the unit in CD Changer Play mode. ● Pressing BAND turns on the unit in Radio mode. PWR TUNE VIA 1 LO Press BAND to select a desired band from among F1 (FM1), F2 (FM2), F3 (FM3) and AM. Toturn the radio off Press PWR. The frequency indication goes off.
1 2 3 2 Press BAND to select a desired band from among FI (FM1), F2 (FM2), F3 (FM3) and AM. 1 Press BAND to select the bend from Press the desired twesetstation button. among F1 (FM1), F2 (FM2), F3 (FM3) and AM. The number of the-pressed preset station button appears next to the frequency indication. 2 Tune in the station that you wish to preset with TUNE Y or TUNE A. 3 Press one of the preset station buttons 1 to 6 for approximately 1.5 asconda.
MY INFORMATION SWITCH 4 Set the time you wish the unit to turn on in Radio mods. Press TUNE7 to set the hour. Press TUNEA to set the minutes. 5 Press SEL. You can timer-activate the radio for up to two daily radio programs. The unit turns on and off in Radio mode at the preset time automatically. The “BAND SEL” indication flashes. Press SEL again. Radio indication flashes., 1 Band indication 6 Press BAND to select the band. 7 Press SEL. The “FREQ indication flashes. Press SEL again.
MY INFORMATION SWITCH TAPE PLAYBACK 21 TAPE 1,3 i 2 I 1 If a cassette is already inserted, press TAPE to stari playback. Playback starts in the direction that the unit played back previously. With the unit turned off, press DRV for more than 1.5 seconds. The “PROGRAM display window. indication flashes in the z Press TUNE Y or TUNE A repeatedly until the “PROG ON” indication flashes. s Press DRV to turn the unit off.
When the end of the tape is reached during playback or fast tape transport, the direction of the tape is automatically reversed, and playback starts again. SOUND ADJUSTMENTS 12 Direction indications Fwfi D[splayed when the upper side of the cassette is being played. REV Displayed when the lower side of the cassette is being played.
SOllNDAPJUSTMENTS You can enjoy music with strong bass sound, MUTEbutton Pressthisbuttontotemporarilylowerthe volume. H-BASS Press it again to restore the previous volume. You can adjust the position of sound stage to best serve a particular seat just by pressing DRV. DRV Press H-BASS to obtain powerful bass. Each time you press H-BASS, the bass sound level changes as follows. OFF $ H-BASS 1 Deactivated i-OW EEEEH J H-BASS2 Press DRV to change the position of sound stage.
Toswltctfmottos CD CHANGER PLAY To turn off the unit, press PWR. Even if the unit is in Radio or Tape Play mode, pressing CD switches the unit to CD Changer Play mode, ● If you wish to switch to another mode, press the following buttons. - Pressing TAPE switches the unit to Tape Play mode, - Pressing BAND switches the unit to Radio mode. ● ● You can play CDs with this unit by connecting the optional AIWA ADC-M55, ADC-M35 compact disc changer.
CONNECTING A PORTABLE CD PLAYER OR OTHER EQUIPMENT This unit is equipped with the line-level input (CD IN) jack enabling high quality of the sound. SETTING THE BEEP TONE The unit is preset at the factory to beep each time you press any button on the front panel except OPEN. You can stop beeping by following the procedure below. 31 2 1 If a cassette is inserted, remove it to prevent possible damage to the unit. 2 Connect a portable CD player, etc. via the CD IN jack (3.5-mm dia.) on the unit.
TROUBLESHOOTING Errorcodes In the followingcasesthe correspondingerror codeindicationappears.Followthesuggestions belowto solvethe problem. If the errorcode indicationdoesnotdisappear,consultan AIWA servicecenter. ERRORO1 The disc magazine is not properly ERROR02 ERROR03 ERROR04 ERROR05 inserted in the compact disc changer. Reinsert the magazine. Refer to the instruction manual for the compact cfkc changer. No discs are loaded in the disc magazine. Insert discs properly.
SPECIFICATIONS RADIOSECTION (FM) FrequencyRange: 87.5 MHz–108MHz (100-kHzsteps) 87.5 MHz-108 MHz ~O;-k steps) UsableSensitivity 50 dB Quieting Sensitivity: 17.