OPERATING INSTRUCTIONS INSTRUCCIONES DE MANEJO MODE D’EMPLOI FR-CD3000 UC CD CLOCK RADIO DISCO COMPACTO RELOJ RADIO OWNER’S RECORD WARNING TO REDUCE THE RISK OF FIRE OR ELECTRIC SHOCK, DO NOT EXPOSE THIS APPLIANCE TO RAIN OR MOISTURE. For your convenience, record the model number (you will find it on the bottom of the unit) and serial number (you will find it in the battery compartment) in the space provided below. Please refer to them when you contact your AIWA dealer in case of difficulty. Model No.
WARNING To reduce the risk of fire or electric shock, do not expose this appliance to rain or moisture. CAUTION RISK OF ELECTRIC SHOCK DO NOT OPEN “CAUTION:TO REDUCE THE RISK OF ELECTRIC SHOCK, DO NOT REMOVE COVER (OR BACK). NO USER-SERVICEABLE PARTS INSIDE. REFER SERVICING TO QUALIFIED SERVICE PERSONNEL.” IMPORTANT SAFETY INSTRUCTIONS English Read the Operating Instructions carefully and completely before operating the unit. Be sure to keep the Operating Instructions for future reference.
IMPORTANT SAFETY INSTRUCTIONS Para reducir el riesgo de incendios o de descargas eléctricas, no exponga esta unidad a la lluvia ni a la humedad. Accessories — Do not place this unit on an unstable cart, stand, tripod, bracket, or table. The unit may fall, causing serious injury to a child or an adult, and serious damage to the appliance. Use only with a cart, stand, tripod, bracket, or table recommended by the manufacturer, or sold with the unit.
ATTENTION IMPORTANT SAFETY INSTRUCTIONS Pour réduire les risques d’incendie ou de décharge électrique, ne pas exposer cet appareil à la pluie ou à l’humidité. Electric Power CAUTION RISK OF ELECTRIC SHOCK DO NOT OPEN “CAUTION:TO REDUCE THE RISK OF ELECTRIC SHOCK, DO NOT REMOVE COVER (OR BACK). NO USER-SERVICEABLE PARTS INSIDE. REFER SERVICING TO QUALIFIED SERVICE PERSONNEL.” Les symboles sont situés sur le dessous du coffret.
NOTE This equipment has been tested and found to comply with the limits for a Class B digital device, pursuant to Part 15 of the FCC Rules. These limits are designed to provide reasonable protection against harmful interference in a residential installation. This equipment generates, uses, and can radiate radio frequency energy and, if not installed and used in accordance with the instructions, may cause harmful interference to radio communications.
REMARQUE Cet appareil a été testé et jugé conforme aux limites des appareils numériques de Classe B, conformément à la Partie 15 des Règles FCC. Ces limites sont conçues pour fournir une protection raisonnable contre les interférences néfastes dans une installation résidentielle. Cet appareil produit, utilise et peut rayonner une énergie de fréquence radio et, s’il n’est pas installé et utilisé conformément aux instructions, peut provoquer des interférences gênantes pour les communications radio.
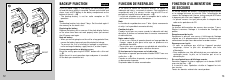
BACKUP FUNCTION A 6F22 B RESET 12 English FUNCION DE RESPALDO Español If the AC power supply is interrupted, the clock display goes off and the alarm setting is canceled. To back up the clock and alarm, insert a 6F22 battery in the battery compartment on the bottom of the unit. → A • The backup battery is not for radio reception or CD operation. Si se corta la fuente de corriente alterna, se apaga la indicación del reloj y se cancela la alarma.
SETTING THE CLOCK 1 BAND/ SUMMER TIME 3,4,5 2,3,4,5 English 1 Connect the AC power cord to a wall outlet a. The clock display begins flashing. If the clock is not displayed correctly, disconnect the AC cord and remove the backup battery if inserted. Then, connect the AC cord and insert the backup battery again. 2 Keep SET pressed for about 2 seconds. Day of the week starts flashing. 3 While day of the week flashes, press MDOWN or NUP to set day of the week, then press SET.
RADIO RECEPTION English Press POWER 6 STANDBY/ON to turn on the power. Press FUNCTION repeatedly until is displayed. Press BAND to select AM or FM. Press NUP or MDOWN to tune in to a station. The frequency display changes to the clock display after about 10 seconds. 5 Adjust the volume. 1 2 3 4 1 2 3 5 4 FM STEREO After listening, press POWER 6 STANDBY/ON to turn off the power. For quick tuning Keep either NUP or MDOWN pressed for 1-2 seconds. When a station is tuned in to, it stops automatically.
RADIO RECEPTION English RECEPCION DE LA RADIO Español RECEPTION RADIO Français FM AM 18 To display the frequency of the station while the clock is shown Press SNOOZE. The unit shows the frequency for about 10 seconds, and shows the clock again after that. Para que aparezca la frecuencia de la emisora mientras aparece el reloj Presione SNOOZE. La unidad muestra la frecuencia durante unos 10 segundos y después vuelve a mostrar el reloj.
PRESETTING STATIONS → A A 1 3 1 2,4 B Up to a total of 30 stations (20 stations for FM and 10 stations for AM) can be preset. 1 Tune in to a station (See page 16). 2 Press SET. CHANNEL appears and MEMORY flashes for about 5 seconds. 3 While MEMORY is flashing, press r or t to select the preset number. 4 While the desired preset number is displayed, press SET. To preset more stations, repeat the procedure from step 1.
CD PLAYING 2 1 6 5 3 4 STOP 22 SNOOZE English REPRODUCCION DE DISCOS COMPACTOS Español 1 Press OPEN to open the disc compartment. 2 Place a disc to the tray with the label side facing you, pressing the disc on the portion near the center so that the disc is securely locked. Close the disc compartment. 3 Press POWER 6 STANDBY/ON to turn on the power. 4 Press FUNCTION repeatedly until is displayed. a total number of tracks in the disc b total playback time of the disc 5 Press e PLAY/PAUSE.
CD PLAYING English PLAY/ PAUSE Note • The unit may not play a CD-R/RW disc that is recorded on personal computers or some kinds of CD-R/RW recorders because of differences in recording platforms. • Do not attach any sticker or label to either side (the recordable side or the labeled side) of a CD-R/RW disc. It may cause malfunction. REPEAT Repeat play RANDOM a B V b Press REPEAT repeatedly during playback to select repeat play as follows.
CD PLAYING 1 1 6 3 STOP 2,4 English LECTURE DE CD Français Reproducción programada Lecture programmée Up to 30 tracks can be programmed for program play. 1 Turn on the unit, place a disc and press FUNCTION to select CD. 2 Press SET. “MEMORY” starts flashing. 3 Select the desired track by pressing r or t. a track number b program number 4 Press SET. 5 Repeat steps 3 and 4 to program more tracks. 6 Press e PLAY/PAUSE to start program play. “MEMORY” stops flashing and remains lit.
CD PLAYING English To erase the program Press s STOP twice during program play, or press s STOP after program play has finished. Note • The program play is also erased when the disc compartment is opened. • When the 30 tracks are programmed, “FULL” appears and no more tracks can be added. • You cannot go back to the previous track by keeping r pressed during program play. • Repeat play can be performed during program play.
ALARM SETTING 2 1 3,4 2,3,4 30 English AJUSTE DE LA ALARMA Español REGLAGE DU REVEIL Français The radio, buzzer or CD automatically sounds at the designated time every day. You can set two different alarm times, one in ALARM 1 and one in ALARM 2. La radio, alarma o disco compacto suena automáticamente a la hora especificada todos los días. Se pueden ajustar dos horas de alarma diferentes, una en la ALARM 1 y otra en la ALARM 2.
ALARM SETTING POWER ALARM 2 A SNOOZE English REGLAGE DU REVEIL Français To set the alarm time in ALARM 2 Press ALARM 2 in step 1 on page 30. The alarm 2 indicator flashes (A), and follow the steps 2 to 4. Para ajustar la hora de la alarma en ALARM 2 Presione ALARM 2 en el paso 1 en la página 31. Destella el indicador de alarma 2 (A) y siga los pasos 2 a 4. Pour régler l’heure d’ALARM 2 Appuyez sur ALARM 2 à l’étape 1 de la page 31. L’indicateur d’alarme 2 clignote (A) et suivez les étapes 2 à 4.
ALARM SETTING B WEEKEND ALARM SKIP a V b c d 34 V V English AJUSTE DE LA ALARMA Español When the buzzer alarm is selected The buzzer starts to sound when the alarm time comes, and it becomes louder after about 10 seconds (alarm step-up function). Cuando se selecciona la alarma de campana La campana empieza a sonar cuando llega la hora de la alarma y se escucha más fuerte después de unos 10 segundos (función de ajuste de la alarma).
SLEEP TIMER SETTING English You can use the sleep timer to turn off the radio or to stop playing back a disc automatically after the specified time (up to 90 minutes). Operate during radio reception or CD playback. 1 Keep SLEEP pressed. SLEEP flashes in the display. While SLEEP is pressed the time changes as follows: SLEEP 2 Release the button when the time to turn off the power is displayed. To turn off the power in approximately 20 minutes, release the button when “20” is displayed.
SPECIFICATIONS Frequency range Antennas Tracking system Laser pickup D/A conversion Frequency response Power source Output Power consumption Speaker English FM: 87.5 – 108.
8C-RD3-901-01 020215AKK-O-AL Printed in Hong Kong