2-050-638-61 DVD Home Theatre System Operating Instructions AVJ-X33 © 2004 Sony Corporation
Safety Precautions WARNING: TO PREVENT FIRE OR ELECTRIC SHOCK HAZARD, DO NOT EXPOSE THIS PRODUCT TO RAIN OR MOISTURE. On power sources • AC power cord must be changed only at the qualified service shop. WARNING: Do not install this equipment in a confined space such as a book case or similar unit. On placement • Place the receiver in a location with adequate ventilation to prevent heat build-up in the system. • At high volume, over long periods of time, the cabinet becomes hot to the touch.
Safety Precautions (Continued) NOTES ON COPYRIGHTS: INTRODUCTION It is forbidden by law to copy, broadcast, show, broadcast via cable, play in public, or rent copyrighted material without permission. This product features the copy protection function developed by Macrovision. Copy protection signals are recorded on some discs. When recording and playing the pictures of these discs on a VCR, picture noise will appear.
Table of Contents Introduction Safety Precautions . . . . . . . . . . . . . . . . . . . . . . . . 2-3 Table of Contents . . . . . . . . . . . . . . . . . . . . . . . . . . 4 Before Use . . . . . . . . . . . . . . . . . . . . . . . . . . . . . . 5-6 Playable Discs . . . . . . . . . . . . . . . . . . . . . . . . . . . 5 Precautions . . . . . . . . . . . . . . . . . . . . . . . . . . . . . 6 Notes on Discs . . . . . . . . . . . . . . . . . . . . . . . . . . 6 About Symbols . . . . . . . . . . . . . . . . . . .
Before Use Playable Discs Title (DVD video discs only) The main film content or accompanying feature content or additional feature content, or music album. Each title is assigned a title reference number enabling you to locate it easily. DVD video discs (8 cm / 12 cm disc) Video CD (VCD) (8 cm / 12 cm disc) Audio CD (8 cm / 12 cm disc) In addition, this unit can play a DVD-R/-RW, SVCD and CD-R or CD-RW that contains audio titles, MP3, or JPEG files.
Before Use (Continued) Precautions Handling the unit When shipping the unit The original shipping carton and packing materials may come in handy. For maximum protection, re-pack the unit as it was originally packed at the factory. When setting up the unit The picture and sound of a nearby TV, VCR, or radio may be disturbed during playback. In this case, position the unit away from the TV, VCR, or radio, or turn off the unit after removing the disc. Storing discs After playing, store the disc in its case.
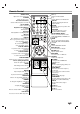
Front Panel Controls @ / 1 (POWER) indicator Switches the DVD Receiver ON and OFF. x) STOP (x Stops playback of a disc. STANDBY indicator Lights red when the receiver is in Standby mode (off). INTRODUCTION X) PAUSE (X Pause playback of a disc temporarily. PLAY (N) To play back a disc. Disc Tray Insert a disc here. OPEN/CLOSE ( ) Opens or closes the disc tray. VOLUME Control Turn the knob clockwise to increase sound level, counterclockwise to decrease sound level.
Display Window Indicators Playing status. Repeat playback mode indicators. Indicates the unit is radio mode. Indicates the unit is stereo mode. Lights up when the DVD Receiver tunes in a station. CD disc inserted. MP3 disc inserted. VCD2.0 disc inserted. SLEEP timer indication DISC TUNED CD REP 1 AM FM ST MONO BASS TITLE CHAP TRK MP3 PBC DIGITAL SLEEP PRO LOGIC II Indicates sound format is DOLBY PROLOGIC II. Indicate current surround format. Lights up when the unit is BASS ON mode.
Remote Control OPEN/CLOSE TV @ / 1 Opens and closes the disc tray. Switches TV ON and OFF. TV/VIDEO Switches DVD Receiver ON and OFF. DISPLAY 0-9 numerical buttons 1 2 3 To display remaining time between Chapter and title. 4 5 6 Momentarily silence the speaker of the DVD Receiver. 7 8 9 Selects numbered options in a menu. >10/ TV ENTER Used to control TV. Playback Control Buttons H (PLAY) Starts playback. X (PAUSE) Pause playback or recording temporarily.
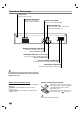
Rear Panel Connections AC Power Cord Plug into the power source. SPEAKER CONNECTORS Connect the six supplied speakers to these terminals. MONITOR OUT (VIDEO) Connect to a TV with video input. VIDEO (AUDIO IN L/R) Connect the audio output of an external source (VCR, LD player, etc). 8 8 8 8 8 MONITOR S VIDEO OUT (DVD ONLY) Connect to a S Video Input on TV. FOR DVD VIEWING ONLY. COMPONENT VIDEO OUT (Y PB/CB PR/CR) Connect to a TV with Y PB/CB PR/CR inputs. FOR DVD VIEWING ONLY.
Connections Connecting to a TV Make one of the following connections, depending on the capabilities of your existing equipment. PREPARATION Tips Depending on your TV and other equipment you wish to connect, there are various ways you could connect the DVD Receiver. Use one of the connections described below. Please refer to the manuals of your TV, VCR or other devices as necessary to make the best connections. – Make sure the DVD Receiver is connected directly to the TV.
Connections (Continued) Connecting to External Equipment (not supplied) 8 8 8 8 8 Connection Tip Connect the VIDEO (AUDIO R/L) jacks on the DVD Receiver to the AUDIO OUTPUT (L/R) jacks on the VCR, LD player, etc using the audio cables. Press FUNCTION on the remote control to select input to these jacks. VIDEO appears on the Display Window.
Connections (Continued) Connect the supplied FM/AM antenna for listening to the radio. Connect the AM Loop antenna to the AM LOOP connector. Connect the FM antenna to the FM 75 Ω connector. When you connect the supplied AM Loop antenna, connect the black cord (B) to the cord (A) to the other terminal. terminal, and the white AM Loop antenna (supplied) FM antenna (supplied) A B 8 8 8 8 8 Notes To prevent noise pickup, keep the AM Loop antenna away from the DVD Receiver and other components.
Connections (Continued) Speaker System Connection Connect the speakers using the supplied speaker cords. To obtain the best possible surround sound, adjust the speaker parameters (volume, distance, etc.). Front speaker (Right) 8 8 Surround speaker (Right surround) Front speaker (Left) Centre speaker 8 8 8 Surround speaker (Left surround) Subwoofer Notes Be sure to match the speaker cable to the appropriate terminal on the components: + to + and – to –.
Connections (Continued) In the case of normal position use the 6 speakers (2 front speakers, centre speaker, 2 surround speakers and subwoofer). • Front speakers According to your listening position set up the speakers for equal distance. And by hearing position set up the interval between speakers to 45 degree. • Centre speaker The centre speakers and front speakers are ideally the same height. But normally place it above or below the television.
Selecting the Output/Input Source Follow these guidelines to select and switch among the various DVD Receiver input and output sources: • CD/DVD To view output from the DVD: Press FUNCTION on the remote. The “CD/DVD” appears in the Display Window. • TUNER FM/AM To listen to AM/FM radio broadcasts: Press TUNER/BAND to toggle between AM and FM radio. The selected frequency appears in the display window.
Before Operation DTS Allows you to enjoy 5.1(or 6) discrete channels of high quality digital audio from DTS program sources such as discs, DVD and compact discs, etc.bearing the trademark. DTS Digital Surround delivers up to 6 channels of transparent audio(which means identical to the original masters) and results in exceptional clarity throughout a true 360 degree sound field. The term DTS is a trademark of DTS Technology, LLC. Manufactured under license from DTS Technology, LLC.
Before Operation (Continued) General Explanation Temporary Feedback Field Icons This manual gives basic instructions for operating the DVD Receiver. Some DVDs require specific operation or allow only limited operation during playback. When this occurs, the symbol appears on the TV screen, indicating that the operation is not permitted by the DVD Receiver or is not available on the disc.
Before Operation (Continued) Menu Language You can set your personal preferences on the DVD function mode. Select a language for the Setup menu. This is the menu you see when you press DVD SETUP. Disc Audio Original Disc Subtitle English Disc Menu French Rating German Area Code Spanish TV Aspect Italian Menu Language Dutch PREPARATION Initial Settings Polish Hungarian 5.1 Speaker Setup Other — — — — Others General Operation 1 2 3 4 5 TV Aspect Press DVD SETUP.
Before Operation (Continued) Speaker Setup 5.1 Speaker settings Others DVD Select speaker settings, including volume balance and distance, or test the speaker settings. Speaker settings are only active on the Analog MultiChannel Output. (See “Speaker Setup”, page 29.) Disc Audio DRC Off Disc Subtitle PBC On Disc Menu Disc Audio Rating Disc Subtitle Disc Menu The DRC and PBC settings can be changed. Press V/v to select the desired item and press ENTER.
Before Operation (Continued) Parental Control Area Code Rating Enter the code of an area whose standards were used to rate the DVD video disc, referring to the list (See “Area Code List”, page 35.). Movies on DVDs may contain scenes not suitable for children. Therefore, discs may contain Parental Control information that applies to the complete disc or to certain scenes on the disc. These scenes are rated from 1 to 8, and alternatively, more suitable scenes are available for selection on some discs.
DVD and Video CD Operation Playing a DVD and Video CD Tip Playback Setup To play from the beginning of the disc, press x twice, then press H (PLAY). DVD VCD2.0 VCD1.1 Turn on the TV and select the video input source connected to the DVD Receiver. Set the Output Source to CD/DVD as shown in Selecting the Output/Input Source on page 16. Z to open the disc tray. 1 Press a disc on the tray, with the label facing up.
DVD and Video CD Operation (Continued) Slow Motion DVD VCD2.0 VCD1.1 1 Press X (PAUSE) during playback. The DVD Receiver will now go into PAUSE mode. 2 Press SLOW t or T during pause mode. The DVD Receiver will enter SLOW mode. Notes On a Video CD with PBC, you must set PBC to Off on the setup menu to use the Repeat function. See page 20. When you press PREV twice or NEXT during Repeat mode to go to previous track or next track, repeat mode (Chapter repeat and Track repeat only) is canceled.
DVD and Video CD Operation (Continued) General Features (Continued) Special DVD Features Checking the contents of DVD Video discs: Menus A DVD is divided into a lot of sections, which make up a picture or music feature. These sections are called “titles.” When you play a DVD which contains several titles, you can select the title you want using DVD TOP MENU. When you play DVDs that allow you to select items such as the language for the sound, select these items using DVD MENU.
Playing an Audio CD and MP3 Notes on MP3 Files Disc About MP3 CD MP3 The DVD Receiver can play MP3 formatted recordings on CD-ROM, CD-R or CD-RW discs. Before playing MP3 disc, read the notes on MP3 files on right. Insert a disc and close the tray. Audio CD: Audio CD menu appears on the TV screen go to step 4. MP3 disc: The MP3/JPEG select menu appears on the TV screen. Go to step 2 1 JPEG Use V/v to select the MP3 then press ENTER. The MP3 disc Menu appears on the TV screen.
Audio CD and MP3 Disc Operation (Continued) Pause CD Repeat MP3 CD MP3 1 Press X (PAUSE) during playback. 1 Press REPEAT when playing a disc. 2 To return to playback, press X (PAUSE) again or press H (PLAY). 2 Press REPEAT to select a desired repeat mode. The Repeat icon appears on the TV screen. TRACK Selecting Another Track CD ALL OFF MP3 If a disc has more than one track, you can move to another track as follows: Press .
JPEG File Operation JPEG This DVD Receiver can play discs with JPEG files. Before playing JPEG files, read the notes on JPEG Files on right. Insert a disc and close the tray. The MP3/JPEG select menu appears on the TV screen. 1 MP3 JPEG Selecting another Files Press . or > once while viewing a picture to advance to the next file or to the previous file. OPERATION Viewing JPEG Files on a Disc Still Picture 1 Press X (PAUSE) during slide show. The DVD Receiver will now go into PAUSE mode.
Programmed Playback VCD2.0 CD Programmed Playback with Audio CD and MP3 Disc The Program function enables you to store your favorite tracks from any disc in the DVD Receiver memory. Program can contain 30 tracks. Press PROGRAM to enter the Program Edit mode. 1 The mark will appear to the right of the word Program on the right side of the menu screen. Note Press PROGRAM to exit the Program Edit mode; the mark will disappear. VCD1.
Speaker Setup Disc Audio Disc Subtitle Disc Menu S S Rating Front L Area Code Volume TV Aspect Size Small Menu Language Distance 0.3 m 0 dB Test Return 5.1 Speaker Setup Others DVD SETUP. 1 Press The Setup menu appears. “5.1 Speaker Setup” using the V/v 2 Select buttons on the setup menu. While “5.1 Speaker Setup” is selected, 3 press b button. 4 Press b buttons to select the desired speaker. 5 Adjust options by using V/v/B/b buttons.
Additional Information Sleep Timer Setting Dimmer You can set the DVD Receiver to turn off automatically at a specified time. This function will change the brightness of the display window on the front panel during in power-on status. Press the DIMMER repeatedly. 1 Press SLEEP to set the desired sleep time. 2 Each time you press SLEEP the setting changes in the following order. SLEEP 90 →80 → 70 → 60→ 50 → 40 → 30 → 20 →10 → OFF The SLEEP indicator and sleep time appears in the display window.
Additional Information(Continued) 1 Load a karaoke disc. the MIC VOL control to the minimum 2 Set level to prevent acoustic feedback (e.g. a loud howling sound) before connecting the microphone. Connect a microphone to MIC socket. ( 3.5mm). 3 4 Press PLAY to start playback. MIC VOL control and then sing a 5 Adjust song. If you want to set KARAOKE option follow steps 6-8. KARAOKE during playback. 6 Press KARAOKE menu appears. 1/2 2 to adjust value of the item 8 Use selected.
Radio Operation Presetting the Radio stations Listening to the Radio You can preset 30 stations for FM and AM (MW). Before tuning, make sure that you have turned down the volume. Preset radio stations in the DVD Receiver’s memory first (see “Presetting radio stations” on the left). Press TUNER/BAND on the remote control until FM or AM (MW) appears in the display window. 1 then every time you press TUNER/BAND, 2 And FM and AM (MW) changes alternately.
Controlling the TV with the Supplied Remote You can control the sound level, input source, and power switch of your TV with the supplied remote. Controlling the TV By pressing You can TV @ / 1 TV/VIDEO Turn the TV on or off. Switch the TV’s input source between the TV and other input sources. TV CH +/- Scans up or down through memorized channels. TV VOL +/- Adjust the volume of the TV.
Language Code List Enter the appropriate code number for the initial settings “Disc Audio”, “Disc Subtitle” and/or “Disc Menu” (See page 19).
Area Code List Code AD AE AF AG AI AL AM AN AO AQ AR AS AT AU AW AZ BA BB BD BE BF BG BH BI BJ BM BN BO BR BS BT BV BW BY BZ CA CC CF CG CH CI CK CL CM CN CO CR CS CU CV CX CY CZ DE DJ DK DM DO DZ EC EE EG EH Area Andorra United Arab Emirates Afghanistan Antigua and Barbuda Anguilla Albania Armenia Netherlands Antilles Angola Antarctica Argentina American Samoa Austria Australia Aruba Azerbaidjan Bosnia-Herzegovina Barbados Bangladesh Belgium Burkina Faso Bulgaria Bahrain Burundi Benin Bermuda Brunei Darus
Troubleshooting Check the following guide for the possible cause of a problem before contacting service. Symptom Cause Correction No power. • The power cord is disconnected. • Plug the power cord securely into the wall outlet. The power is on, but the DVD Receiver does not work. • No disc is inserted. • Insert a disc. (Check that the DVD or, audio CD indicator in the DVD display is lit.) No picture. • The TV is not set to receive DVD signal output.
Troubleshooting (Continued ) Radio stations cannot be tuned in. The remote control does not work properly. Cause • The antenna is positioned or connected poorly. • Adjust the antennas and connect an external antenna if necessary. • The signal strength of the stations is too weak (when tuning in with automatic tuning). • Tune in the station manually. • No stations have been preset or preset stations have been cleared (when tuning by scanning preset stations). • Preset the stations (page 32).
Specification [General] Power supply Power consumption Mass External dimensions (W x H x D) Operating conditions Operating humidity Laser [Video] [CD/DVD] Emission duration Signal system Frequency response (audio) Signal-to-noise ratio (audio) Dynamic range (audio) Harmonic distortion (audio) Inputs Video output S VIDEO OUT [Amplifier] AM [MW] [Tuner] [FM] COMPONENT VIDEO OUT Tuning Range Intermediate Frequency Signal-to Noise Ratio Tuning Range Intermediate Frequency Stereo mode Surround mode (*
Sony Corporation Printed in China http://www.aiwa.