DVD STEREO SYSTEM SISTEMA ESTEREO DVD CHAINE STEREO AVEC LECTEUR DE DVD HT-DV90 OPERATING INSTRUCTIONS MANUAL DE INSTRUCCIONES MODE D’EMPLOI En (English) E (Español) F (Français) For assistance and information call toll free 1-800-BUY-AIWA (United States and Puerto Rico) 8B-AX2-903-11 011201BCK-U-AN U Downloaded From TheatreSystem-Manual.
ENGLISH PRECAUTIONS WARNING TO REDUCE THE RISK OF FIRE OR ELECTRIC SHOCK, DO NOT EXPOSE THIS APPLIANCE TO RAIN OR MOISTURE. CAUTION RISK OF ELECTRIC SHOCK DO NOT OPEN “CAUTION:TO REDUCE THE RISK OF ELECTRIC SHOCK, DO NOT REMOVE COVER (OR BACK). NO USER-SERVICEABLE PARTS INSIDE. REFER SERVICING TO QUALIFIED SERVICE PERSONNEL.” Read the Operating Instructions carefully and completely before operating the unit. Be sure to keep the Operating Instructions for future reference.
Electric Power Maintenance Power Sources - This unit should be operated only from the type of power source indicated on the marking label. If you are not sure of the type of power supply to your home, consult your appliance dealer or local power company . To operate unit on battery power , or other sources, refer to the operating instructions. Cleaning - Unplug this unit from the wall outlet before cleaning. Do not use liquid cleaners or aerosol cleaners. Use a damp cloth for cleaning.
TABLE OF CONTENTS PREPARATIONS CONNECTIONS .................................................................. 5 CONNECTING OTHER EQUIPMENT ................................ 7 REMOTE CONTROL ........................................................... 9 PARTS AND CONTROLS ................................................... 9 BEFORE OPERATION ...................................................... 12 PLAYING DVDS AND AUDIO CDS BEFORE USE ....................................................................
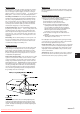
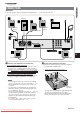
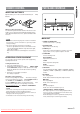
PREPARATIONS PREPARATIONS CONNECTIONS IMPORTANT Connect the speakers, antennas, and all optional equipment first. Then connect the AC cord. Subwoofer Surround speaker Surround speaker Center speaker En Front speaker Front speaker 1 Connect your television set to this unit. If your TV has an S-video input jack; Connect the S-VIDEO OUT jack of this unit to the S-video input jack of your TV with an optional S-video connecting cord.
• L&R: Front speakers • C: Center speaker Place it in the center of the two front speakers, possibly on or below the TV set. • LS&RS: Surround speakers Place them directly to the side of or slightly behind the listening area. Align them horizontally , preferably 0.6 to 1 meter above ear height. • SW: Subwoofer Place it anywhere between the two front speakers. NOTE • Do not place the left and right front speakers close to the TV set, as doing so may cause picture noise.
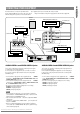
PREPARATIONS CONNECTING OTHER EQUIPMENT Besides the basic connections described earlier , other equipment can be connected to this unit as needed. Before making additional connections, be sure to turn of f the power and disconnect power supply for this unit and other equipment. Wall mounting of the speakers is also described here. Active subwoofer Video player/recorder, etc. to LINE IN jack MD recorder, etc. to LINE OUT jack to OPTICAL OUT jack to OPTICAL IN jack Video player, etc.
OPTICAL IN VIDEO 1/OPTICAL IN VIDEO 2 jack / OPTICAL OUT jack The OPTICAL IN VIDEO 1 jack and OPTICAL IN VIDEO 2 jack accept digital audio input from connected equipment. The OPTICAL OUT jack outputs digital audio signals to the connected equipment. Connect digital audio playback/recording equipment, such as an MD recorder , a DAT deck, or a CD-R deck, etc. with optional optical fiber cables.
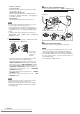
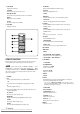
PREPARATIONS REMOTE CONTROL PARTS AND CONTROLS INSERTING BATTERIES Open the battery cover on the rear and insert two R03 (size batteries. AAA) When to replace the batteries The maximum operational distance between the remote control and the sensor on the main unit should be approximately 5 meters (16 ft.). When this distance decreases, replace the batteries with new ones.
7 TOP MENU Displays the title menu. RANDOM Enters random playback mode (CDs only). RETURN Returns to the previous menu screen. REPEAT Enters repeat playback mode. ikjl ENTER Selects the menu item and enters the selected item. SLEEP MENU Displays the menu for DVDs. MONO TU Switches between stereo or monaural FM reception. TITLE/CHP. Switches the display between title and chapter SETUP Enters the setup menu for DVDs. . 4 VIDEO 1 Selects VIDEO 1 function and the remote control goes to VIDEO 1 mode.
AUDIO Changes audio tracks (DVDs only). SUBTITLE Changes the subtitle language (DVDs only). ON SCREEN Displays the disc playback status on the TV screen. TV/VIDEO Switches between TV or VIDEO. DIGITAL/ANALOG When the function is VIDEO 1 or VIDEO 2, selects digital or analog input. 7 Audio signal type indicators Indicates the signal type of the current audio track. “PCM” lights up when playing back linear PCM audio signal. (MPEG audio signal is converted to linear PCM audio signal.
When VIDEO 1 or VIDEO 2 is selected with the remote control BEFORE OPERATION The active external audio source is selected by a combination of the VIDEO 1 or VIDEO 2 function button and the DIGITAL/ ANALOG button on the remote control. • Pressing VIDEO 1 selects either the OPTICAL IN VIDEO 1 jack (digital audio input) or the AUDIO VIDEO 1 IN jacks (analog audio input).
The descriptions in this section apply to all types of discs that can be played on this unit unless otherwise noted. REGION CODE OF THE DISC PLAYER AND DVDS This DVD player is designed and manufactured for playback of region “1” encoded DVD software. Region code appears on most DVD labels to indicate which type of player can play the disc. BEFORE USE 1 SUPPORTED DISC FORMATS This unit can play discs with the following logos.
COPYRIGHT PROTECTION It is forbidden by law to copy , broadcast, show , broadcast via cable, play in public, or rent copyright material without permission. This unit features the copy protection function developed by Macrovision. Copy protection signals are included in some DVD discs. If you record such discs on a VCR, picture noise will appear during recording and playback. This product incorporates copyright protection technology that is protected by method claims of certain U.S.
PLAYING DVDS AND AUDIO CDS • File extension A 3-character string added to a file name under W indows or DOS environment is called “file extension”. A file extension is used mainly to identify types of files. File extension for MP3 files is “.mp3”. BASIC OPERATIONS Notes on creating MP3 discs • When converting audio data to MP3 To enjoy high sound quality , we recommend storing MP3 files with a sampling frequency of 44.1 kHz and a fixed bit rate of 128 kbps.
DVDs: Playback starts automatically . If the menu is displayed, see “USING STOPPING AND PAUSING THE MENU”, below . To stop playback Press s. Playback stops. For DVDs, “RESUME” appears and the unit remembers the point at which playback stopped. Title number Elapsed time of current title To switch the number between title and chapter , press SHIFT+TITLE/CHP. With each press, title or chapter is displayed alternately . To resume playback from the point where it stopped (DVD only) Press c.
Besides the methods described here, discs can also be searched by title/chapter (DVDs), track (CDs) or time. See “ON SCREEN DISPLAY INFORMATION”, page 23. SKIPPING Press r or t during playback. With each press of t, the disc position skips to the succeeding tracks (CDs) or chapters (DVDs). When r is pressed once, the disc position skips back to the beginning of the current tracks (CDs) or chapters (DVDs).
FRAME ADVANCE AND SLOW PLAYBACK REPEAT PLAYBACK REPEAT PLAYBACK (DVD) FRAME ADVANCE (DVD ONLY) Press SHIFT+REPEAT repeatedly on the remote control during playback. With each press, the Repeat playback mode changes: CHAPTER: Repeats the current chapter . 1 Press a to pause the disc. 2 Press a repeatedly to advance frames. With each press, playback advances one frame. TV screen: CHAPTER REPEAT ON To return to normal playback Press c. NOTE There is no audio during Frame Advance.
Press SHIFT+REPEAT repeatedly on the remote control during playback. With each press, the Repeat playback mode changes: ONE: Repeats the current track. TV screen: Unit’ s display PLAYING DVDS AND AUDIO CDS REPEAT PLAYBACK (CDs) PROGRAMED PLAYBACK (CD ONLY) You can program up to 32 selected tracks to be played back in your desired order . If the total playing time of the program exceeds 99 minutes and 59 seconds, the playing time is not displayed properly .
To check the program Press i or k repeatedly during stop in programed playback mode. With each press, the track numbers appear in the order programed on the unit’ s display . RANDOM PLAYBACK (CD ONLY) All tracks on the disc can be played randomly . To clear the program Press C during stop in the programed playback mode. • The program is also cleared in the following cases. - The disc tray is opened. - The function is switched. - The power is turned of f.
SUBTITLES (DVD ONLY) You can also change the subtitle language if more than one is available. Operations for special features characteristic to DVDs are described here. Press SUBTITLE on the remote control repeatedly during playback to select the desired subtitle language. With each press, the subtitle will change. 1 ENG He’s having a great run today, Jim. ZOOM FUNCTION (DVD ONLY) OFF 2 FRE PLAYING DVDS AND AUDIO CDS SPECIAL DVD FEATURES Jim, lui, roule trés bien aujourd´ hui.
CHANGING AUDIO TRACKS (DVD ONLY) USING A TITLE MENU (DVD ONLY) Some DVDs have more than one audio tracks, such as soundtracks in dif ferent languages. You can change the audio track when playing such discs. Some DVDs have two or more titles and one of them can be selected. 1 Press TOP MENU during playback. Press AUDIO on the remote control during playback. With each press, the audio track will change. The title menu appears on the TV screen.
[DVD] Press j or l to select the desired item. The information of current disc is displayed on the TV screen and you can select title, chapter or audio language etc. Press ON SCREEN on the remote control during playback. 1 23 1 5 6 1 shows the title number . Press 0-9 to select the desired title and then press ENTER. 2 shows the chapter number . Press 0-9 to select the desired chapter and then press ENTER. 3 shows the elapsed playing time.
SURROUND PLAYBACK This unit comes equipped with a built-in Dolby Digital decoder, Dolby Pro Logic decoder and a DTS decoder. PLAYING WITH SURROUND SOUND With this unit’ s built-in Dolby Digital decoder , Dolby Pro Logic decoder , DTS decoder and the speaker system (the center , surround speaker units and the subwoofer supplied in addition to the left and right front speakers), Dolby Digital, Dolby Pro Logic, or DTS sources can be played back in full scale home theater sound.
SURROUND PLAYBACK SURROUND PLAYBACK MODE INDICATION SPEAKER SETTING The “ h DIGITAL”, “dts” and “ h PRO LOGIC” indicators show your present playback condition as follows; “h DIGITAL” indicator lights up... when a Dolby Digital source is played back. “dts” indicator lights up... when a DTS source is played back. “h PRO LOGIC” indicator lights up...
8 Press SHIFT+SP SETUP. ADJUSTING THE SPEAKER CHANNEL LEVEL The setting is completed. NOTE • When “F-SMALL” is selected, “SW -YES” is automatically set and cannot be changed. • “CENTER” and “SURROUND” cannot be set when STEREO mode is selected. (See “PLA YING WITH SURROUND SOUND”, page 24) Using a test signal, the sound level of all available channels should be adjusted so that the volume level from each speaker sounds equal. 1 Press SHIFT+SP SETUP. 2 Press i or k to select “TEST TONE”.
Your receiver can receive FM and AM radio broadcast. RADIO RECEPTION PRESET TUNING The unit can store up to 32 preset stations for each band (FM, AM). Presetting allows you to tune in to a station directly . 5 stations are preset with test frequency for each band. (factory setting) Automatic Presetting The tuner scans through the receivable frequency range and stores stations automatically . 1 Select the band. 2 Hold down SETa for 3 seconds. The tuner searches for a station.
SOUND AND TIMER ADJUSTMENTS ADJUSTMENTS ADJUSTING THE ANTENNAS FM antenna: Sound and timer adjustment are possible on this unit. SOUND ADJUSTMENTS Extend fully and position for the best possible reception. An outdoor antenna is recommended for better reception. See “CONNECTING AN OUTDOOR ANTENNA”, page 8. AM antenna: Position and rotate the antenna to find the best reception. Changing FM reception to monaural Press SHIFT+MONO TU on the remote control. “MONO” appears on the display .
OVERVIEW OF THE SETUP MENU 1 Play the Dolby Digital sound. There are 4 major menu items that can be adjusted. are as follows: See “PLA YING WITH SURROUND SOUND”, page 24. 2 Press SHIFT+MIDNIGHT repeatedly to select desired mode. [NIGHT MIN] Minimum dynamic range compression. Enjoy the full dynamic range of the sound track as experienced in a movie theater [NIGHT STD] Standard dynamic range compression recommended by the software producers when playing back at home. Default.
BASIC MENU OPERATIONS Basic operation of the SETUP MENU is described here. RATING Sets the rating limit allowed to playback on this unit when playing discs with restriction level encoding. To change the restriction level, you have to input the password. The default setting is “UNLOCK”. 1 Select “RATING” in the “SETUP MENU”. 2 Press ENTER. 3 Use 0-9 to input password. default: 1234 SETUP MENU RATING PASSWORD TV DISPLAY TV TYPE UNLOCK INPUT - - - 4:3 /LB NTSC PLEASE ENTER PASSWORD 4Press ENTER.
TV TYPE Sets the aspect ratio of the video signal sent to your connected TV set. Set “TV TYPE” according to the color system of the connected TV. SETUP MENU RATING PASSWORD TV DISPLAY TV TYPE SETUP MENU UNLOCK CHANGE 4:3 /LB NTSC RATING PASSWORD TV DISPLAY TV TYPE SET TV DISPLAY MODE The default setting is “4:3 /LB (letterbox)”. If you are connecting to a 16:9 (wide) ratio setting to “16:9 WIDE”.
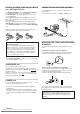
GENERAL Fingerprints and dust on the disc can cause poor picture quality and sound distortion. Before playing, clean the disc with a clean cloth. W ipe the disc from the center out. CARE AND MAINTENANCE HANDLING THE UNITS When shipping the unit The original shipping carton and packing materials come in handy For maximum protection, re-pack the units as it was originally packed at the factory . . When setting the unit The picture and sound of a nearby TV, VCR or radio may be distorted during DVD playback.
If the unit fails to perform as described in these Operating Instructions, check the following guide. RECEIVER GENERAL There is no sound. • Is the AC cord connected properly? • Is there a bad connection? ( ➞ pages 5 and 6) • There may be a short circuit in the speaker terminals. ➞ Disconnect the AC cord, then correct the speaker connections. • Was an incorrect function selected? • Was the MUTE button pressed? Sound is not heard from either of the front speakers.
SPECIFICATIONS Main unit HT-DV90 FM tuner section Tuning range 87.5 MHz to 108 MHz Usable sensitivity (IHF) 16.2 dBf Antenna jack 75 ohms (unbalanced) Usable sensitivity Antenna Power requirements Power consumption Power consumption in standby mode Dimensions (W x H x D) Weight 520 kHz to 1720 kHz (10 kHz step) 531 kHz to 1629 kHz (9 kHz step) 700 µV/m Loop antenna COLOR system Supported discs Amplifier section Power output Front Rated: 38 W + 38 W (40 Hz - 20 kHz, T.H.D.
APPENDIX/APÉNDICE/APPENDICE BRAND CODES/CÓDIGOS DE MARCAS/CODES DE MARQUE TV brand code/Código de marca de televisior/Codes de marque de televiseur Brand Marca Marque ABEX Code Código Code 272 ADMIRAL 101 AIWA 100 271 CXC 138 DAEWOO 104 105 FUNAI 138 279 146 IMA 138 FUTURETEC 138 INFINITY 162 GE 103 JBL 162 106 104 JC PENNY 104 AKAI 102 117 106 105 ALLERON 146 118 110 106 AMTRON 138 271 119 108 ANAM 111 ANAM NATIONAL AOC DAYTRON 104 121 122 145 106 122 1
122 162 156 151 169 158 179 174 104 255 180 175 105 256 182 177 106 154 283 107 284 110 103 119 271 MIDLAND 272 RCA 103 272 271 LOEWE 162 272 LUXMAN 104 281 104 120 LXI MAGNAVOX PHILIPS 106 MINUTZ 152 108 121 106 MITSUBISHI 104 112 135 149 105 119 156 162 106 162 185 172 119 169 198 185 122 174 199 262 151 175 200 281 179 176 201 104 180 186 202 106 181 187 210 108 182 188 221 119 210 189 279 162 221 230 281 169
TV brand code/Código de marca de televisior/Codes de marque de televiseur SEARS 106 175 146 112 176 152 124 177 162 135 188 169 138 283 174 146 284 175 104 SYMPHONIC 138 176 106 TATUNG 103 185 113 TECHNICS 154 187 119 TECHWOOD 104 188 146 106 219 148 154 220 149 SHARP TEKNIKA 104 105 166 106 105 172 108 106 185 112 209 113 210 138 247 262 146 253 280 176 254 281 182 104 205 106 270 271 112 129 TELECAPTION 217 211 TMK 104 106 212 2
APPENDIX/APÉNDICE/APPENDICE VCR brand code/Código de marca de videograbadora/Codes de marque de magnétoscope Brand Marca Marque ADMIRAL Code Código Code 531 ADVENTURA 426 AIWA 400 DAEWOO 515 418 417 520 458 GRADIENTE 426 511 428 HARLEY DAVIDSON 426 409 HARMAN KARDON 409 KLH 461 410 HARWOOD 461 KODAK 414 426 DBX 426 AKAI 415 523 533 DIMENSIA 412 HEADQUARTER 411 403 DYNATECH 426 HI-Q 423 421 404 ELECTROHOME 414 HITACHI 421 414 LG (GOLDSTAR) 409 429 455 418
VCR brand code/Código de marca de videograbadora/Codes de marque de magnétoscope 419 526 446 451 421 527 448 455 416 453 456 429 455 454 507 455 456 455 456 507 456 424 PENTAX 518 SHARP 417 520 462 429 466 PENTEX RESEARCH 418 482 431 467 PHILCO 421 483 494 469 462 484 495 470 463 486 496 421 487 531 472 462 488 473 496 489 456 474 524 490 461 465 471 PHILIPS SHINTOM 404 506 PILOT 414 491 513 PIONEER 410 494 SHOGUN 413 523 443 507
415 ZENITH 404 449 498 451 504 455 519 465 528 Code Código Code 702 746 493 703 783 506 704 784 516 705 785 413 706 788 414 709 789 UNITECH 413 753 790 VECTOR RESEARCH 409 700 791 TOTEVISION Brand Marca Marque ABC AIWA VIDEO CONCEPTS VIDEOSONIC WARDS 415 793 416 ANTRONIX 708 771 709 779 708 780 410 409 ARCHER LG (GOLDSTAR) 770 410 709 MAGNAVOX 725 415 710 MEMOREX 726 416 711 MOVIE TIME 702 513 CABLETENNA 708 413 CABLEVIEW 708 413 CENT
CABLE brand code/Código de marca de TV por cable/Code de marque de décodeur de télévision par câble 749 REGAL ZENITH 726 722 750 735 751 SAT brand code/Código de marca de TV por satélite/Code de marque de décodeur de télévision par satellite Brand Marca Marque CHAPPARAL Code Código Code 756 REGENCY 717 774 REMBRANDT 703 777 RUNCO 726 S.
NOTE REMARQUE This equipment has been tested and found to comply with the limits for a Class B digital device, pursuant to Part 15 of the FCC Rules. These limits are designed to provide reasonable protection against harmful interference in a residential installation. This equipment generates, uses, and can radiate radio frequency energy and, if not installed and used in accordance with the instructions, may cause harmful interference to radio communications.