For assistance and information, call toll free 1-800-BUY-AIWA.
7 WARNING TO REDUCE THE RISK OF FIRE OR ELECTRIC SHOCK, DO NOT EXPOSE THIS APPLIANCE TO RAIN OR MOISTURE. A . ● RISK OF ELECTRIC ~ 8 SHOCK DO NOT OPEN A ● “CAUTION:TO REDUCE THE RISK OF ELECTRIC SHOCK, DO NOT REMOVE COVER (OR BACK). NO USER-SERVICEABLE PARTS INSIDE. REFER SERVICING TO QUALIFIED SERVICE PERSONNEL.” .
w&wk4?&u&?bw@s@tk?#% Congratulations on your purchase of an Aiwa Stereo System. To optimize the performance of this system, please take the time to read through these Operating Instructions and become familiar with the operating procedures. TABLE OF CONTENTS PREPARATIONS PRECAUTIONS ................................................................... 1 CONNECTIONS 3 BEFORE OPERATION ........................................................ 4 . . . . . . . . . . . . . . . . . . . . . . . . . . . . . . . . . .
CONNECTIONS 2 Connect Connect terminals Before The connecting rated voltage 120 V AC, Check the supplied the FM antenna antennas. to the upper one of the FM ;75 Q and the AM antenna to the AM LOOP terminals. the AC cord of your unit shown that the rated voltage on the rear matches panel your II FM antenna is local AM antenna voltage. IMPORTANT Connect the speakers, antennas, and all optional first. Then connect the AC cord in the end.
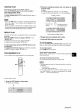
BEFORE OPERATION ADJUSTING THE SOUND 3-MODE EQUALIZER POWER - GEQ VOLUME 1> --- PHONES -- .–--+ - @ t= ADJUSTING THE VOLUME To turn the unit on Press the POWER button. Press the VOLUME control, Press the upper side to increase After use Press the POWER changes button to turn off the power. The volume level is shown to the PHONES jack with a stereo mini plug (03,5 mm, 1/8 inch). while the headphones are off.
Display PLAYING A CD in stop mode Music calender (only the first 16 tracks are displayed) Total rdavina time ,,” I Total number of tracks To start play when the power is off (Direct Play Function) Press the ➤11 button. The power is turned on and play of the loaded disc beains. If other than Cb play is selected with the power on, one press of the ➤11 button selects the CD function and starts play.
RANDOM PLAY 2 Press All the tracks on the disc can be played Press the RANDOM button program randomly. on the remote control random buttons and +10 button to track. Example: in To select the 12th track, press the +1 O and 2 buttons. stop mode to display “RAN”. Press the ➤1I button to start play. To cancel the numbered To select the 20th track, press the +1 O, +1 O and O buttons. play, press the RANDOM button again Program in number I stop mode.
PRESETTING MANUAL TUNING STATIONS ‘——————l P-SCAN 0–9,+1 o TUNER MODE The unit can store a total of 32 preset stations. Press the BAND button repeatedly desired band. 1 to select the or M button to select a station. 2 Press the SET button to store the station. Each time the button is pressed, the frequency changes. When a station is tuned in, “TUNE” is displayed for a moment. During FM stereo reception, “STEREO” is displayed.
RECORDING PLAYING A TAPE This section explains other external how to record from the tuner, CD player or equipment. ‘AND—————l u, Use only type I (normal) tapes 7 Press the WA button to open the cassette holder and insert a tape with the exposed side down. Push the cassette holder to close it. Preparation . Wind up the tape to the point recording starts. “ Note that recording is done on only one side of the tape. Use only type I (normal) tapes.
SETTING THE TIMER SETTING THE CLOCK <— u m— -m 1 c). .——---‘ When the AC cord is connected display flashes. Set the time for the first time, the time on the while the power is off. as follows The unit can be turned on at a specified time with the built-in timer. Preparation Make sure the clock is set correctly. 1 Press the SET button. The hour flashes. 1 Press the TIMER button on the remote control to display 0, and press the SET button within z seconds. O is displayed, and the hour flashes.
To check the specified time Press the TIMER time flashes activated ‘To cancel button on the remote for 2 seconds. However, control. The timer-on the duration SETTING THE SLEEP TIMER for the timer- period will not be displayed. timer Press the TIMER standby button mode temporarily on the remote control twice to turn off 0. 1 Using the unit while the timer is set You can use the unit normally after setting the timer.
CONNECTING EQUIPMENT CONNECTING CARE AND MAINTENANCE OPTIONAL Occasional care and maintenance are needed to optimize of the unit and the software the performance of your unit. To clean the cabinet TO AUX JACKS Use a soft and dry cloth. If the surfaces are moistened mild solvents, with such damage extremely detergent as alcohol, dirty, use a soft solution. benzine cloth lightly Do not use strong or thinner as these could the finish of the unit.
SPECIFICATIONS TROUBLESHOOTING Main If the unit fails unit FM tuner section Tuning range Antenna terminals Instructions, 87.5 MHz tO 108 MHz 75 ohms (unbalanced) section 530 kHz to 1710 kHz (10 kHz step) 531 kHz to 1602 kHz (9 kHz step) Loop antenna Antenna ● ● Was an incorrect 5W+5W(1 kHz, T.H.D. 10%,4 ohms) 3.5 W+ 3.5 W(100–15kHz, T.H. D.
7 ADVERTENCIA PARA REDUCIR EL RIESGO DE INCENDIOS O DESCARGAS ELECTRICAS, NO EXPONGA ESTE APARATO A LA LLUVIA NI A iA HUMEDAD. A ● RISK OF ELECTRIC SHOCK DO NOT OPEN ~ 8 A ● “CAUTION:TO REDUCE THE RISK OF ELECTRIC SHOCK, DO NOT REMOVE COVER (OR BACK). NO USER-SERVICEABLE PARTS INSIDE. REFER SERVICING TO QUALIFIED SERVICE PERSONNEL.
Enhorabuena por haber adquirido un sistema estereo Aiwa. Para optimizar la funcion de este sistema, por favor tomese el tiempo para leer estas Manual de Instrucciones y familiaricese con Ios procedimientos PREPARACIONES PRECAUCIONES .... ............................................................ 1 CONEXIONES ....... ............m.................................................3 ANTES DE LA OPERACION ..............................................4 de operation.
CONEXIONES 2 Conecte Ias antenas suministradas. Conecte la antena de FM a Ias terminals de AM a Ias terminals de AM LOOP. Antes de conectar el cable de alimentacion de CA FM 75 Q y la antena Antena de FM La tension nominal de su unidad indicada en el panel posterior es de 120V CA. Compruebe que esta tension coincide con la de la red local. Antena IMPORTANTE . Conecte primero Ios altavoces, antenas y todos Ios demas equipos ● D opcionales. Luego conecte el cable de alimentacion.
ANTES DE LA OPERACION AJUSTE DEL SONIDO 3-MODE EQUALIZER POWER GEQ VOLUME PHONES Para encender Presione la unidad AJUSTE DEL VOLUMEN el boton POWER. Presione el control VOLUME. Presione Despues del uso Presione el boton POWER para desconectar La pantalla pasara a ser la del reloj. El nivel Mientras a la toma PHONES Ios auriculares del volumen segundos. Uso de Ios auriculares Conecte Ios auricuiares estereo (a3.5 mm). el Iado mas alto para aumentar esten conectados (maximo).
DE UN DISCO REPRODUCTION COMPACTO Pantalla en modo de parada. Tiempo de reproduction Calendario de musics (solo se visualizaran Ias primeras 16 pistas) total I Numero total de pistas Para iniciar la reproduction cuando la alimentacion este desconectada (Funcion de Reproduction Directs) Presione el boton comenzara ➤11 La alimentacion la reproduction se conectara y del disco introducido.
REPRODUCTION Todas Ias pistas ALEATORIA del disco pueden 2 Presione reproducirse Ios botones numericos para programar una pista. de forma Ejemplo: aleatoria, Para seleccionar Presione el boton RANDOM del control remoto en el modo de parada para que se visualice “RAN”.
SINTONIZACION TUNER MODE 2- ..-_-.., —— [: 1 PREAJUSTE DE EMISORAS MANUAL Presione el boton BAND re~etidamente seleccionar la banda deseada. ~ara La unidad puede memorizar un total de 32 emisoras. Cuando se memoriza una emisora, a esa emisora se Ie asignara un ntimero de preajuste, Ufilice el numero de preajuste para sintonizar directamente una emisora preajustada. n’ 2 Presione el boton [<4 una emisora.
REPRODUCTION GRABACION DE UNA CINTA Esta seccion explica de CDs o desde como grabar desde la radio, el reproductor un equipo externo. U,B+ 2 L-II 3 Use unicamente cintas tipo I (normal) 1 Presione el boton 9/4 para abrir el portacasete e introduzca una cinta con el Iado expuesto hacia abajo. Empuje el portacasete para cerrarlo. Preparation o Bobine la cinta hasta el punto desde el cual va a comenzar la grabacion. ● Observe que la grabacion se realiza en una sola cara de la cinta.
AJUSTE DEL TEMPORIZADOR AJUSTE DEL RELOJ w Cuando se conecta por primers vez el cable de alimentacion Corriente Alterna, la hors parpadea en la pantalla. Configure este la hors como sigue mientras de La unidad memento puede encenderse cada dia automaticamente en el que se Ie especifique gracias al tempo rizador incorporado. la alimentacion desconectada. Preparation Asegurese 1 Presione el boton SET.
Comprobacion Presione durante del tiempo el boton 2 segundos se indicara, TIMER remoto. la hors de activation sin embargo, Para cancelar especificado en el control la duration el modo Parpadeara del temporizador. No del per~odo de activation. de standby AJUSTE DEL TEMPORIZADOR APAGADO DE dei temporizador temporalmente Presione dos veces el boton TIMER apagar 0.
CONEXION DE UN EQUIPO OPCIONAL CUIDADO Y MANTENIMIENTO El mantenimiento y cuidado ocasional de la unidad y del software resultan necesarios para optimizar el funcionamiento de su unidad. Para Iimpiar CONEXION A TOMAS AUX la caja Utilice un pafio suave y seco. Su Ias superficies estan muy sucias, utilice un pafro suave Iigeramente humedecido en una solution de detergence suave.
GUiA PARA LA SOLUCION PROBLEMAS ESPECIFICACIONES Unidad principal Seccion del sintonizador de FM Si la unidad no funciona como se describe Instrucciones, compruebe la gu[a siguiente: 87,5 MHz a 108 MHz 75 ohmios (asimetricos) Gama de sintonizacion Terminals de antena Seccion del sintonizador Gama de sintonizacion de AM 530 kHz a 1710 kHz (increments de 10 kHz) 531 kHz a 1602 kHz (increments de 9 kHz) Antena de cuadro Antena DE en este Manual de GENERALIDADES No hay sonido .
7 AVERTISSEMENT DE REDUIRE TOUT RISQUE D’INCENDIEOU DE DECHARGE ELECTRIQUE, vEILLE.Z A CE QUE cET APPAREILSOITA L’ABRI DE LA PLUIE ETDE L’HUMIDITE. AFIN A ● 8 RISK OF ELECTRIC ~ SHOCK DO NOT OPEN A ● “CAUTION:TO REDUCE THE RISK OF ELECTRIC SHOCK, DO NOT REMOVE COVER (OR BACK). NO USER-SERVICEABLE PARTS INSIDE. REFER SERVICING TO QUALIFIED SERVICE PERSONNEL.
TABLE DES MATIERES A%wwaa44wi&&tH2e#aa Nous vous felicitous d’avoir achete une chalne stereo AlWA. Afin d’optimiser Ie bon fonctionnement de cette chalne, prenez Ie temps de bien [ire ces instructions d’utilisation et devousfamiliariser avec Ies methodes d’utilisation. Verifiez votre chaine PREPARATIONS PRECAUTIONS ........... ........................................................ 1 coNNExloNs ....................................................................3 AVANT llUTILISATION ...................
CONNEXIONS 2 Connectez Connectez Ies antennes l’antenne fournies. FM aux bornes ‘FM 75 Q et I’antenne AM aux bornes ‘AM LOOP’. Avant de connecter Ie cordon secteur La tension nominale indiquee sur Ie panneau arriere de votre appareil est de 120V C.A. Verifiez si cette tension nominale correspond bien a la tension locale. Antenne FM Antenne IMPORTANT AM Connectez tout d’abord Ies haut-parleurs, Ies antennes et tout Ie materiel facultatif. Finissez par connecter Ie cordon secteur.
AVANT LWTILISATION REGLAGE DU SON 3-MODE POWER EQUALIZER GEQ VOLUME ‘I ..— ___._ _—. 1..__ —-. ~ PHONES Pour allumer Appuyez POWER. Appuyez sur la commande Appuyez Apres I’utilisation: VOLUME. sur Ie cbte Ie plus haut pour augmenter Ie volume e[ sur Ie plus bas pour Ie baisser. Appuyez sur la touche POWER pour eteindre L’affichage passe a I’indication de I’heure, Utilisation II RkGLAGE DU VOLUME I’appareil sur la touche (~~ du casque I’appareil.
LECTURE D’UN DISQUE COMPACT Affichage en mode d’arlret. Flepertoire des pistes (seules Ies 16 premieres pistes sent affichbes) Temps total de lecture ‘“”~ 0–9,+10 l!!’ !clllfi Nombre RANDOM REPEAT total de pistes Pour commencer (Fonction Appuyez ❑ II sur la touche compacts fois sur la touche disques DU DISQUE Appuyez Appuyez sur la touche de positon OPEN afin cf’ouvrir Ie compartment du disque. Placez un disqr.
LECTURE ALEATOIRE Toutes Ies pistes sur Ie disque peuvent ~tre Iues de fagon 2 Appuyez sur Ies touches nurm!riques et sur la touche +1 O pour programmer uine piste. Exemple aleatoire. Appuyez sur la touche en mode arret RANDOM afin que s’affiche de la telecommande RANDOM la 12eme piste, appuyez sur Ies touches la 20eme piste, appuyez deux fois sur la +10 et 2. “RAN”. Pour selectionner Appuyez sur la touche }11 pour que la lecture commence.
ACCORD MANUEL PREREGLAGE DES STATIONS ‘——————7 TUNER MODE 1 Appuyez plusieurs fois sur la touche BAND afin cle selectionner la bande desiree. FM dAM r directement 1 — 2 Appuyez sur la touche selectionner une station. 1++ ou WI afin de Chaque fois que vous appuyez sur la touche, la frequence change.
ENREGISTREMENT LECTURE D’UNE CASSETTE Cette section explique utilisant Ie syntoniseur, appareil externe comment effectuer Ie Iecteur un enregistrement de disques compacts en ou un -1 L[l Utilisez uniquement des cassettes type I (normal). 1~ 1 Appuyez sur la touche WA pour ouvrir Ie cornpartirnent de la cassette puis inserez la cassette avec Ie tote ouvert vers Ie has. Poussez sur Ie compartment de la cassette pour Ie referlmer. Preparation .
REGLAGE DE LA MINUTERIE RfGLAGEDEL’HORLOGE I 1 La Ipremiere clignote fois que Ie cordon secteur est branche, I’heure sur I’affichage. Reglez I’heure comme suit pendant que I’appareil L’appareil peut 6tre allume chaque grace a la minuterie incorporee. jour a une heure specifiee est eteint. Preparation Assurez-vous 1 Appuyez sur la touche SET. L’heure que I’horloge est reglee a la bonne heure. clignote.
Pour vtirifier Appuyez ,.. . speclflee I’heure surlatouche TIMER d’allumage par la minuterie Cependant, laduree sur Iatelecommande. clignote delaperiode pendant L’heure 2 secondes. deactivation par laminuterie REGLAGE DE LA MINLITERIE DE SOMMEIL * ne sera pas affichee, Pour arlnuler temporairement Ie mode d’attente de la minutwie Appuyez deux fois sur la touche pour eteindre 0.
CIDNNEXION D’UN APPAREIL OPTIONNEL SOINS ET ENTRETIEN Vous devez effectuer un entretien periodique de votre chalne Iet dLl Iogiciel afin d’optimiser Ieur bon fonctionnernent. Pour nettoyer Ie coffret Utilisez un chiffon doux et sec. Si Ies surfaces sent extr~mement sales, utilisez un chiffon doux Iegerement humecte d’une solution de detergent doux. N’utilisez pas de solvants forts tels que de I’alcool, de la benzine ou du diluanit car ils pourraient endommager la finition de I’appareil.
GUIDE DE DEPISTAGE DES D~FAUTS SPECIFICATIONS Unit6 ptincipale Partie syntoniseur Gamme cf’accord Bornes d’smtenne FM Partie syntoniseur Gamme ct’accord AM Si I’appareil d’utilisation, 87,5 MHz a 108 MHz 75 ohms (asymetriques) ne fonctionne pas comme decrit clans ces instructions consulfez Ie guide ci-dessous.
PARTS INDEX The parts on the main alphabetical order unit and remote with the pages each page for instructions control are listed on the right side. in Refer to about each part. INDICE DE LAS PARTES Las partes de la unidad principal y del control remoto se indican en orden alfabetico con sus paginas correspondientes en la columns de la derecha. ConsuIte cada pagina para conocer Ias instrucciones relacionadas con cada parte.