OPERATING INSTRUCTIONS INSTRUCCIONES DE MANEJO MODE D’EMPLOI MM-VX200 MP3 PLAYER REPRODUCTOR MP3 ENGLISH OWNER’S RECORD ESPAÑOL For your convenience, record the model number (you will find it on the rear of your set) and the serial number (you will find it in the cassette holder of your set) in the space provided below. Please refer them when you contact your Aiwa dealer in case of difficulty. FRANÇAIS Model No. Serial No. For assistance and information, call toll free 1-800-BUY-AIWA.
WARNING TABLE OF CONTENTS TO REDUCE THE RISK OF FIRE OR ELECTRIC SHOCK, DO NOT EXPOSE THIS APPLIANCE TO RAIN OR MOISTURE. Chapter 1 PREPARATION BEFORE USE Copyright Notices Under the copyright laws, neither the documentation nor the software for this product may be copied, photocopied, reproduced, translated, or reduced to any electronic medium or machine-readable form, in whole or in part, without the prior written consent of AIWA Co., Ltd. Copyright © 2000 AIWA Co., Ltd. All rights reserved.
2 Chapter 1 PREPARATION BEFORE USE 1 2 3 4 5 SYSTEM REQUIREMENTS . . . . . CONTENTS . . . . . . . . . . . . . . . . . PRECAUTIONS . . . . . . . . . . . . . . INSERTING A BATTERY . . . . . . . CONNECTING THE PLAYER TO YOUR PC . . . . . . . . . . . . . . . . . . . 6 SmartMedia-ID INSTALLATION . . . . 1 3 3 4 5 6 6 CONTENTS The following are supplied with this player. Check to be sure all the items are in the package.
3 PRECAUTIONS The following are precautions that you should always keep in mind.
4 INSERTING A BATTERY Battery indicator An alkaline battery is recommended for use with this player. The battery indicator on the display changes depending on the remaining power of the battery. 1 Open the cover of the battery compartment. Full → → → → → Empty Battery replacement Replace the battery when battery indicator lights. of the Note on dry cell battery 2 Insert a size AA (LR6) alkaline battery with the 0 and 9 marks correctly aligned, then close the cover.
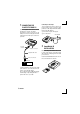
5 CONNECTING THE PLAYER TO YOUR PC Use the supplied USB cable to connect this player to your PC, as follows: Connect the series B connector to the USB port connector of the player and the other plug to the USB port connector of your PC. Series B connector USB port connector Series A connector USB port If a plug is already connected to the USB port connector of your PC, disconnect it before connecting this player.
To eject the SmartMedia-ID Use for data storage Slide the EJECT switch as follows. With up to 64MB memory, including 32MB in the SmartMedia-ID, you can store not only MP3 files but also any data files such as doc, gif, txt, bmp, wav, etc. files, as long as no file is larger than 32MB. Supplied label for SmartMedia-ID contact area write protect area index area You can paste the supplied protecting label on the write protect area on the SmartMedia-ID.
Chapter 2 SOFTWARE INSTALLATION VX200 Manager is communication software that allows your computer to share information with the player. In order for the player to work properly, the VX200 Manager software must be installed correctly under Windows 98. 1 INSTALLING THE VX200 MANAGER SOFTWARE . . . . . . . . 8 2 INSTALLING THE USB DRIVER . . . . . . . . . . . . . . . . . . . . 10 3 INSTALLING THE WAVE DRIVER (ADPCM Driver) . . . . . . . . . . . . . 10 4 UNINSTALLING THE VX200 MANAGER SOFTWARE . . . . . . .
3 Double-click on the VX200 Manager folder to open it. 4 The setup file for the VX200 Manager software is setup. Double-click on setup to start installation of VX200 Manager software. ENGLISH ENGLISH 1 In the Welcome! dialog box, click on the Next button to continue software installation.
2 INSTALLING THE USB DRIVER If the USB driver is not installed into your PC, you cannot download the MP3 files to the player. To install the USB driver, connect the player with the supplied USB cable and insert the supplied CD-ROM into the CDROM drive of your PC. 1 Click “Next” on the “Add New Hardware Wizard.” 2 Select “Search for best driver for your device” clicking the button of upper side and click “Next”. 3 Check CD-ROM drive and click “Next”. 4 Click “Next” according to the message.
4 UNINSTALLING THE VX200 MANAGER SOFTWARE To uninstall the VX200 Manager software, choose the /Start/Programs/Vx200/ Uninstall item from the Windows menu bar. This will remove all VX200 files and the VX200 folder. 5 UNINSTALLING THE WAVE DRIVER (ADPCM Driver) If you wish to uninstall the ADPCM Driver from your system, choose the /Start/ Programs/ADPCM Drivers/Uninstall ADPCM Drivers item from the Windows menu bar. This will automatically remove the ADPCM Wave Drivers from your PC.
Chapter 3 SOFTWARE OPERATION VX200 Manager is software that interacts with the player and a PC. MP3 files and data files can be downloaded to this player. However, you can upload only data files or recorded voice files to the PC. 1 OPENING VX200 MANAGER . . . 12 2 PREPARING MP3 FILES . . . . . . 12 3 OPERATING VX200 MANAGER . . 14 1 OPENING VX200 MANAGER Before you begin, make sure that the player is properly connected to the USB Port of your PC and the VX200 Manager software has been properly installed.
After installing the RealJukebox software, change the encoding options as follows.
3 OPERATING VX200 MANAGER 1 2 3 4 5 6 7 8 9 10 11 17 12 18 13 19 14 15 16 20 1 Option button 2 Firmware button The Option button brings up the Setup menu that allows you to specify the path for an MP3 player on your PC. You can also access the Setup dialog box from the Tools/Option menu. You need not use this button for usual operation. This button has a function for reprogramming the firmware.
4 List of File Type box The default file type argument *.mp3 can be used to display the MP3 files in the current folder. Select the file type argument *.wav to display WAV files. Select the file type argument *.* to display all types of files. 5–9 Cut, Copy, Paste, Delete, and Rename buttons These buttons work the same as those of Microsoft Windows Explorer. You can cut, copy, paste, delete, rename or move the files you select in the display list box (local display list box) of the PC.
Note 14 Delete button • VX200 Manager will not allow you to upload MP3 files from the player to your PC because of copyright considerations. Only data files and voice files can be uploaded to your PC. • If the player is turned off during a copy process on purpose or because of insufficient battery power, the transferred data might be corrupted. You might need to initialize the player. • You cannot upload any files during playback of voice recording.
To select multiple files MP3 file info • While holding the Ctrl key on the keyboard pressed, click on the desired files. If you click on a highlighted file, the file will be unselected. • If you click on a file while holding the Shift key pressed, the files between the first click and the release of the mouse button will be highlighted. • The total size of the selected files in the local display list box will be displayed below the list box.
Chapter 4 PLAYER OPERATION 1 PLAYER OVERVIEW . . . . . . . . . 18 2 DISPLAY OVERVIEW . . . . . . . . . 20 3 PLAYER OPERATION . . . . . . . . 21 This chapter provides an overview of the display and operation of the player. 1 PLAYER OVERVIEW Main unit 1 MP3 button Press to enter MP3 mode, in which you can play MP3 files. Press repeatedly to display the MP3 song information such as MPEG Type, Sampling Rate and Bit Rate. 2 \ jack Connect the supplied remote control.
9 VOLUME button Press to adjust the volume. The volume level ranges from 0 to 20. 0 VOICE button Press to enter Voice mode, in which you can create and play voice files. Press again to display the sampling frequency of the voice file for 3 seconds. ! ERASE button Press to erase the current MP3 or voice file. @ Built-in microphone Records your voice messages. # DC 3 V jack Connect the AC adaptor Aiwa AC-D302 (not supplied). $ e POWER ON button Keep pressed for 1 second to turn on the power.
2 DISPLAY OVERVIEW Display window 12 3 4 5 6 7 @ ! 0 1 Battery Indicator This displays the remaining battery power. 2 HOLD Icon This indicates that the HOLD switch is set to the HOLD position. 3 Playback mode Icon This indicates the selected playback mode. (No Icon) Normal Repeat Repeat All Random Random Repeat All 4 Segment Repeat (A-B) This indicates the specified location (a portion being repeated) of the currently playing file.
3 MP3 playback PLAYER OPERATION Turning the power on and off 2 1 \ 3 DTP POWER OFF HOLD POWER OFF POWER ON PLAY MODE 4 A-B HOLD POWER OFF DTP POWER OFF When operating with the remote control Press the e button. The power is turned on, and playback of MP3 files starts automatically. After use, press the s POWER OFF button to stop playback. The power is turned off automatically.
To select a preset equalizer Note Press the DTP button repeatedly to select a desired equalizer mode. Classic – Normal sound setting Rock – Optimized sound setting for Rock music Pop – Optimized sound setting for Pop music Jazz – Optimized sound setting for Jazz music You can specify a location to be repeated only in one MP3 file at a time. If the end of the current track is reached before you press the A-B button again, repeat playback is canceled automatically.
To playback a recorded voice message 1 POWER OFF \ Erasing Files 2,3 2 3 1 MP3 or voice files can be erased without using VX200 Manager. 1 Connect the supplied remote control to the \ jack of the player and connect the supplied headphones to the remote control. 2 Press the ERASE button. 2 Press the VOICE button to select voice file playback mode. 3 Press the ERASE button again to erase the current track. 3 Press the e button to start playback.
NOTE FOR USE IN THE U.S.A. This equipment has been tested and found to comply with the limits for a Class B digital device, pursuant to Part 15 of the FCC Rules. These limits are designed to provide reasonable protection against harmful interference in a residential installation. This equipment generates, uses, and can radiate radio frequency energy and, if not installed and used in accordance with the instructions, may cause harmful interference to radio communications.