OPERATING INSTRUCTIONS MANUAL DE INSTRUCCIONES MODE D'EMPLOI NSX-999 COMPACT DISC STEREO SYSTEM SISTEMA ESTEREOFONICO DE DISCO COMPACTO OWNER'S RECORD For your convenionco. record the model number and serial nuinbei (you will find them on the roar of your set) in the space provided below. Please refer to them when you contact your AIWA dealer in case of difficulty. COMPACT DISC STEREO CASSETTE RECEIVER RADIOCASSETTE COMPACTO ESTEREO CON DISCO CX-N999 u : NSX-999 U Sériai No.
FOREWORD Welcome to the Aiwa NSX-999 Congratulations on your purchase of an Aiwa Stereo System. To optimize the performance of this system, please take the time to read through these Operating Instructions and become fdmiliar with the operating procedures. About the layout of this manual This manual contains instructions in three languages ((g) English, (3) Spanish, (3) French) and illustrations ® -♦ □ .
PREFACIO PREFACE Bienvenido a Aiwa NSX-999 Aiwa vous souhaite ia bienvenue. Muchas gracias por su acertada compra del Sistema Estereofónico de Aiwa. Para obtener el óptimo funcionamiento de su sistema, sírvase leer detenidamente este manual instrucciones y familiarícese con los procedimientos de operación. Félicitations pour votre achat d’une chaîne stéréo Aiwa. La lecture de ce mode d’emploi vous permettra de maîtriser l’utilisation et d’optimiser les performances de cette chaîne.
TABLE OF CONTENTS FEATURES............................................................................. 6 PRECAUTIONS.......................................................................8 CONNECTIONS.......................................................... 10 CONNECTING THE SPEAKERS.................................... 10 CONNECTING THE AC CORD....................................... 10 ANTENNA CONNECTIONS............................................ 12 OTHER CONNECTIONS....................................
INDICE TABLE DES MATIERES CARACTERISTICAS.............................................................. 7 PRECAUCIONES....................................................................9 CARACTERISTIQUES............................................................7 PRECAUTIONS...................................................................... 9 CONEXIONES............................................................ 11 CONNEXIONS............................................................
FEATURES Three CD changer system Three compact discs can be placed in the disc compartment at the same time and played continuously. You can select any track on any of the discs, either directly or in programmed play. You can change two of the discs while the third is playing. DSP (Digital Signal Processor) system DSP circuits can recreate the effect of sounds reflected from walls or ceilings, to obtain the sound presence of real environments without the need to connect surround speakers.
CARACTERISTICAS CARACTERISTIQUES Sistema de cambiadiscos de tres discos compactos Système changeur à trois disques compacts Pueden colocarse al mismo tiempo tres discos compactos sobre el compartimiento de discos y reproducirse continuamente. Usted puede seleccionar cualquier canción de cualquier disco, directamente o en la reproducción programada. Además, puede cambiar los dos primeros discos durante la reproducción del tercer disco.
PRECAUTIONS Follow the advice below for safe and correct operation. On AC voltage Before use, check that the rated voltage of your system matches your local voltage. On placement • Do not use the system in places which are extremely hot, cold, dusty or humid. • Place the system on a flat, even surface. • Be careful not to obstruct the ventilation holes on the exterior of the unit, as increased internal temperature may affect the electric parts. In particular, do not place the system In an airtight rack.
PRECAUCIONES PRECAUTIONS Para obtener una operación segura y correcta, siga los consejos descritos a continuación. Prière de respecter les consignes suivantes pour une utilisation sûre et correcte. Voltaje de CA Tension du secteur Antes del uso, compruebe si ei voltaje nominal de su sistema coincide con el voltaje de su localidad. Avant l’utilisation, vérifier que la tension nominale de la chaîne correspond à celle du secteur.
CONNECTIONS CONNECTING THE SPEAKERS Connection □ The cords with white stripes should be connected to the ® terminals and other cords to the © terminals. 1 Connect the speaker cords to the speakers. 2 Connect the speaker cords with the unit. Connect the right speaker to the @ and © R terminals, and the left speaker to the @ and © L terminals. Then, shut the lever to lock. NOTE ' The speaker systems are magnetically shielded.
CONNEXIONS CONEXIONES CONEXION DE LOS ALTAVOCES CONNEXION DES ENCEINTES Conexión -► O Connexion -* 0 Los cables con las franjas blancas deberán conectarse a los terminales ®, y los otros cables a los terminales 0. 1 Conecte los cables de los altavoces a los altavoces. 2 Conecte los cables de los altavoces a la unidad. Conecte ei altavoz derecho a los terminales R ® y 9, y el altavoz izquierdo a ios terminaies L @ y 0. Luego, cierre las palancas para bloquear los cables.
CONNECTIONS ANTENNA CONNECTIONS mm CONNECTING THE SUPPLIED ANTENNAS Supplied antennas AM antenna, FM feeder antenna • AM antenna can be fixed. -> Q Connection -»0 FM: Connect the FM feeder antenna @ to the FM 75Q. terminals. AM: Connect the AM loop antenna (D to the AM LOOP terminals. Positioning each antenna • Extend the FM feeder antenna horizontally in a T-shape and attach the ends to the wall with the cellophane tape. • For AM reception, find the best position and fix this antenna vertically.
CONNEXIONS CONEXIONES CONEXION OE LAS ANTENAS CONNEXION DES ANTENNES ANTENNA CONEXION DE LAS ANTENAS SUMINISTRADAS Antenas suministradas Antena de AM, antena de línea de FM • Es posible fijar una antena de AM. -♦ Q Conexión -> □ FM: Conecte la antena de línea FM © a los terminales FM 75Q. AM: Conecte la antena de cuadro AM (2) a los terminales AM LOOP. Ubicación de cada antena • Extienda horizontalmente la antena de FM en forma de Ty fije sus extremos a la pared con cinta plástica.
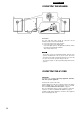
CONNECTIONS OTHER CONNECTIONS m Ü n ®// ®®// 1 1 Ui---------J 1 J>\ _____^ ili CONNECTING OPTIONAL EQUIPMENT □ VIDEO/AUX jacks This unit can input the sound signai through the VIDEO/AUX jacks. Use a cable with an RCA phono plug (not supplied) to connect equipment (turntables, LD players without digital output connec tors, VCRs, etc.) for audio playback. Connect the red plug to the R jack, and the white plug to the L jack of the VIDEO/AUX jacks.
CONNEXIONS CONEXIONES OTRAS CONEXIONES AUTRES CONNEXIONS I CONEXION DE EQUIPOS OPCIONALES -> □ CONNEXION D’UN APPAREIL OPTIONNEL □ Tomas VIDEO/AUX Esta unidad podrá introducir la señal del sonido a través de las tomas VIDEO/AUX. Use un cable con clavija Phono RCA (no suministrado) para conectar un equipo (tocadiscos, reproductor de discos compactos sin conectores de salida digital, videograbadora, etc.) para la reproducción de audio.
PREPARATIONS DEMO (DEMONSTRATION) MODE ...n_____ ! When you first connect the AC cord, the display window demon strates the unit’s preset functions. When the power is turned on, the DEMO display is hidden by the operation display. When the power is turned off, it is restored. ii“I'O DEMO- FH»--. "0 r, To cancel DEMO mode -» □ oQCiTg)cp •0r00 n... ■' h ■4 -> I-," Press the DEMO button. ........... To reenter DEMO mode Press the DEMO button again.
PREPARATIONS PREPARATIVOS MODO DEMO (DEMOSTRACION) MODE DEMO (DEMONSTRATION) Al conectar por primera vez el cordón CA, la ventanilla visualizadora muestra las funciones memorizadas del aparato. Cuando la alimentación está conectada, la indicación DEMO queda oculta por la visualización de operación. Se visualiza al desconectarse la alimentación. Quand on branche le cordon secteur, la fenêtre d’affichage montre les fonctions mémorisées de l’appareil.
PREPARATIONS BEFORE OPERATION r' 3^ SENSOR- DIRECT PLAY FUNCTIONS I, ' P ñ~T^. ooc )C33_. fi O o o --------- !I You can turn the unit on and start playback immediately by pressing one of the direct play buttons. To listen to the tuner, a tape, or discs loaded in the disc compart ment, you have only to press the TUNER/BAND button, the TAPE/ DECK 1/2 button or the CD button. NOTE Pressing the CD button or the TAPE/DECK 1/2 button during turning on the unit does not select direct play.
PREPARATIONS PREPARATIVOS A VANT L’UTILISA TION ANTES DE LA OPERACION FUNCIONES DE REPRODUCCION DIRECTA FONCTIONS DE LECTURE DIRECTE Usted podrá conectar la alimentación de la unidad e iniciar inmediatamente la reproducción presionando uno de los botones de reproducción directa. Para escuchar programas de radiodifusión, una cinta, o discos compactos cargados en el compartimiento de discos, solamente tendrá que presionar el botón TUNER/BAND, el botón TAPE/ DECK 1/2 o el botón CD.
PREPARATIONS SEHING THE CLOCK 1,3, ■clear 2,4 When you first connect the AC cord, the II SET button flashes to inform you that the current time needs to be set. Set the time as follows, while the power is still off. 1 Press the II SET button. The hour flashes. 2 Press the ◄◄ DOWN or ►► UP button to designate the hour. 3 Press the II SET button to set the hour. The hour stops flashing and the minute starts flashing. 4 Press the ◄◄ DOWN or ►► UP button to designate the minute.
PREPARATIVOS PREPARATIONS AJUSTE DEL RELOJ REGLAGE DE L’HORLOGE Al conectar el cordon CA, parpadea el botón II SET para informarle que la indicación horaria debe ajustarse. Ajuste la indicación horaria mientras que la alimentación esté desconectada. Quand on branche le cordon secteur, la touche II SET clignote pour signaler que l’heure courante doit être réglée. L’alimentation étant coupée, régler l’heure comme décrit ci-dessous. 1 Presione el botón II SET. 1 Appuyer sur la touche II SET.
ADJUSTING THE SOUND VOLUME 0 GEQ 1 !; PRGM =ferrrt-T-BASS ! ■... i i 1...'li-VOLUIVlE I Adjust the volume with the VOLUME control. Turn the control clockwise to increase the volume, and turn the control counterclockwise to decrease the volume. When using the remote control Press the VOLUME buttons. Pressing the /\ button increases the volume, and pressing the v button decreases the volume.
AJUSTE DEL SONIDO REGLAGE DU SON VOLUMEN -> □ VOLUME □ Ajuste el volumen con el control VOLUME. Gire el control hacia la derecha para aumentar el volumen, y hacia la izquierda para reducirlo. Régler le volume avec la commande VOLUME. Tourner la commande vers la droite pour monter le volume, ou vers la gauche pour le baisser. Cuando utilice el control remoto Quand on utiiise ia télécommande Presione los botones VOLUME.
THE GEQ (GRAPHIC EQUALIZER) PRESETTING AN EQUALIZATION CURVE MANUALLY □ GtQ MANU DSP PRGM 1 Press the PRGM/MANUAL button of the GEQ so that one of the GEQ M1 to M4 indicators in the dispiay is surrounded by red. 2 Press one of the CURSOR CONTROL buttons to display EQ ON. While EQ ON is displayed, go to next step. If DELAY is displayed, press the OFF button of the DSP. 3 Press the CURSOR CONTROL buttons to adjust the level of the frequency. ◄/►: A/T: To select the frequency To adjust the level .
SONIDO GEO (ECUAUZADOR GRAFICO) GEO (EGALISEUR GRAPHIQUE) MEMORIZACION MANUAL DE UNA CURVA DE ECUALIZACION □ PREREGLAGE MANUEL D’UNE COURBE D’EGALISATION B 1 Presione el botón PRGM/MANUAL del GEQ de forma que en el visualizador se rodee en rojo uno de los indicadores GEQ M1 a M4. 1 Appuyer sur la touche PRGM/MANUAL du GEQ de manière qu’un des indicateurs GEQ M1 à M4 sur l’affichage soit entouré de rouge. 2 Presione uno de los botones CURSOR CONTROL para hacer que se visualice EQ ON.
SOUND THE DSP (DIGITAL SIGNAL PROCESSOR) To cancel the selected DSP mode -* □ Press the OFF button of the DSP so that S-oFF is displayed. -DSP MANU When the music source is monaurai A simulated stereo effect can be obtained by selecting the LIVE and MOVIE modes. The other modes.keep the source monaural. PRESETTING A DSP SURROUND SOUND MANUALLY 1 Press the PRGM/MANUAL button of the DSP so that one of the DSP M1 to M4 indicators in the display Is surrounded by red.
SONIDO DSP (PROCESSEUR NUMERIQUE DE _________________________SIGNAUX) DSP (PROCESADOR DE SEÑAL DIGITAL) Para cancelar el modo del DSP seleccionado -» □ Pour annuler le mode DSP sélectionné -► □ Presione el botón OFF del DSP de forma que se visualice S-oFF. Appuyer sur la touche OFF du DSP de manière que S-oFF soit affiché. Cuando la fuente de música sea monoaural Usted podrá obtener un efecto estéreo seleccionando los modos UVE y MOVIE. Los otros modos mantendrán el sonido monoaural.
CD PLAYING BASIC OPERATIONS xc 2,4 ■DISC DIHECT PLAY 1 Press the CD button. CD is displayed. If you press the button with power off II The power is turned on and CD is displayed. If a disc is loaded, play begins without any need to press the ◄ ► button (direct play function). 5 2 Press the ±. OPEN/CLOSE button to open the disc compartment. 3 Load disc(s) with the iabei side up. © To play one or two discs Place the discs on trays 1 and 2.
REPRODUCCION DE DISCOS COMPACTOS LECTURE DE DISQUES COMPACTS OPERACIONES BASICAS OPERATIONS DE BASE 1 Presione el botón CD. 1 Appuyer sur la touche CD. Se visualizará CD. CD est affiché. Si presiona ei botón con ia alimentación desconectada Si on appuie sur ia touche quand i’appareii est hors tension La alimentación se conectará y se visualizará CD. Si hay un disco cargado, la reproducción se iniciará sin necesidad de presionar el botón (función de reproducción directa).
CD PLAYING BASIC OPERATIONS DISC DIRECT PLAY To check the remaining time Press the CD EDIT/REMAIN button during playback. The amount of time remaining until all tracks finish playing is displayed. To restore the play time display, press it again. When using the remote control, press the EDIT/REMAIN button. Searching for a particular point in a track You can locate a particular point in a track during play by monitoring fast forward sound or observing CD playing time in the display.
REPRODUCCION DE DISCOS COMPACTOS LECTURE DE DISQUES COMPACTS OPERACIONES BASICAS OPERATIONS DE BASE Para verificar el tiempo restante Pour vérifier le temps restant Presione el botón CD EDIT/REMAIN durante la reproducción. Se visualiza el tiempo que queda hasta que termine la reproducción de todas las canciones. Para restablecer a la indicación del tiempo de reproducción, presione otra vez el mismo botón. Cuando utilice el control remoto, presione el botón EDIT/REMAIN.
CD PLAYING SELECTING A TRACK DIRECTLY ■ REPEAT RANDOM- ii DISC — DIRECT PLAY You can select any track on any disc directly and begin play. H ■0-9.1-10 t □a iC . .oOoc 1 Press one of the DISC DIRECT PLAY buttons to select a disc. The selected disc is indicated in red in the display. 2 Press the numeric buttons and the -flO button on the remote control to select a track. Play begins with that track, and all the tracks on the disc will be played.
REPRODUCCION DE DISCOS COMPACTOS LECTURE DE DISQUES COMPACTS SELECCION DIRECTA DE UNA CANCION SELECTION DIRECTE D’UNE PLAGE Usted puede seleccionar directamente cualquier canción de cualquier disco e iniciar la reproducción. -> Q On peut sélectionner directement n’importe quelle plage de n’importe quel disque et commencer la lecture. -* H 1 1 Appuyer sur une des touches DISC DIRECT PLAY pour Presione uno de los botones DISC DIRECT PLAY para seleccionar un disco.
CD PLAYING PROGRAMMED PLAY The CD player has a built-in memory function that aiiows piay of up to 30 tracks over three discs in any order. 1 Press the PRGM button in stop mode. The PRGM indicator flashes in the dispiay. 2 Press one of the DISC DIRECT PLAY buttons to select a disc. The seiected disc is indicated in red in the display. Go to the next step when the tray stops rotating. 3 Press the numeric buttons and the +10 button to program a track.
REPRODUCCION DE DISCOS COMPACTOS LECTURE DE DISQUES COMPACTS REPRODUCCION PROGRAMADA LECTURE PROGRAMMEE El reproductor de discos compactos tiene una función de memoria que le permite reproducir hasta 30 canciones de tres discos en cualquier orden. Le lecteur de disques compacts possède une fonction de mémorisation qui permet la lecture d’un maximum de 30 plages de trois disques dans n’importe quel ordre. 1 Presione el botón PRGM en el modo de parada. El indicador PRGM parpadea en el visualizador.
TAPE PLAYBACK BASIC OPERATIONS On deck 1, tapes are always played back on both sides. On deck 2, you can select reverse mode to play back one or both sides. 4 3 1 Press the TAPE/ DECK 1/2 button. ■REV MODE TAPE is displayed. If you press the button with power off 2 The power is turned on and TAPE is dispiayed. If a tape is ioaded, piay begins without any need to press the ◄ ► button (direct piay function). 2 Open the cassette holder by pressing the EJECT ± mark and insert a tape exposed side down.
REPRODUCCION DE LA CINTA LECTURE DE CASSE J OPERACIONES BASICAS OPERATIONS DE BASE En el deck 1, las cintas se reproducen siempre en ambas caras. En el deck 2, usted podrá seleccionar el modo de inversión para reproducir una o ambas caras de la cinta. Sur la platine 1, les cassettes sont toujours lues sur les deux faces. Sur la platine 2, on peut sélectionner le mode d’inversion pour lire une face ou les deux. 1 Presione el botón TAPE/DECK 1/2. 1 Appuyer sur la touche TAPE/DECK 1/2.
TAPE PLAYBACK BASIC OPERATIONS To fast forward or rewind In stop mode, press the ◄◄ DOWN or ►► UP button. To stop fast fonward or rewind, press the ■ button. To Change the playback side During play or in pause mode, press the DIRECTION/ PRESET button. Each time the button is pressed, the piayback side changes. To set the selected tape counter to 0000 In stop mode, select a deck by pressing the TAPE/DECK1/2 button, then press the ■ CLEAR button. The selected counter is set to 0000.
LECTURE DE CASSETTES REPRODUCCION DE LA CINTA OPERATIONS DE BASE OPERACIONES BASICAS Para hacer avanzar rápidamente o reenrollar la cinta Pour obtenir une avance rapide ou un rebobinage En el modo de parada, presione el botón ◄◄ DOWN o ►► UP. Presione el ■ botón para detener la cinta. Dans le mode arrêt, appuyer sur la touche ◄◄ DOWN ou ►► UP. Pour arrêter l’avance rapide ou le rebobinage, appuyer sur la touche ■.
RADIO RECEPTION MANUAL TUNING 1 Press the TUNER/BAND button to select the band. Selected band is displayed. You can also select the tuner by pressing the button with the power off (di rect piay function). After the power comes on. press it again to select the band. C Press the station. FM DOWN or AM ;] UP button to select a Each time it is pressed, the frequency changes. When a station is received, TUNE is displayed for 2 seconds. During FM stereo reception, is displayed.
RECEPCION DE LA RADIO RECEPTION RADIO SINTONIZACION MANUAL ACCORO MANUEL 1 Presione el botón TUNER/BAND para seleccionar la banda. 1 Appuyer sur la touche TUNER/BAND pour sélectionner la gamme. La banda seleccionada se visualizará. Usted también podrá seleccionar el sintonizador presionando el botón con la alimentación desconectada (función de reproducción directa). Después de que se haya conectado la alimentación, vuelva a presionarlo para seleccionar la banda deseada.
RADIO RECEPTION TUNING IN TO A PRESET STATION 1 Press the TUNER/BAND button to select a band. 2 Press the button to select a preset number. Each press of the button selects the next highest number. ICLEAn DISPLAY @ Preset number (2) Frequency Selecting a preset number directly 1 Press the TUNEFi/BAND button to select a band. 2 Press the numeric buttons and the +10 button on the remote control to select a preset number. ES The selected preset station can be tuned.
RECEPCION DE LA RADIO RECEPTION RADIO SINTONIZACION DE UNA EMISORA MEMORIZADA ACCORD SUR UNE STATION MEMORISEE 1 Presione el botón TUNER/BAND para seleccionar una banda. 1 Appuyer sur ia touche TUNER/BAND pour séiectionner une gamme. 2 Presione el botón para seleccionar un número memorizado. 2 Appuyer sur ia touche pour séiectionner un numéro de prérégiage. Cada vez que se presione el botón ◄►se selecciona el siguiente número más alto. A chaque pression sur la touche ◄►.
OTHER SOURCES LISTENING TO OTHER SOURCES i’OWhH- 1 Press the VIDEO/AUX button. The power is turned on (direct piay function). 2 Play the external source. Refer to the operating instructions of the connected equipment. To change a source name in the display The source name in the display can be changed to VIDEO, AUX, or TV. □ With the power on, press the POWER button while pressing the VIDEO/AUX button. Repeat these steps until the desired source name is displayed.
OTRAS FUENTES AUTRES SOURCES ESCUCHA DE OTRAS FUENTES SONORAS ECOUTE D’AUTRES SOURCES 1 Presione el botón VIDEO/AUX. 1 Appuyer sur la touche VIDEO/AUX. Se conecta la alimentación (función de reproducción directa). 2 Reproduzca la fuente externa. Refiérase ai manual de instrucciones del equipo conectado. Para cambiar un nombre de la fuente sonora en el visualizador Ei nombre de la fuente en el visualizador puede cambiarse a VIDEO, AUX o TV.
RECORDING RECORDING FROM THE RADIO OR CONNECTED EQUIPMENT Preparation • Wind up the tape to the point where recording wiil start. • Use normal (type I) or CrOa (type n) tapes. 1 Insert the tape to be recorded on into deck 2. II 1 Press the EJECT ± mark to open the cassette holder. Insert the tape with the side to be recorded on first facing you and the exposed side down. Push the cassette holder to close it. 2 Set DOLBY NR. To record with DOLBY NR; Press the DOLBY NR button to turn on the Dolby NR.
GRABACION GRABACION DE LA RADIO O DEL EOUIPO CONECTADO ENREGISTREMENT ENREGISTREMENT A PARTIR DE LA RADIO OU DE L’APPAREIL CDNNECTE Preparación Préparation • Enrolle la cinta hasta su punto inicial. • Utilice cintas normales (tipo I) o CrOa (tipo II). • Bobiner la cassette jusqu’à l’endroit où on veut démarrer l’enregistrement. • Utiliser des cassettes normales (type I) ou Cr02 (type II). 1 Inserte el cassette que desea grabar en el deck 2. 1 Insérer la cassette à enregistrer dans la platine 2.
RECORDING RECORDING FROM TAPE TO TAPE MANUALLY Preparation • • Wind up the tape to the point where recording will start. (Note that recording is done only on one side of the tape.) Use normal (type I) or CrOs (type II) tapes. 1 Press the TAPE/DECK 1/2 button. If a tape is inserted When pressing the TAPE/DECK1/2 button with the power off, play begins by the direct play function. Press the ■ button to stop playback. 2 Insert the tape to be recorded on into deck 2.
ENREGISTREMENT GRABACION GRABACION DE CINTA A CINTA MANUALMENTE ENREGISTREMENT MANUEL DE CASSEHE A CASSEHE Preparación Préparation • • Bobiner la cassette jusqu’à l’endroit où on veut démarrer l’enregistrement. (Noter que l’enregistrement n’est fait que sur une face de la cassette.) • Utiliser des cassettes normales (type I) ou Cr02 (type II). • Enrolle la cinta hasta el punto de inicio de la grabación. (Tenga en cuenta que la grabación se realiza sólo en una cara de la cinta.) .
RECORDING DUBBING THE WHOLE TAPE When an original tape is dubbed onto another tape rated at the same recording time, the back side of the recording tape may not be an exact dupiicate of the back side of the original tape. This is because there are differences in actual recording times between tapes, since each tape has a bit more time than indicated on the iabei. This time varies with each brand. This unit’s STSD function ailows you to make exact copies of both sides of the original tape. .........
GRABACION ENREGISTREMENT COPIA DE LA CINTA COMPLETA DUPLICATION DE LA TOTALITE D’UNE CASSEHE Cuando la cinta original es copiada en una cinta del mismo tiempo de grabación, la cara inversa de la cinta de grabación puede que no corresponda a la cara inversa de la cinta original. Esto se debe a que existe diferencia en los tiempos de grabación entre las cintas, ya que cada cinta posee un cierto tiempo mayor que el indicado en su etiqueta. La longitud de la cinta varía según la marca.
RECORDING r RECORDING FROM A CD 1....- .f.. - .—......... Preparation 1 r. =■ r ■ ! ; 'i .f - -- • Wind up to the point where recording wiii start. • Use normal (type I) or Cr02 (type II) tapes. ■ 2 3 ------) 66 1 ...... 1 Insert the tape to be recorded on into deck 2. Press the EJECT ± . mark to open the cassette holder. Insert the tape with the side to be recorded on first facing you and the exposed side down. 2 Set DOLBY NR.
GRABACION GRABACION DE UN DISCO COMPACTO ENREGISTREMENT A PARTIR D’UN DISOUE COMPACT Preparación Préparation • Enrolle la cinta hasta el punto de inicio de la grabación. • Use cintas normales (tipo I) o Cr02 (tipo II). • Bobiner la cassette jusqu’à l’endroit où on veut démarrer l’enregistrement. • Utiliser des cassettes normales (type I) ou Cr02 (type II). 1 Inserte el cassette de cinta a grabarse en el deck 2. Presione la marca EJECT ± para abrir el portacassette.
RECORDING Al EDIT RECORDING The Al EDIT function lets you record CDs without worrying about tape lengths and track lengths. When yeu Insert a CD, the unit automatically calculates track lengths. If necessary; it rearranges the order of tracks, so that no track is cut short. 1 Insert the tape to be recorded on into deck 2 and set the Dolby NR. See steps 1 and 2 on page 52 “RECORDING FROM A CD’’. 2 Press the CD button and load discs onto the trays. 3 Press the CD EDIT/REMAIN button once.
GRABACION GRABACION CON EOlCION Al La función Al EDIT le permite grabar discos compactos sin que se preocupe de la duración de la cinta y de las canciones. Cuando inserte un disco compacto, el aparato calcula automáticamente la duración de las canciones. Si es necesario, acomoda el orden de las canciones para que no se produzca ningún corte de canción. 1 Inserte el cassette de cinta que desea grabar en el deck 2 y fije ei Doiby NR.
RECORDING T.U. Al EDIT RECORDING r: u To clear the edit program ■laU ■Wl: _____ JJH ■ i Before recording, press the ■ CLEAR button twice so that EDIT in the display goes out, or press the ± OPEN/CLOSE button. J CD EDIT/ REMAIN To check the edit program Before recording, press the CD EDIT/REMAIN button. The program for one side of the tape is displayed each time the button is pressed.
GRABACION ENREGISTREMENT ENREGISTREMENT AVEC MONTAGE ET CALCUL DU TEMPS GRABACION CON EDICION Al Para borrar el programa de edición Pour effacer le programme du montage Antes de la grabación, presione dos veces el botón ■ CLEAR de manera que se apague la indicación “EDIT”, o presione el botón ^ OPEN/CLOSE. Avant l’enregistrement, appuyer deux fois sur la touche ■ CLEAR de manière que EDIT disparaisse de l’affichage, ou appuyer sur la touche A OPEN/CLOSE.
RECORDING PROGRAMIVIED EDIT RECORDING This function lets you program tracks to be recorded from all of the discs in the CD compartment, in any order. The remaining time on each side of the tape is dispiayed as you program the tracks. 1 Insert the tape to be recorded on into deck 2 and set the Dolby NR. See steps 1 and 2 on page 52 “RECORDING FROM A CD”. 2 Press the CD button and load discs onto the trays. 3 Press the CD EDIT/REMAIN button twice. EDIT lights up and PRGM flashes in the display.
ENREGISTREMENT GRABACION GRABACION CON EOICION PROGRAMADA ENREGISTREMENT AVEC MONTAGE PROGRAMME Esta función le permite programar las canciones a grabarse de todos los discos contenidos en el compartimiento de discos, en cualquier orden. El tiempo remanente de cada cara de la cinta se visualiza cuando usted programa las canciones. Cette fonction permet de sélectionner, dans n’importe quei ordre, ies piages à enregistrer parmi tous les disques situés dans le compartiment.
RECORDING PROGRAMMED EDIT RECORDING 9 Program the tracks to be recorded on side B. After confirming 5 in the display, repeat steps 5 and 6 for side B. 10 10 Press the • REC/REC MUTE button to start record ing. The tape is rewound to the beginning of the front side, plays through the leader for 10 seconds, and then recording starts. When you use the remote control to start recording, first press the #/0 REC/REC MUTE button and then press the button within 2 seconds.
GRABACION ENREGISTREMENT GRABACION CON EDICION ENREGISTREMENT AVEC MONTAGE PROGRAMADA PROGRAMME 9 Programe las canciones a grabarse en la cara B. Después de confirmar ^ en el visualizador, repita los pasos 5 y 6 para la cara B. - 10 Presione el botón ' REC/REC MUTE para iniciar la grabación. La cinta se reenrolla al comienzo de la cara frontal, la porción extrema avanza por 10 segundos y luego inicia la grabación.
SEHING THE TIMER The unit can be turned on at the specified time every day by the buiit-in timer. You can aiso set timer recording from the radio orthe connected equipment. Preparation nUD i_) 0““Q Make sure the ciock is set correctiy. 1 ® Press the TIMER button on the remote control to select timer playback mode or timer record ing mode. Each time it is pressed, © or ^ is dispiayed.
TEMPORIZADOR MINUTERIE AJUSTE DEL TEMPORIZADOR REGLAGE DE LA MINUTERIE EI aparato puede encenderse a la hora especificada cada día mediante ei temporizador incorporado. Usted podrá fijar ei tiempo para ia grabación de ia radio o dei equipo conectado. Avec la minuterie intégrée, l’appareil peut être mis sous tension chaque jour à l’heure spécifiée. La minuterie peut également commander l’enregistrement à partir de la radio ou de l’appareil connecté.
SETTING THE TIMER 6 Adjust the volume and tone. 7 Press the POWER button to turn the unit off. Check whether © or ^ is displayed, and the function buttons turn off (timer standby mode). When the timer-on time is reached, the unit is turned on and play begins using the selected source. To cancel timer standby mode temporarily Press the TIMER button on the remote control so that © or ^ goes out in the display. To restore timer standby mode, press the TIMER button to display © or © .
TEMPORIZADOR REGLAGE DE LA MINUTERIE AJUSTE DEL TEMPORIZADOR 6 Ajuste el volumen y el tono. 7 Presione el botón POWER para desconectar la alimentación del aparato. Confirme que se visualiza ® 0 ^, y se apagan los botones de función (el modo de espera). Cuando llega la hora señalada, el aparato se enciende e Inicia la reproducción de la fuente SGiGcoionada. Para cancelar temporalmente el modo de espera del temporizador 6 Régler le volume et la tonalité.
KARAOKE MICROPHONE MIXING _. Up to two microphones can be connected to this unit, ailowing you to sing aiong to music sources. Use a microphone with a mini (e3.5 mm/Ve inches) piug. .... 4# ::i ■niGITAI. FCHO ■ '7' S JJ.' I t * - 4 —a-T ------^1 ■I M MIO bCHO- Before connecting a microphone Set the MIC MIXING control to MIN. ttJt 11 Connect your microphone(s) to the MIC jack(s). . —'■ ; ^ * 2 source to be mixed, and play It. 3 Adjust the volume and tone of the source.
KARAOKE KARAOKE MEZCLA DE MICROFONO MIXAGE AVEC MICROPHONE Usted puede conectar a este aparato hasta dos micrófonos para cantar junto con una fuente musical. Utilice un micrófono con mini-clavija (03,5 mm). Pour chanter avec accompagnement par une source musicale, on peut brancher jusqu’à deux microphones à cet appareil. Utiliser un microphone à mini-fiche (3,5 mm 0). Antes de conectar un micrófono Ajuste el control MIC MIXING a la posición MIN. 1 Conecte su(s) micrófono(s) a la(s) toma(s) MIC.
KARAOKE USEFUL FUNCTIONS FOR KARAOKE This unit is equipped with the following Karaoke functions. VOCAL FADER function MULTIPLEX function KARAOKf----------i----- • Recording with the KARAOKE functions You can record while using these functions. See page 48 or 52. After using the Karaoke functions Cancel them to return to normal sound. NOTE While the Karaoke functions are on, the sound source is heard as monaural, even if it is recorded in stereo.
KARAOKE KARAOKE FUNCIONES UTILES PARA KARAOKE FONCTIONS UTILES POUR KARAOKE Este aparato está equipado con las siguientes funciones de Karaoke. Función de VOCAL FADER Función de MULTIPLEX Cet appareil est muni des fonctions Karaoke suivantes. Fonction VOCAL FADER Fonction MULTIPLEX Grabación con las funciones de KARAOKE On peut enregistrer tout en utilisant ces fonctions. Voir page 49 ou 53. Enregistrement avec ies fonctions Karaoke Usted puede grabar durante el uso de estas funciones.
CARE AND MAINTENANCE Occasional maintenance of the unit and care of the unit and care of the software are needed to optimize the performance of your unit. To clean the cabinet Use a soft cloth lightly moistened with a mild detergent solution. Do not use strong solvents such as alcohol, benzine or thinner. To clean the heads and tape paths After every 10 hours of use, clean the heads and tape paths with a head cleaning cassette or cotton swab moistened with cleaning fluid or denatured alcohol.
CUIDADO Y MANTENIMIENTO SOINS ET ENTRETIEN De vez en cuando efectúe el servicio de mantenimiento del aparato y cuidado del software para conservarlos siempre en óptimas condiciones. Un entretien et des soins réguliers de l’appareil et des disques et cassettes sont nécessaires pour assurer un fonctionnement opti mal. Para limpiar ei gabinete Nettoyage du coffret Utilice un paño suave ligeramente remojado con una solución de detergente suave.
SPECIFICATIONS Frequency range Usable sensitivity (iHF) Aiternate channei selectivity Signal-to-noise ratio Harmonic distortion Frequency response Stereo separation Antenna 87.5 MHz to 108 MHz 1.3 |iV (75 ohms) 13.2 dBf 50 dB (±400 kHz) STEREO: 70 dB MONO: 76 dB 0.3 % (MONO), 1 kHz 0.5 % (STEREO, L-R), 1 kHz 30 Hz to 15 kHz (+0.
ESPECIFICACIONES SPECIFICATIONS 87,5 MHzatOS MHz 1,3 |iV (75 ohmios) 13,2 dBf Selectividad de canal alternativo 50 dB (±400 kHz) Relación señal a ruido ESTEREO: 70 dB MONO: 76 dB Distorsión armónica 0,3 % (MONO), 1 kHz 0,5 % (ESTEREO, L-R), 1 kHz Respuesta de frecuencia 30 Hz a 15 kHz (+0,5 dB, -3 dB) Separación estereofónica 33 dB a 1 kHz 75 ohmios (desequilibrados) Antena Plage de fréquences Sensibilité utile (IHF) Antenne Gama de frecuencia
SPECIFICATIONS Disc Scanning method Laser Rotation speed Error correction No. of channels D-A converter Wow/flutter Signal-to-noise ratio Harmonic distortion Compact disc Non-contact optical scanner (semi conductor laser) Semiconductor laser (^=780 nm) Approx. 500 rpm - 200 rpm (CLV) Cross Interleave, Reed Solomon code 2 channels 1 bit dual Unmeasurable 85 dB (1 kHz, 0 dB) 0.03 % (1 kHz, 0 dB) SPEAKER SYSTEM (These values are for one speaker.
ESPECIFICACIONES Disco Disco compacto Explorador óptico sin contacto Método de exploración Láser Velocidad de rotación Corrección de error No. de canales Convertidor D-A Lloro y tremolación Relación señal a ruido Distorsión armónica (aplicación del laser de semi conductor) Láser de semiconductor {X = 780 nm) Aprox. 500 r.p.m.-200 r.p.m.
TROUBLESHOOTING GUIDE If the unit fails to perform as described in these operating instruc tions, check the foliowing guide. GENERAL There is no sound. • Is the AC cord connected properly? • Is there a bad connection? Sound is emitted from one speaker only. • is the other speaker disconnected? The output sound is not stereo. • is the KARAOKE function turned on? CD PLAYER SECTION The CD does not play.
GUIA PARA LA SOLUCION DE PROBLEMAS EN CAS DE PROBLEME Si la unidad no funciona como se ha descrito en este manual de instrucciones, compruebe la guía siguiente. Si l’appareil ne fonctionne pas comme décrit dans ce mode d’emploi, contrôler le guide suivant. SECCION GENERAL No hay sonido. GENERALITES Il n’y a pas de son.
PARTS AND CONTROLS The names of the buttons and controls are indicated in the following illustrations, instructions about each button are in the pages indicated in the black circles. The illustrations are classified accord ing to their functions. The instructions in this manual refer mainly to the buttons on the main unit. Buttons on the remote control with the same names as those on the main unit can be used as well.
PIEZAS Y CONTROLES NOMENCLATURE Los nombres de los botones y controles se indican en las siguientes ilustraciones. Las instrucciones sobre cada botón se encuentran en las páginas indicadas en los círculos negros. Las ilustraciones se clasifican según sus funciones. Las instrucciones descritas en este manual se refieren principalmente a los botones del aparato principal. Los botones del control remoto con los mismos nombres pueden usarse de la misma manera que los del aparato principal.
COPYRIGHT Please check the laws on copyright relating to recordings from discs, radio or external tape for the country in which the machine is being used. DERECHOS DE AUTOR Sírvase observar las leyes de derechos de autor relacionadas a las grabaciones de los discos, radio o cinta externa para el país donde se utiliza el aparato.