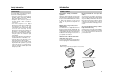
Operating Manual Personal Communication Telephone PT-H99 Than you for choosing Aiwa PT-H99. This operating manual contains the information you need to get the most of your new telephone. Please read it carefully, and save it for future reference. 8Z-PD3-905-01 000908ATN-OX *PT-H99(AH)_00E.cover 2-3 01.10.
able of Contents T Safety Information .................................. 4 Introduction ............................................ 9 Chapter 1: Before using PT-H99 Names of parts and functions .............. 12 How to see the PT-H99 display ............ 14 Charging the battery ............................ 16 Setting the language ............................ 18 Setting the calendar and time signal .... 19 When you need your phone number and help .........................................
Safety Information Always follow correct procedures to operate your phone safely. Improper use may lead to fire, electric shock, or injury. To avoid such problems, take care to read and heed the following kinds of warnings. Warning text is labeled differently according to the severity of problem that could occur through failure to follow the operating instructions. DANGER Failure to head these warnings is likely to result in death or serious injury.
Safety Information CAUTION Do not place the phone in areas where there is high humidity or dust, oil smoke or steam, near heaters or in direct sunlight. These conditions can result in fire or electric shock. Use the AC adaptor correctly To avoid fire or electric shock, always use the AC adaptor according to the following guidelines: Do not leave the phone in an automobile with the windows closed The interior of tightly closed automobiles can reach 100°C.
Safety Information Introduction Correct usage PT-H99’s features To properly utilize your Aiwa PCT, please observe the following guidelines: • Your phone cannot be used in tunnels, mountain valleys, and inside buildings where radio signals don’t reach. • Telephone calls cannot be placed or received outside a PCT cell station’s service area. • Your PCT telephone uses digital transmission, which makes it difficult for eavesdroppers to listen in on your conversation.
Chapter 1: Before using PT-H99 Names of parts and functions .............. 12 How to see the PT-H99 display ............ 14 Charging the battery ............................ 16 Setting the language ............................ 18 Setting the calendar and time signal .... 19 When you need your phone number and help .........................................
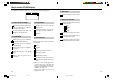
Names of parts and functions Names of parts Functions 1 Enable you to hear the voice of the party you are talking with. 2 Used in almost all operations: displays redial numbers and Phone Book entries back and forth, displays selection items back and forth, and shifts the input column in text entry. Easy Shuttle 3 Used when you select a setting function. 4 Allow you to make and receive calls, and cancel an operation to return to the previous or communication display during communication.
How to see the PT-H99 display According to the setting of your phone, some items of the follwing display appear. 5 Auto answer Appear when Auto answer is in effect. 6 Battery level and other 1 Power and signal strength Appear when your phone is in the service range. If it disappears, your phone is out of the service range. Show the strength of the signal. If it disappears, the signal is faint. 3 Calling method Ringing. The lower icon shows the volume level.
Charging the battery 3 Charge the battery before using PT-H99 for the first time. Warning: • Be sure to power off PT-H99 before removing the rechargeable battery pack. Removing the battery pack while the phone is powered on may result in loss of stored data. • Grasp the power connector and unplug the battery pack or the AC power adaptor. Do not pull the cable or code. 1 Place the phone in the charger, then push the phone backwards to lock it.
Setting the language Setting the calendar and time signal Your PT-H99 supports Thai and English. The default setting is Thai. You can change the language as follows. Date and time are not set at the factory. You need to set them when you use your PCT for the first time. You can also set the time signal so that your PT-H99 beeps every hour. However, PT-H99 does not beep when it is powered off or when you are dialing, talking, or doing a setting operation.
When you need your phone number and help When you forget your phone number, you can display it. You can also display the explanation of functions and operation when you need it. To display your phone number: To display help: 1 Either during standby mode or communication, press and successively. 1 In standby mode, press and successively. 2 2 Press press Turn the Easy Shuttle to display the information you need. 3 Press to return to the normal display. during standby mode or during communication.
Chapter 2: Basic operations *PT-H99(AH)_02E 21 01.10.11, 9:13 PM Making a call ........................................ 22 Answering a call ................................... 24 Adjusting the volume ............................ 25 Holding the call .................................... 26 Locking the keys .................................. 26 Redialing a previous phone number .... 27 Setting to vibration mode ..................... 28 Selecting the ringer style ......................
22 23
Answering a call Adjusting the volume 1 You can adjust both the ringer volume and the receiver volume. Press and hold standby mode. for one second or longer to power on and enter the The following display appears. To adjust the ringer volume: For the display in the standby mode, see page 14. To prevent from accidental key operation, you can lock the keys. (See page 26.) 1 In standby mode, press , and successively. To adjust the receiver volume: , During communication, turn the Easy Shuttle.
Redialing a previous phone number Your PT-H99 memorizes the phone numbers of the last 20 calls you made and answered. You can search these phone numbers and dial them. If the searched phone number is registered in the phone book, the name is displayed. 1 In standby mode, turn the Easy Shuttle upward once. The phone number you dialed last or the phone number of the call you answered last is displayed.
Setting to vibration mode Selecting the ringer style PT-H99 has three modes, ringing, ringing and vibration, or vibration, to notify you of an incoming call. You can set the ringer style to one of the 15 patterns for each public call with or without number notification, private call, S-mail call, P-mail DX call, and data call. The following procedure shows an example to set the ringer style for the private calls to pattern 05. 1 In standby mode, or during communication, press , , and successively.
Chapter 3: Using electronic phone book *PT-H99(AH)_03E 31 01.10.11, 9:13 PM Entering text ......................................... 32 Using the accessory keyboard ............. 35 Registering in the Phone Book ............ 38 Searching a phone number .................. 41 Editing and deleting Phone Book data ................................................ 43 Enabling the Black List/White List ........ 45 Using the voice label ............................
Entering text You need to enter text such as when you register in the Phone Book and send mails. Your PT-H99 supports Thai and English languages, and you can switch to either language. In English input mode: Text input is made by pressing a numeric key, pressing the key a number of times to get the target character, and repeating these actions.
Using the accessory keyboard Entering text You can use the accessory keyboard when you enter long text. Example: to input “Terry” on the Phone Book 1 During text input mode in the Phone Book, press to change the language. 5 To insert the batteries: Turn the Easy Shuttle once. To use the same key, you need to move the input cursor to the next column. See page 38 for how to use the Phone Book.
Using the accessory keyboard To set the accessory keyboard: Hint: The following keys on the keyboard function as the same as the buttons on PT-H99: Open the Keyboard cover, and place PT-H99 as illustrated. Be sure the infrared sensors (a, b) are lined up behind each other. Keys on keyboad Buttons on PCT a b key , or Easy Shuttle upward or Easy Shuttle downward Changes the language between Thai and English when keying in.
Registering in the Phone Book You can register up to 300 names and/or phone numbers in the Phone Book. You can start registration in 4 ways: button 1. Using the 2. Entering a phone number 3. Displaying a redial number 4. Displaying P-mail DX call history data To start by the F/SELECT button In standby mode, press , and successively. To start by a redial number: , 1 Your PT-H99 prompts you to enter the name.
Searching a phone number Registering in the Phone Book 7 Press , and turn the Easy Shuttle to select a ringer style among the 15 patterns. 10 Press data. or to store the Each time you turn it, the selected ringer style will sound. The display on step 1 appears after a few seconds. While registering, you can go back to previous step with pressing . to go back to the You can also use previous step in steps 7 through 9.
Searching a phone number You can edit the data in the Phone Book by repeating the registration sequence. You can also delete Phone Book entries. To search by name: 1 Editing and deleting Phone Book data While displaying Phone Book Data, press twice. To edit Phone Book data: To delete Phone Book entry: 1 1 In standby mode, turn the Easy Shuttle downward once. The first entry in the Phone Book is displayed like the following. 2 3 In standby mode, turn the Easy Shuttle downward once.
Enabling the Black List/White List This function enables the Black List or White List for the phone numbers you registered in the Phone Book. Thereby: • BLACK LIST: Calls from the registered phone numbers are rejected. • WHITE LIST: Only calls from the registered phone numbers are answered. (The other calls are refused.) To enable the Black List: 1 In standby mode, press , and successively. 2 Turn the Easy Shuttle to select “BLACK LIST” or “WHITE LIST”. , This example enables the Black List.
Using the voice label You can add a voice label (such as a name or others) to a phone number registered in the Phone Book, and play it when you search the phone number. A maximum of 10 voice labels can be recorded in the Phone Book. To do this, first enable the voice label function, then register a phone number in the Phone Book. To enable the voice label: 1 2 3 In standby mode, press , and successively.
Chapter 4: Recording voice messages and Auto answer *PT-H99(AH)_04E 49 01.10.11, 9:14 PM Recording voice memo or communication .............................. 50 Enabling the auto answer function ....... 52 Recording an original answer message ........................................ 54 Setting time to start auto answer message ........................................
Recording voice memo or communication When you perform the following steps, you can record your voice memo or communication. The operation is the same: communication is recorded when you do this while you are talking with the other party, and voice memo is recorded when you do this in the standby mode. You can record a maximum of 30 seconds voice data.
Enabling the auto answer function When you are at the wrong time, you can enable this function so that the answer message is played and record the calling party’s message. You can also record your own answer message instead of the fixed answer message (See page 54), and set the time to play the answer message after an incoming call arriving (See page 56). 4 To enable the auto answer function: 1 2 If you select “ON”, you can hear the answer message when an incoming call arrives.
Recording an original answer message You can record your own message to answer calls. To record original answer message: To playback or delete answer message: 1 In standby mode, press , and successively. 2 Press , and record an answer message within 10 seconds. , 1 In standby mode, press , and successively. 2 Turn the Easy Shuttle to select “PLAYBACK MSG” or “DELETE MSG”. , This example deletes the answer message. Hints: • The voice memory holds voice data of a total of 70 seconds.
Setting time to start auto answer message Your PT-H99 waits 15 seconds from when an incoming call arrives and PT-H99 starts ringing to when the auto answer message starts to play. You can change this time period. 1 In standby mode, press , and successively. 2 Key in the time (000 – 099 seconds) you want to set, and press . , The normal display returns after a few seconds. 56 *PT-H99(AH)_04E 56 01.10.
Chapter 5: Useful features Using the alarm .................................... 58 Using the scheduler ............................. 60 Entering a text memo ........................... 63 Protecting your phone from an unauthorized use ........................... 65 Turning on/off the operate tone ............ 68 Conserving the battery power during standby .......................................... 69 Turning on/off the display illumination .....................................
Using the alarm The alarm sounds and/or vibrates according to the time (See page 58), the volume level (See page 25), the ringer style (See page 29) you set for one minute. However, PT-H99 doesn’t alarm you when it is powered off or when you are dialing, talking, or doing a setting operation. To set the everyday alarm: To stop the alarm: 1 Set the clock correctly. (See page 19.) 2 In standby mode, press , and successively. 3 Turn the Easy Shuttle to select “APPOINT”.
To stop the alarm Pressing any button stops the alarm. Hints: • When the editing message is too long and not fit within the display area, you can also keep turning Easy Shuttle upward or downward to scroll the message. • If the same date and time is set for the scheduler and the alarm, the setting for the scheduler has priority over the setting for the alarm. • In step 1, you can also use the 1 button. You do not need to press F/SELECT in step 2. • In step 5, you can also use the numeric button.
Entering a text memo Using the scheduler 6 To delete a schedule: 1 2 3 4 Press schedule. to delete the To enter a text memo: In standby mode or during communication, press , , and successively. Turn the Easy Shuttle to select “CONFIRM”. Press , and turn the Easy Shuttle to display the schedule you want to delete. Press , and turn the Easy Shuttle to select “DELETE”. You can enter up to 50 text memos. 1 In standby mode, press , and successively.
Protecting your phone from an unauthorized use You can set the security lock for call origination only, Phone Book only, or all operations. You need the security code for the security lock. If the security lock is set, you’ll have to enter a security code before using your PT-H99. To set the security lock: 1 2 In standby mode, press , and successively. 5 Prees , and turn the Easy Shuttle to select “LOCK”. 6 Press , and key in your security code. , Key in your security code.
Protecting your phone from an unauthorized use 4 Hints: • In step 4, you can also use the numeric button. 1: MAKE A CALL 2: PHONE BOOK 3: ALL OPERATION You do not need to press F/SELECT in step 5. • In step 5, you can also use the 1 button. You do not need to press F/SELECT in step 6. Press , and key in your security code. To change a security code: 1 In standby mode, press , and successively. 2 Turn the Easy Shuttle to select “PIN EDIT”. 3 Press to enter the security code mode.
Turning on/off the operate tone Conserving the battery power during standby You can turn on or off the operate tone. When you turn it off, no sound will be made even when you touch a button, make an error, and end an operation. While in the power save mode, your PT-H99 displays only a group of icons located at the top of the display. If any event happens, such as any button is pressed, a call has arrived, or the alarm sounds, the PT-H99 restores the normal display.
Turning on/off the display illumination You can select “ON,” “OFF,” or “AUTO” for the display illumination. When you set the display illumination to “ON”, your PT-H99 illuminates for 10 seconds after you touch a button or start communication, and during call origination and call termination. When you select “AUTO”, your PT-H99 illuminates but only when it is dark. 1 In standby mode or during communication, press , , and successively. The current setting blinks.
Making an original melody as the ringer You can make your own melody and set it as the ringer style. You can make up to 5 original melodies on melody numbers 11 to 15, specifying notes and tempo for each. To make an original melody: 1 In standby mode, press , and successively. 2 Turn the Easy Shuttle to select a melody number. 3 Press , and turn the Easy Shuttle to select “EDIT”. 4 Press , and use to set the tempo.
Making an original melody as the ringer 6 Press repeatedly to set the length of the note. When you set a rest in step 5, press repeatedly to set the length of the rest. 7 Turn the Easy Shuttle to set the next note. 8 Repeat steps 5 to 7 to make a melody. 9 Press melody. Hints: • Pressing INT/CLR/HOLD deletes the current note, and pressing and holding it deletes all the notes you entered. • On the editing screen, you can press to give an audition of melody.
Changing the display to show image and clock You can set your PT-H99 so it displays a bitmap image (wall paper) or the digital clock in the standby mode. You can also set a bitmap image for the opening (when the power is turned on) and ending (when the power is turned off) displays. However, if a message is on the display in the standby mode, it remains displayed regardless of your setting. 5 To display the image in standby: 1 2 In standby mode, press , and successively.
Changing the display to show image and clock 3 Hints: • If you set a digital clock for the standby display, it appears after the normal display lasts for 5 seconds when you press . • When recovering from displaying digital clock in the standby mode, select “NORMAL” at step 3. • In step 2, you can also use the 3 button. You do not need to press F/SELECT in step 3. • In step 3, you can also use the 3 button. You do not need to press F/SELECT in step 4. • In step 4, you can also use the numeric button.
Turning on the subaddress dialing When you turn on the subaddress dialing, you can dial a subaddress together with a phone number. In this case, the digits after the phone number and asterisk (*) are recognized as a subaddress. 1 78 In standby mode, press , and successively.
To rename location data: (Procedure for being monitored) 1 In standby mode, press , and successively. 2 Turn the Easy Shuttle to select the location to rename. 3 Press , and turn the Easy Shuttle to select “RENAME”. 4 Press mode. 5 Press to delete a character, then enter the name. , to enter the edit You can move the cursor by turning the Easy Shuttle. 6 80 Press data.
Using location report function To delete location data: (Procedure for being monitored) 1 In standby mode, press , and successively. 2 Turn the Easy Shuttle to select the location to delete. , 6 Repeat steps 2 to 5 to delete other data. 4 Press to connect to the monitored PCT. 7 Press to return to the normal display. 5 Press Hint: In step 3, you can also use the 3 button. You do not need to press F/SELECT in step 4. V to disconnect.
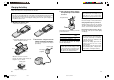
Using PT-H99 for data communication You can connect a personal computer to your PT-H99 for digital data communication. To do this, you need an optional data cable or an optional PCT data communication card. To start data communication: See the manual attached to the other equipment for how to send/receive data. To connect PT-H99 and PC: Data communication connector USB slot or PCT data communication card When connected to a personal computer, the display appears in the standby mode.
Displaying/storing/restoring current settings You can check the current settings of your PT-H99, and store those settings so that you can restore to the stored conditions after making changes. 3 To check the current settings: 1 In standby mode, press , and successively. , 2 Turn the Easy Shuttle to check the another settings. 3 After you check, press to return to the normal display. Press , and turn the Easy Shuttle to select “STATE 1”, “STATE 2” or “DEFAULT”.
Displaying/storing/restoring current settings To check the stored settings: 5 To store the current settings: 1 In standby mode, press , and successively. , 1 In standby mode, press , and successively. 2 Turn the Easy Shuttle to select “CONFIRM”. 2 Turn the Easy Shuttle to select “RENEW STATE”. Press to store the settings to the selected state. , The normal display returns after a few seconds. 3 Press , and turn the Easy Shuttle to select “STATE 1”, “STATE 2” or “DEFAULT”.
Resetting a function to the factory setting You can reset each PT-H99 function to the factory setting. 1 In standby mode, press and successively. 2 Turn the Easy Shuttle to select a function to reset. 3 Press 4 Press . to reset. This example resets the Phone Book. Turning the Easy Shuttle downward changes the display as follows: FUNC. RESET V PHONE BOOK V REDIAL V S - MAIL V P - MAIL DX V VOICE DATA V TEXT MEMO V SCHEDULE V LOC. DATA V RING SOUND V ALL DATA V FUNC.
Chapter 6: Sending and receiving a short mail (S-mail) *PT-H99(AH)_06E 91 01.10.11, 9:16 PM Sending an S-mail ................................ 92 Receiving an S-mail ............................. 95 Returning an S-mail to the sender ....... 96 Using preset message ......................... 97 Setting automatic display ................... 101 Setting the Continue mode ................ 103 Sending an S-mail in incoming/outgoing message history .......................... 104 Deleting the S-mail ...........
Sending an S-mail You can send a short mail consisting of up to 20 characters. For short mails, you cannot enter text in Thai. 4 To send an S-mail: 1 In standby mode, press and successively. 5 2 When you complete entering a mail, press or . Press If you enable the Succession mode, you can send an S-mail up to 100 characters, where the mail is divided into 20-character blocks to be sent. To send an S-mail over 20 characters: 5 1 In standby mode, press and successively.
Receiving an S-mail Sending an S-mail To check the outgoing message history: 1 In standby mode, press and successively. 2 Turn the Easy Shuttle to select “CONFIRM MAIL”. 5 Press at least one second to return to the normal display. When an incoming S-mail arrives, and indication is made in the standby-mode display. When an incoming S-mail arrives Hint: In step 2, you can also use the 2 button. You do not need to press F/SELECT in step 3. Press , and turn the Easy Shuttle to select “RECEIVED MAIL”.
Returning an S-mail to the sender Using preset message 1 Your PT-H99 has 20 fixed messages for use in entering mail. You can newly register up to 50 messages, each consisting of up to 20 characters, that you think you’ll use frequently in sending mails. Display the incoming mail you reply to. See “To check an incoming S-mail history” on page 95. Contents of fixed messages Message number 1 While entering an S-mail, press and turn the Easy Shuttle to select “FIXED MSG”.
Using preset message To register a preset message 1 2 5 Press message. to register a In standby mode, press and successively. To store an S-mail as a preset message: 1 Turn the Easy Shuttle to select “FIXED MSG”. 6 While displaying a mail, press , and turn the Easy Shuttle to select “FIXED MSG”. To delete a preset message: 1 In standby mode, press and successively. 2 Turn the Easy Shuttle to select “FIXED MSG”. 3 Press , and turn the Easy Shuttle to select a number to delete.
Using preset message Setting automatic display 6 When you set this function, not an indication but the S-mail itself is automatically displayed when it arrives. Press . To set automatic display: The normal display returns after a few seconds. 1 In standby mode, press and . 2 Turn the Easy Shuttle to select “AUTO DISPLAY”. Hint: In step 2, you can also use the 3 button. You do not need to press F/SELECT in step 3.
Setting automatic display To cancel automatic display 1 2 3 4 In standby mode, press and successively. Turn the Easy Shuttle to select “AUTO DISPLAY”. Setting the Continue mode When you set the Continue mode, the line is not disconnected after an S-mail is sent, and you can talk with the other party. However, the number of characters sent as one S-mail is 18 in this mode. To set the Continue mode: 1 In standby mode, press and successively. 2 Turn the Easy Shuttle to select “CONT. MODE”.
Sending an S-mail in incoming/outgoing message history Deleting the S-mail You can send a displayed S-mail as it is or after changing the contents and/or phone number. Each incoming/outgoing history holds 100 messages. When it is full, the newest message is stored with the oldest one deleted. You can delete the S-mail in the incoming or outgoing history. 1 Display an incoming outgoing mail to send. or 6 See page 95 for how to display the incoming mail.
Deleting the S-mail To delete all S-mails in the incoming or outgoing history 1 In standby mode, press and successively. 2 Turn the Easy Shuttle to select “DEL ALL SENT” or “DEL ALL RCV”. 4 Press . or DEL ALL SENT: Deleting the outgoing message(s) DEL ALL RCV: Deleting the incoming message(s) The normal display returns after a few seconds. Hint: In step 2, you can also use the numeric button. 6: DEL ALL SENT 7: DEL ALL RCV You do not need to press F/SELECT in step 3. or 3 Press .
Setting mail rejection When you receive a non-caller ID direct mail, you can reject the reception. 1 In standby mode, press successively. and 2 Turn the Easy Shuttle to select “FUNCTION SET”. 3 Press , and turn the Easy Shuttle to select “MAIL REFUSE”. 4 Press , and turn the Easy Shuttle to select “On”. 5 Press Hints: • In step 2, you can also use the 4 button. You do not need to press F/SELECT in step 3. • In step 3, you can also use the 4 button. You do not need to press F/SELECT in step 4.
Chapter 8: Using PT-H99 as a cordless phone and transceiver *PT-H99(AH)_08E 125 01.10.11, 9:17 PM Before using PT-H99 as a cordless phone ........................................... 126 Setting a mode for cordless phone .... 128 Using PT-H99 as a cordless phone ... 129 Using PT-H99 as a transceiver ..........
Before using PT-H99 as a cordless phone Before using your PT-H99 as a cordless phone, you have to: 1. Register your PT-H99 in the Home Base Unit (HBU). 2. Select the HBU’s number, because your PT-H99 can be registered in 5 HBUs. 3. Set the PT-H99’s mode to PUBLIC & PRIVATE. (See page 128.) To register your phone in HBU: 1 4 Enter a group number (1 – 8), and press . To select HBU to connect: 1 In standby mode, press , and successively. 2 Turn the Easy Shuttle to select HBU.
Setting a mode for cordless phone To use your PT-H99 as a cordless phone, you have to change the mode to “PUB&PRIVATE”. You can use PT-H99 as an ordinary PCT and cordless phone. Using PT-H99 as a cordless phone For calling, refer to the operating manual of HBU.
Using PT-H99 as a transceiver You can communicate between PCTs that are both registered in the same Home Base Unit (HBU). However, the communication should be within 3 minutes. Before using your PT-H99 as a transceiver, you have to: 1. Register your PT-H99 in the Home Base Unit (HBU). (See page 126.) 2. Select the HBU’s number, because your PT-H99 can be registered in 5 HBUs. (See page 127.) 3. Set the PT-H99’s mode to “PUB&TRANS” or “TRANSCEIVER”. (See below.
Appendix Troubleshooting ................................. 134 PT-H99 Specifications ........................ 136 *PT-H99(AH)_App. 133 01.10.
Troubleshooting If… Possible causes Power won’t turn on • Battery connector is not Connect the battery pack properly. attached. • Battery is exhausted. Solution If… Charge the battery. Phone does not ring • Ringer volume is turned Adjust the ringer volume. (See off. page 25.) • Phone is in the vibration Set the phone to “BELL” or mode. “VIB&BELL” mode. (See page 28.) You entered a phone • Outside the service area, number, but cannot or the signal is weak.
PT-H99 Specifications Standby modes Ringer volume Receiver volume Ringer type Ringer style Redial storage Electric phonebook Text memos Home Base Units (HBUs) Other functions Communication protocol Transmission format Transmission frequency Transmission power Power source Continuous talk time Continuous standby time Dimension Weight Accessories 4 modes: Public, Public & Private, Public & Transceiver, Transceiver 4 levels: OFF, Volume 1, Volume 2, Volume 3 4 levels: Volume 1, Volume 2, Volume 3, Volume 4