4-254-179-12(1) Operating Instructions Owner’s Record The model and serial numbers are located on the rear of the unit. Record the serial number in the space provided below. Refer to them whenever you call upon your Aiwa dealer regarding this product. Model No. ______________ Serial No.
CAUTION WARNING The use of optical instruments with this product will increase eye hazard. To prevent fire or shock hazard, do not expose the unit to rain or moisture. To prevent fire, do not cover the ventilation of the apparatus with news papers, table-cloths, curtains, etc. And don’t place lighted candles on the apparatus. To prevent fire or shock hazard, do not place objects filled with liquids, such as vases, on the apparatus.
NOTICE FOR THE CUSTOMERS IN THE U.S.A. If you have any questions about this product, you may call; Aiwa Customer Information Service Center 1-800-289-2492 or http://www.us.aiwa.com/ The Number below is for the FCC related matters only. Regulatory Information Declaration of Conformity Trade name: Model No.: Responsible Party: Address: AIWA AWP-ZX7 Sony Electronics Inc. 16450 W. Bernardo Dr, San Diego, CA 92127 U.S.A. Telephone No.: 858-942-2230 This device complies with Part 15 of the FCC Rules.
Table of Contents How to use this manual........................... 5 Playable discs.......................................... 5 Getting Started Hooking up the system............................ 7 Setting the clock...................................... 9 CD/MP3 – Play Loading a disc ....................................... 10 Playing a disc ........................................ 10 — Normal Play/Shuffle Play Playing repeatedly................................. 12 — Repeat Play Creating your own program ..
How to use this manual This manual mainly explains operations using the remote, but the same operations can also be performed using the buttons on the system having the same or similar names. Playable discs You can play back the following discs on this system. Other discs cannot be played back.
Notes on CD-R and CD-RW • Some CD-Rs or CD-RWs cannot be played on this system depending upon the recording quality or physical condition of the disc, or the characteristics of the recording device. Furthermore, the disc will not play if it has not been correctly finalized. For more information, see the operating instructions for the recording device. • Discs recorded on CD-R/CD-RW drives may not be played back because of scratches, dirt, recording condition or the driver’s characteristics.
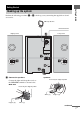
Getting Started Perform the following procedures 1 to 4 to hook up your system using the supplied cords and accessories. Getting Started Hooking up the system AM loop antenna FM lead antenna Right speaker Left speaker 1 Connect the speakers. Connect the right and left speaker cords to the SPEAKER terminals as shown below.
2 Connect the FM and AM antennas. Set up the AM loop antenna, then connect it. 3 For models with a voltage selector, set VOLTAGE SELECTOR to the local power line voltage. Refer to the print on your system’s VOLTAGE SELECTOR for available settings. Plug type A AM loop antenna AM LOO P 4 Connect the power cord to a wall outlet. If the plug does not fit the wall socket, detach the supplied plug adaptor (only for models equipped with an adaptor). To turn on the system, press ?/1.
Attaching the speaker pads Use buttons on the remote for the operation. 1 2 3 4 5 6 1 Make sure that all discs are removed from the system. 2 Press FUNCTION repeatedly to switch the function to CD. 3 Hold down Z CD and then press M on the unit until “STANDBY” appears. After “STANDBY” disappears, then “LOCK” appears. 4 Unplug the power cord. Press CLOCK/TIMER SET. Press . or > repeatedly to set the hour. Press ENTER. Press . or > repeatedly to set the minute. Press ENTER.
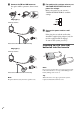
Playing a disc CD/MP3 – Play — Normal Play/Shuffle Play Loading a disc Use buttons on the unit for the operation. This system lets you play audio CDs and discs with MP3 audio tracks. 1 Example: When a disc is loaded Press DISC 1 – 5 to select a disc stocker. Disc indicator If a disc is loaded, press Z CD to remove a disc from the disc slot. “No Disc” appears. 2 Track number Insert a disc in the disc slot with the label side facing right.
2 Select To play ALL DISCS (Normal Play) All discs in the disc slot continuously. 1DISC (Normal Play) The tracks on the disc you have selected in original order. ALBM (Normal Play) All MP3 audio tracks in the album on the disc you have selected in original order. When playing a non-MP3 disc, Album Play becomes 1DISC Play. ALL DISCS SHUF (Shuffle Play) The tracks on all discs in random order. 1DISC SHUF (Shuffle Play) The tracks on the disc you have selected in random order.
Notes • You cannot change the play mode during playback. • Some time may be needed to start playback of discs recorded in complex configurations such as many layers. • When the disc is inserted, the player reads all the tracks on that disc. If there are many albums or nonMP3 audio tracks on the disc, it may take a long time for play to begin or for the next MP3 audio track to start play. • Do not save unnecessary albums or tracks other than MP3 ones in the disc to be used for MP3 listening.
6 Creating your own program — Program Play 1 2 3 Press CD (or FUNCTION repeatedly) to switch the function to CD. Press PLAY MODE in stop mode repeatedly until “PGM” appears. Press DISC SKIP (or DISC 1 – 5 on the unit) to select a disc. To program all the tracks on a disc at once, proceed to step 5 with “AL” displayed. 4 Press . or > repeatedly until the desired track number appears. When programming the MP3 audio tracks, press ALBUM – or + to select album, then press .
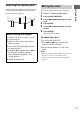
5 Press TUNER MEMORY. The preset number flashes. Perform steps 6 and 7 while the preset number flashes. Tuner Presetting radio stations MP3 PRESET AUTO ALBUM STEREO MONO TRACK TUNED 1 You can preset up to 20 FM stations and 10 AM stations. You can then tune in any of those stations simply by selecting the corresponding preset number.
Other operations Do this Tune in a station with a weak signal Follow the procedure described in “Manual tuning preset” (page 14). Set another station to the existing preset number Start over from step 2. After step 5, press – or + (or TUNING – or + on the unit) repeatedly to select the preset number you want to store the station. To improve tuner reception Listening to the radio You can listen to a radio station either by selecting a preset station, or by manually tuning in the station.
Tips • To improve broadcast reception, adjust the supplied antennas, or connect a commercially available external antenna. • When an FM stereo program has static noise, press FM MODE repeatedly until “MONO” appears. There will be no stereo effect, but the reception will improve. • Press TUNING MODE repeatedly until “AUTO” appears in step 3 above, then press – or + (or TUNING – or + on the unit). The frequency indication changes and scanning stops when the system tunes in a station (Automatic Tuning).
Tape – Play Loading a tape 1 2 Playing a tape You can use TYPE I (normal) tape. 1 Press Z PUSH on the unit. Load a recorded/recordable tape into the cassette holder. Press DIRECTION on the unit repeatedly to select “g” to play one side of a tape, “h” to play both sides, or “j”* to play both sides repeatedly. * The tape deck stops automatically after repeating the sequence five times. 3 Press N (or TAPE nN on the unit). Tape – Play With the side you want to play/record facing towards you.
Tape – Recording Recording your favorite CD tracks on a tape — CD-TAPE Synchro Recording You can record a whole CD on a tape. You can use TYPE I (normal) tape. Use buttons on the unit for the operation. 1 2 Load a recordable tape. Load a CD you want to record. If you have already loaded the disc, press DISC 1 – 5 to select the disc, then press x.
Recording on a tape manually — Manual Recording You can record just the portions you like from a CD, tape or radio program on a tape. You can also record from connected components (see “Hooking up optional components” on page 30). Use buttons on the unit for the operation. Load a recordable tape. Press FUNCTION repeatedly to select the desired source to record. • CD: To record from this system’s CD player. • FM or AM: To record from this system’s tuner.
Sound Adjustment Timer Adjusting the sound Falling asleep to music — Sleep Timer Adjusting the bass and treble You can adjust the bass and treble to enjoy more powerful sound. 1 Press EQ repeatedly to select “BASS” or “TREBLE”. Each time you press the button, the display changes as follows: BASS y TREBLE 2 Press – or + repeatedly to adjust the level while “BASS” or “TREBLE” appears. Press SLEEP.
Waking up to music — Play Timer You can wake up to music at a preset time. Make sure you have set the clock (see “Setting the clock” on page 9). Use buttons on the remote for the operation. 1 Prepare the sound source you want to play. 2 3 4 Press VOLUME +/– to adjust the volume. Press CLOCK/TIMER SET. Press . or > repeatedly until “PLAY SET?” appears, then press ENTER. “ON TIME” appears and the hour indication flashes. 5 Set the time to start playing. Press ?/1 to turn off the system.
Timer recording radio programs — Rec Timer You can record a preset radio station from a specified time. To timer record, you must first preset the radio station (see “Presetting radio stations” on page 14) and set the clock (see “Setting the clock” on page 9). Use buttons on the remote for the operation. 1 2 3 Press CLOCK/TIMER SET. Press . or > repeatedly until “REC SET?” appears, then press ENTER. Set the time to start recording. Press . or > repeatedly to set the hour, then press ENTER.
Viewing information about the disc in the display Display Turning off the display — Power Saving Mode The clock display can be turned off to minimize the amount of power consumed during standby (Power Saving Mode). Press DISPLAY repeatedly while the system is off until the clock display disappears. To cancel Power Saving Mode * The clock is displayed only if you set the clock. Note You cannot perform the following operations in Power Saving Mode.
Checking the total playing time and titles (CD/MP3) Checking the station name (TUNER) Press DISPLAY in stop mode. Press DISPLAY while listening to the radio.
Optional Personal Computer Connecting a personal computer to the system Use the supplied USB cable for the connection. You can listen to the audio recorded in the computer’s hard disk or on a CD-ROM loaded on the CD-ROM drive through the system’s speakers.
Installing the driver 5 Follow the instructions appearing on the monitor. When first connecting the computer to the system’s USB port, you must install the driver. The driver is supplied as standard with the OS. The installation procedure differs according to the OS type. Follow the procedures described below. (Also see the operation manual supplied with the computer.) For Windows 98 Second Edition/Windows Millennium Edition To install the USB driver 1 2 3 Start up the computer.
To verify the status of the installed devices Be sure to check the status of the installed devices after you have installed their drivers. 1 Open the [Control Panel]. In the Start menu, point to [Settings] and click [Control Panel]. 2 Double-click the [System] icon. The “System Properties” dialog box appears. Note (For Windows Me) If you cannot find the [System] icon, click “View all Control Panel options”.
4 Click the [Device Manager] button. Make sure that “devices by type” is selected in the “View” menu. 5 Make sure that the following items are listed in the “Device Manager” dialog box. • “USB Audio Device” under “Sound, video and game controllers” • “USB Composite Device” under “Universal Serial Bus controllers” For Mac OS 9.0.4, 9.2 or X 10.0 To install the USB driver 1 2 3 Start up the computer. 4 Connect the system to the computer with the USB cable (see page 25).
Listening to audio files on a personal computer 1 Start up the computer. Wait for the OS to start up properly. 2 3 4 5 Press ?/1 to turn on the system. Press FUNCTION repeatedly to switch the function to PC. Perform the operations on the computer side to start playback. Press VOLUME +/– (or turn VOLUME control on the unit) to adjust the volume. Notes Optional Personal Computer • When playing back music through the USB port, do not turn off the system or change the sound source.
Optional Components Hooking up optional components To enhance your system, you can connect optional components. Refer to the operating instructions provided with each component. Sub woofer From the USB port on an optional computer From the audio output jacks of an optional analog component A personal computer Optional analog component A USB port B SUB WOOFER OUT jack Use the supplied USB cable to connect a personal computer (see “Optional Personal Computer” on page 25).
To place the sub woofer To obtain a better bass reproduction, we recommend you to place the subwoofer on a solid floor where resonance is unlikely to occur. Notes • Always place the subwoofer vertically, keeping it a few centimeters away from the wall. • If the sub woofer is placed in the center of a room, the bass could be extremely weakened. This is due to the influence of the standing wave of the room.
General Troubleshooting Problems and remedies Should you encounter a problem with your system, do the following: 1 Make sure the power cord and speaker cords are correctly and firmly connected. 2 Find your problem in the troubleshooting checklist below and take the indicated corrective action. If the problem persists after doing all of the above, consult your nearest Aiwa dealer. When the ?/1 indicator flashes Immediately unplug the power cord and check the following items.
Speakers Sound comes from only one channel, or the left and right volumes are unbalanced. • Check the speaker connections and placement. CD/MP3 player “LOCKED” appears. • Contact your Aiwa dealer or local authorized Aiwa service facility. The disc does not eject. • You cannot eject the disc during CD Synchro Recording. Press x to cancel the CD Synchro Recording, then press Z CD on the unit to eject the disc. • Consult your nearest Aiwa dealer. MP3 audio track cannot be played back.
A stereo FM program cannot be received in stereo. • Press FM MODE on the unit until “STEREO” appears in the display. If the system still does not operate properly after performing the above measures, reset the system as follows: Noise is heard while loading/removing a disc. • Change the location of the AM antenna. Use buttons on the unit for the operation. Tape deck The tape does not record or play, or there is a decrease in sound level. • The heads are dirty. Clean them (page 37).
Messages One of the following messages may appear or flash in the display during operation. CD/MP3 No Disc There is no disc in the player. Reading The system is reading TOC information of the disc. Some buttons are not available. Timer TIME NG! The Play Timer or Rec Timer start and end times are set to the same time. SET CLOCK! The clock has not been set, therefore the timer setting is unavailable. Set the clock to the correct time, then set the timer.
In case color irregularity is observed on nearby a TV screen Additional Information Precautions On operating voltage On operation Before operating the system, check that the operating voltage of your system is identical with the voltage of your local power supply. • If the system is brought directly from a cold to a warm location, or is placed in a very damp room, moisture may condense on the lens inside the CD player. Should this occur, the system will not operate properly.
Cleaning the cabinet Clean the cabinet, panel and controls with a soft cloth slightly moistened with mild detergent solution. Do not use any type of abrasive pad, scouring powder or solvent such as thinner, benzene or alcohol. To save a tape permanently To prevent a tape from being accidentally recorded over, break off the cassette tab from side A or B as illustrated. Break off the cassette tab If you later want to reuse the tape for recording, cover the broken tab with adhesive tape.
SPEAKER: SUB WOOFER OUT: accepts impedance of 6 ohms voltage 1.5 V CD player section System Laser Frequency response Signal-to-noise ratio Dynamic range Compact disc and digital audio system Semiconductor laser (λ=770 – 810 nm) Emission duration: continuous 20 Hz – 20 kHz More than 90 dB More than 90 dB Speaker (SSX-LZX7) Speaker system Speaker units Woofer: Tweeter: Nominal impedance Wow and flutter 4-track 2-channel stereo 100 – 10,000 Hz, using Sony TYPE I cassettes ±0.15% W. Peak (IEC) 0.1% W.
List of button locations and reference pages How to use this page Use this page to find the location of buttons and other parts of the system that are mentioned in the text.
Remote control ALPHABETICAL ORDER BUTTON DESCRIPTIONS A–E F–Z ALBUM + qa (11, 13, 18) ALBUM – qd (11, 13, 18) CD qk (10, 13, 19) CLEAR qg (13) CLOCK/TIMER SELECT 2 (21, 22) CLOCK/TIMER SET 3 (9, 21, 22) DISC SKIP 0 (11, 13) DISPLAY wa (16, 23) ENTER 9 (9, 13, 14, 21, 22) EQ qf (20) FM MODE 4 (16) FUNCTION 6 (10, 13, 14, 15, 17, 19, 26, 29, 31) PLAY MODE w; (11, 13) REPEAT 4 (12) SLEEP ws (20) TAPE qj (17, 19) TUNER BAND 5 (14, 15, 19) TUNER MEMORY ql (14) TUNING MODE w; (14, 15) VOLUME +/– qs (21, 29)