VX-S207U VX-S137U INTEGRATED COLOR TV/STEREO VIDEO CASSETTE RECORDER TELEVISOR EN COLOR/VIDEOGRABADORA ESTEREO INTEGRADOS TELEVISOR COULEUR/MAGNETOSCOPE STEREO INTEGRE OPERATING INSTRUCTIONS INSTRUCCIONES DE MANEJO MODE D'EMPLOI ENGLISH ESPAÑOL For Assistance And Information Call Toll Free 1-800-BUY-AIWA (United States and Puerto Rico) FRANÇAIS
ENGLISH Warning To reduce the risk of fire or electric shock, do not expose this appliance to rain or moisture. Heat - Do not use this unit near sources of heat, including heating vents, stoves, or other appliances that generate heat. It also should not be placed in temperatures less than 5˚C (41˚F) or greater than 40˚C (104˚F). Mounting surface - Place the unit on a flat, even surface. CAUTION RISK OF ELECTRIC SHOCK DO NOT OPEN WARNING: SHOCK HAZARD - DO NOT OPEN.
Overloading - Do not allow anything to rest on the power cord. Do not overload wall outlets and extension cords because this can result in fire or electric shock. Do not place the unit in an area where people will walk on the cord. Outdoor Antenna Power lines - An outside antenna system should not be located in the vicinity of overhead power lines or other electric light or power circuits, or where it can fall onto such power lines or circuits.
Welcome Thank you for purchasing this AIWA product. To optimize the performance of this unit, please read through this operating instructions carefully. Main features of this unit VCR Plus+ system and OneTouch Playback You can easily set the timer with the VCR Plus+ system. The recorded TV programs can be played back quickly with One-Touch Playback. MTS (Multi-channel TV Sound) broadcast You can receive, record and play back stereo and bilingual TV programs.
PREPARATION Connecting the antenna o Basic connections VX-S207 75-ohm coaxial cable (not supplied) 300-ohm twin-lead cable (not supplied) Antenna adaptor (supplied) 1 UHF/ VHF AC cord hook 2 1 To AC outlet Connect the antenna cable to the UHF/VHF connector on the unit. If the cable is a round-type 75-ohm coaxial cable, connect it directly to the UHF/VHF connector.
Connecting the antenna (continued) To connect the supplied telescopic antenna (VX-S137 only) Antenna holder VX-S137 Antenna adaptor (Supplied) UHF/ VHF Mount the supplied antenna in the antenna holder. Extend and adjust the ends of the antenna to get the best signal reception. Note For better reception, especially in outlying areas, or where ghosting or interference is a problem, use an external room-mounted antenna.
CATV connections To connect a CATV system without using a CATV converter VX-S207 CATV system 75-ohm coaxial cable (not supplied) 1 UHF/ VHF AC cord hook 2 To AC outlet 1 Connect the cable from the CATV system to the UHF/VHF connector on the unit. 2 Connect the AC cord to the AC wall outlet after passing it through the AC cord hook.
Preparing the remote control Controlling the TVs and CATVs The remote control can control the CATV converters for the CATV. To control CATV converters, set the manufacturer’s code number shown in the table on the next page. Inserting the batteries Caution To prevent damage from leakage or explosion, follow the descriptions below. • Insert two supplied R03 (size AAA) batteries with the 0 and 9 marks correctly as illustrated. • Do not mix old batteries with new ones or different types of batteries.
CATV converter manufacturer Code number ALLEGRO 46 ARCHER 39 CABLEVIEW 39 CITIZEN 39 CURTIS MATHES 15 EAGLE 24, 25, 28 GEMINI 05, 22, 23 GENERAL ELECTRIC 43 GENERAL INSTRUMENT 05, 07, 09 GOBRAND 39 HAMLIN 33, 34, 35 JERROLD 04, 06, 07, 08, 09, 10, 17, 39 KALE VISION 29 MACOM 03, 40, 41 MAGNAVOX 24, 25, 28, 29, 36, 37 NSC 38 OAK 11, 12, 44 PANASONIC 13, 19, 21 PARAGON 01 PHILIPS 24, 25, 26, 27, 28 PIONEER 13, 14 PULSER 39 RCA 13, 15 REGAL 28 REGENCY 32 SAMS
5 Setting the clock Set DAY, YEAR and hours in the same way as in step 4. Press and hold SET/TRACKING + or – to change the setting rapidly. You must set the date and time for timer recording. When you connect the AC cord to the AC wall outlet, the date and time will be set automatically if the unit receives the clock adjustment signal. If the unit cannot receive the clock adjustment signal or reception signal is weak, the unit may set the clock incorrectly. In this case, you must set the time manually.
3 Press SET/TRACKING + or – to select AUTO CLOCK. Setting the standard time according to your area When you move to a different area of the country, you can adjust the clock only with selecting your new area. This setting is only when connecting with the RF cable. Set the channel correctly, before setting the standard time. 4 Press ENTER to select ON. 1 2 5 3 Press SET/TRACKING + or – to select SYSTEM SETUP, then press ENTER. Press MENU twice to return to the normal screen.
5 Setting the channels Before Auto Channel Memory, this unit can receive all channels in your area by pressing the CHANNEL N or M button repeatedly. After Auto Channel Memory, you can skip the channels which are not preset with the CHANNEL N or M button. TV VCR/CATV Press MENU twice to return to the normal screen. Tip To interrupt the Auto Channel Memory, press MENU. Note Once you conduct the Auto Channel Memory, the previous settings will be canceled.
Checking the channel set-up to use VCR Plus+® system To set the timer using VCR Plus+® system, you have to check whether the VCR channel numbers match the guide channels which are assigned to the TV stations. If they do not match, the VCR Plus+® system does not function correctly. In this case, coordinate the number. Before starting Set the TV VCR/CATV selector to TV VCR. 1 2 Press MENU. Press SET/TRACKING + or – to select CH SETUP, then press ENTER.
BASIC OPERATIONS Watching a TV program To turn off the TV Press POWER. To mute the volume TV VCR/CATV POWER Press MUTING. To restore the volume, press MUTING, VOLUME + or –. SLEEP To recall a previous channel Number buttons PREV.CH Press PREV.CH to switch back and forth between the current channel number and the previous one. CHANNEL N/M To listen through the headphones, insert headphones (not supplied) with a stereo mini plug into the headphones jack on the front.
Selecting the closed captions mode This unit can decode and display closed captioned television programs or tapes. CAPTION Press CAPTION repeatedly to select the caption mode. Notes • After selecting a closed caption mode, it will stay in effect until it is changed, even if the channel is changed. • If the captions signal is lost due to a commercial or a break in the signal, the captions will reappear when the signal is received again.
Adjusting the picture 5 Press SET/TRACKING + or – to adjust the setting. After several seconds from releasing the button, the display returns to the normal screen. You can adjust the picture settings for brightness, contrast, color, tint and sharpness.
5 Adjusting the sound Press SET/TRACKING + or – to adjust the setting. After several seconds from releasing the button, the display returns to the normal screen. You can adjust the settings for bass sound, treble sound and the balance of the sound.
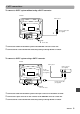
Setting the On-Timer 4 Press SET/TRACKING + or – to select ON TIMER, then press ENTER. Once this timer is set, the unit turns on at the programmed time to the programmed channel. TV VCR/CATV MENU 5 Press SET/TRACKING + or – to set the hours, then press ENTER. 6 Press SET/TRACKING + or – to set the minutes, then press ENTER. ENTER SET/TRACKING +/– To change the minutes setting in ten minutes, press and hold SET/TRACKING + or –.
9 Press SET/TRACKING + or – to display SET, then press ENTER. The ON-TIMER indicator on the unit lights. Setting the Off-Timer Once this timer is set, the unit turns off everyday at the programmed time. TV VCR/CATV 10 Press MENU 3 times to return to the normal screen. • At the programmed time, the channel is changed to a programmed one. • You can turn the unit off. The unit automatically turns on to a programmed channel at the programmed time.
PLAYBACK Setting the Off-Timer (continued) 5 Playing back a tape Press SET/TRACKING + or – to set the hours, then press ENTER. zEJECT TV MONITOR dPLAY AD-SKIP 6 Press SET/TRACKING + or – to set the minutes, then press ENTER. fREW/[ To change the minutes setting in ten minutes, press and hold SET/TRACKING + or –. sSTOP gF FWD/] aPAUSE/STILL SET/TRACKING +/– SLOW ATR VX-S207 7 Press SET/TRACKING + or – to display SET, then press ENTER.
If you cannot get a clear playback picture Although the unit adjusts the tracking automatically, you may need to adjust the tracking manually if the tape quality is too poor. If the picture and the sound have noise, try manual tracking. To adjust the tracking manually During playback, press SET/TRACKING + or – repeatedly until you get the best possible picture. (Automatic Tracking is canceled and “MANUAL TR.” and tracking bar appear.
Playing back a tape repeatedly Various search functions TV VCR/CATV TV VCR/CATV POWER INDEX ZERORETURN T-REC RESET CALL ZERORETURN dPLAY wREC/OTR MENU Number buttons (1-9) fREW/[ ENTER REC. END SEARCH gF FWD/] sSTOP SET/TRACKING +/– Before starting Set the TV VCR/CATV selector to TV VCR. 1 Press MENU. 2 Press SET/TRACKING + or – to select AUTO REPEAT. Rewinding or fast-forwarding to a specific point – Zero Return 1 3 4 5 Press CALL to display the tape counter.
Searching with the index function — Index Search The unit automatically marks an index signal on the tape each time recording starts. You can use these signals to find the beginning of any recording. Before starting Set the TV VCR/CATV selector to TV VCR. Searching the end of the recorded program — End Search You can fast-forward/rewind the tape at the end of the recorded program automatically. Before starting Set the TV VCR/CATV selector to TV VCR. Press REC. END SEARCH during stop.
RECORDING Recording a TV program 3 To select CATV broadcast using the number buttons Set the TV VCR/CATV selector to CATV. When selecting the number between 10 and 19, press 0 once to enter the hundreds digit, and then press the buttons 1 through 9 to enter tens and ones digits. When selecting the numbers less than 10, press 0 twice to enter the hundreds and tens digits, and then press the buttons 1 through 9 to enter the ones digit.
Playing back the portion you just recorded – One-Touch Playback Using One-Touch Playback after VCR Plus+® system (page 25) or manual timer recording (page 27) is convenient. You can make timer recordings and play back only the portion you just recorded with the timer by pressing a single button later. Recording with One-Touch Recording You can immediately start recording the current channel for a specified time with One-Touch Recording.
Playing back a tape (continued) To stop recording Press s STOP on the remote control or Z STOP/ EJECT on the unit. The w REC/OTR button on the unit lights off. To extend the recording duration while recording Press w REC/OTR until the new duration you want appears on the screen. Setting the timer with VCR Plus+® system You can greatly simplify timer recordings with VCR Plus+® system.
3 4 Press SET/TRACKING + or – to select ONCE, DAILY or WEEKLY. To record a single program daily program Select ONCE DAILY weekly program such as every Monday (WKL-MON) WEEKLY To cancel a program Press MENU. And press SET/TRACKING + or – to select TIMER REC SET in the menu. Then press SET/TRACKING + or – to select the unnecessary program, and press CANCEL. If the program overlaps another The overlapped portions will be deleted.
If you cannot use VCR Plus+® system, you can set the timer manually. You can set up to 8 programs within one month of the current date. TV VCR/CATV T-REC MENU SET/TRACKING +/– ENTER CANCEL Before starting • Check that the clock is set correctly. • Insert a cassette with its erasure prevention tab in place. • Set the TV VCR/CATV selector to TV VCR. • If the CATV converter is used for the timer recording, check that the CATV converter is turned on and the channel you want to record is selected.
Dubbing Connecting with another VCR VX-S207 (Front) VX-S207 (Rear) AUDIO VIDEO R L (MONO) UHF/ VHF Yellow Red Red White LINE 1 Yellow White Audio/Video cable (not supplied) or To audio/video output jacks Tips • If the other VCR is monaural type, connect one of the audio plugs only to AUDIO IN L (MONO). • If you use this unit for playback, connect the AUDIO/VIDEO OUT jacks on this unit and the audio/video input jacks on the recording unit. • Please refer to operating instruction of the other VCR.
OTHER FUNCTIONS 5 Setting the V-chip Enter the same password again for the safety, then press ENTER. An age limitation can be set to prevent children from viewing or listening to violent scenes or programs with adult content. This unit corresponds to “TV-RATING” and “MOVIE RATING.” To use the V-chip function, register a password at first. TV VCR/CATV V-CHIP SET menu appears.
• When TV-MA is selected, the items below appear. :TV-MA VIOLENCE SEXUAL SITUATIONS ADULT LANGUAGE ON ON ON To use the TV after the TV is protected When the program applied to the V-chip setting is received, “PROTECT BY V-CHIP” is displayed. PROTECTED BY V-CHIP IF YOU CANCEL PROTECT, INPUT PASSWORD. 4 5 PASSWORD :– – – – Press MENU to return to the V-CHIP SET menu. Press ENTER, and press SET/TRACKING + or – to select MOVIE RATING, then press ENTER. Enter the password, then press ENTER.
Multichannel TV Sound (MTS) and Hi-Fi audio sound system TV VCR/CATV Number buttons Recording the sound of the SAP Broadcast Before starting • Insert a cassette and select the tape speed. • Set the TV VCR/CATV selector to TV VCR. 1 2 Press MENU. Press SET/TRACKING + or – to select TV SET-UP, then press ENTER. CHANNEL N/M wREC/OTR ENTER MENU AUDIO 3 Press SET/TRACKING + or – to select SAP. 4 Press ENTER to select ON.
Recorded and output signals of the MTS broadcast Recorded signal TV screen Broadcast SAP — Mono OFF STEREO Stereo SAP OFF OFF Mono+SAP ON STEREO/ Stereo+SAP SAP OFF ON Hi-Fi track Mono Signal output from AUDIO OUT Normal L track Mono Mono R Mono Left/ Mono Right (L+R) channel Right Left channel channel Mono Mono Mono L:Mono SAP R:SAP SAP SAP Left/ Mono Right (L+R) channel L:L+R SAP R:SAP Right Left channel channel Mono On-screen display SAP CALL SAP Playing back a MTS-progra
ADDITIONAL INFORMATION Troubleshooting If the unit does not seem to operate properly, read the instructions again, then check the following guide. Care and maintenance TV reception is noisy or there is no TV reception. Connect the antenna correctly and securely. To clean the cabinet Wipe with a soft dry cloth. If the surfaces are extremely dirty, use a soft cloth lightly moistened with mild detergent solution.
Specifications Tuner system Frequency synthesized tuner TV system M Channel coverage VHF: 2 to 13 UHF: 14 to 69 CATV: 5A, A-1 to A-5, A to W, W+1 to W+84 Program memory 181 Antenna input 75 ohms, unbalanced Picuture tube VX-S207 406(W) × 305(H) mm (16 × 12 1/8 in.) 508 mm (diagonal) (20 in.) VX-S137 208(W) × 211(H) mm (8 1/4 × 8 3/8 in.) 335 mm (diagonal) (13 in.
Parts and controls Front panel (VX-S207) Television screen = ONE-TOUCH PLAYBACK button Cassette compartment wREC (Recording)/OTR (OneTouch Recording) button DPLAY button POWER button Headphones jack LINE 2 IN VIDEO/AUDIO L (MONO)/R jacks Indicators (POWER, TIMER REC, ON-TIMER) ZSTOP/EJECT button gF FWD (Fast-Forward)/ ] button fREW (Rewind)/ [ button CHANNEL N/M buttons Remote sensor VOLUME +/– buttons Front panel (VX-S137) Television screen = ONE-TOUCH PLAYBACK button wREC (Recording)/OTR (OneT
Rear panel Antenna holder Security hook (VX-S207 only) UHF/VHF connector VIDEO OUT/AUDIO OUT L/R jacks AC cord hook LINE 1 IN VIDEO/AUDIO L (MONO)/R jacks AC cord Remote control VCR PLUS+ button TV VCR/CATV selector OTPB (One-Touch Play Back) button POWER button zEJECT button SLEEP button Number buttons (0-9) PREV.
FRANÇAIS Avertissement Pour réduire le risque d’incendie ou d’électrocution, ne pas exposer cet appareil à la pluie ou à l’humidité. CAUTION RISK OF ELECTRIC SHOCK DO NOT OPEN WARNING: SHOCK HAZARD - DO NOT OPEN. AVIS: RISQUE DE CHOC ELECTRIQUE - NE PAS OUVRIR. Accessoires - Ne placez pas l’appareil sur un chariot, un support, un trépied, un montant ou une table instable. L’appareil risque de tomber et de causer de graves blessures, voire d’être gravement endommagé.
Surcharge - Evitez de surcharger les prises murales et les prolongateurs, car vous risquez de provoquer un incendie ou une décharge électrique. Ne placez pas l’appareil dans un endroit où son cordon risque d’être piétiné. Ne posez jamais aucun objet sur le cordon d’alimentation.
Félicitations ! Nous vous remercions d’avoir fait l’acquisition de ce produit Aiwa. Pour optimiser les performances de cet appareil, nous vous invitons à lire attentivement le présent mode d’emploi. Principales caractéristiques de ce téléviseur Système VCR Plus+ et lecture monotouche Le programmateur se règle simplement à l’aide du système VCR Plus+. Les émissions télévisées enregistrées peuvent être reproduites rapidement grâce à la fonction de lecture monotouche.
PREPARATION Raccordement de l’antenne Raccordements de base VX-S207 Câble coaxial de 75 ohms (non fourni) Câble bifilaire de 300 ohms (non fourni) Adaptateur d’antenne (fourni) 1 UHF UHF/ VHF Crochet du cordon d’alimentation 2 1 Vers une prise secteur Raccordez le câble d’antenne au connecteur UHF/VHF du téléviseur. Si le câble est un câble coaxial rond de 75 ohms, raccordez-le directement au connecteur UHF/VHF.
Raccordement de l’antenne (suite) Pour installer l’antenne télescopique fournie (VX-S137 uniquement) Support d’antenne VX-S137 Adaptateur d’antenne (fourni) UHF/ VHF Placez l’antenne fournie dans le porte-antenne Etirez et déplacez les deux branches de l’antenne afin d’obtenir le meilleur signal de réception. Remarque Pour obtenir une meilleure réception, spécialement dans les zones isolées, ou si vous rencontrez des problèmes d’interférences ou d’images fantôme, utilisez une antenne d’extérieur.
Raccordements CATV Pour raccorder un système CATV sans utiliser de convertisseur CATV VX-S207 Système CATV Câble coaxial de 75 ohms (non fourni) 1 UHF/ VHF Crochet du cordon d’alimentation 2 1 2 Vers une prise murale Raccordez le câble du système CATV au connecteur UHF/VHF du téléviseur. Raccordez le cordon d’alimentation à une prise murale (secteur) après l’avoir fait passer dans le crochet.
Préparation de la télécommande Introduction des piles Attention Pour prévenir tout dommage causé par une fuite ou une explosion des piles, conformez-vous aux instructions suivantes. • Introduisez deux piles R03 (AAA) en faisant correspondre les pôles 0 et 9 comme illustré. • Ne mélangez pas une pile neuve et une pile usagée ou des piles de types différents. • Ne jetez pas les piles au feu, ne les soumettez pas à de lachaleur et ne les démontez pas.
Fabricant du convertisseur CATV Numéro de code ALLEGRO 46 ARCHER 39 CABLEVIEW 39 CITIZEN 39 CURTIS MATHES 15 EAGLE 24, 25, 28 GEMINI 05, 22, 23 GENERAL ELECTRIC 43 GENERAL INSTRUMENT 05, 07, 09 GOBRAND 39 HAMLIN 33, 34, 35 JERROLD 04, 06, 07, 08, 09, 10, 17, 39 KALE VISION 29 MACOM 03, 40, 41 MAGNAVOX 24, 25, 28, 29, 36, 37 NSC 38 OAK 11, 12, 44 PANASONIC 13, 19, 21 PARAGON 01 PHILIPS 24, 25, 26, 27, 28 PIONEER 13, 14 PULSER 39 RCA 13, 15 REGAL 28 REGENCY 3
Réglage de l’horloge 5 Réglez JOUR, ANNEE et les heures de la même manière qu’à l’étape 4. Maintenez la touche SET/TRACKING + ou – enfoncée pour changer les valeurs de réglage plus rapidement. Vous devez régler la date et l’heure manuellement pour effectuer des enregistrements par programmateur. Lorsque vous raccordez le cordon d’alimentation secteur à la prise murale, la date et l’heure sont automatiquement réglées si l’appareil reçoit un signal de réglage de l’horloge.
3 Appuyez sur SET/TRACKING + ou – pour sélectionner HOLOGE AUTO. S Y S T E M E D E R E G L AG E R E G L AG E H O R L O G E LANGUAGE/IDIOMA/LANGUE H O L O G E AU TO O N O F F HEURE DE L'EST H E U R E AVA N C E E 4 Appuyez sur ENTER pour sélectionner ON. SYSTEME DE REGLAGE REGLAGE HORLOGE LANGUAGE/IDIOMA/LANGUE HOLOGE AUTO ON OFF HEURE DE L'EST HEURE AVANCEE 5 2 1 2 3 Appuyez sur SET/TRACKING + ou – pour sélectionner SYSTEME DE REGLAGE et appuyez ensuite sur ENTER.
5 Sélection des chaînes Avant la mémoire de chaîne automatique, cet appareil peut recevoir toutes les chaînes captables dans votre zone géographique en appuyant plusieurs fois de suite sur la touche CHANNEL N ou M. Après la mémoire de chaîne automatique, vous pouvez omettre les chaînes qui ne sont pas présélectionnées à l’aide des touches CHANNEL N ou M. Appuyez deux fois sur MENU pour revenir à l’écran normal. Conseil Pour interrompre la mémoire de chaînes automatique, appuyez sur MENU.
Contrôle de la sélection des chaînes en vue de l’utilisation du système VCR Plus+® Avant de commencer. Réglez le sélecteur TV VCR/CATV sur TV VCR. 1 Appuyez sur MENU. 2 Appuyez sur SET/TRACKING + ou – pour sélectionner PROG. CNL, et appuyez ensuite sur ENTER. Pour régler le programmateur à l’aide du système VCR Plus+®, vous devez vérifier si le numéro des chaînes sur le magnétoscope correspond aux canaux guides assignés aux stations de télévision.
OPERATIONS DE BASE Regarder une émission de télévision POWER Touches numériques Pour mettre le téléviseur hors tension Appuyez sur POWER. Pour couper le son TV VCR/CATV Appuyez sur MUTING. Pour restaurer le son, appuyez sur MUTING, VOLUME + ou –. SLEEP Pour rappeler une chaîne précédente PREV.CH Appuyez sur PREV.CH pour commuter la chaîne en cours et la chaîne précédente.
Sélection du mode de soustitres Cet appareil peut décoder et afficher les sous-titres de télévision ou des cassettes vidéo. CAPTION Appuyez plusieurs fois de suite sur CAPTION pour sélectionner le mode de sous-titres. SS-TITRE CNL1 Remarques • Après avoir été sélectionné, le mode de sous-titres reste activé jusqu’à ce qu’il soit modifié, même si vous changez de chaîne.
5 Réglage de l’image Appuyez sur SET/TRACKING + ou – pour régler le paramètre sélectionné. Quelques secondes après avoir relâché la touche, l’affichage revient à l’écran normal. Vous pouvez ajuster le réglage de la luminosité, du contraste, de la couleur, de la teinte et de la netteté de l’image.
Réglage du son 5 Appuyez sur SET/TRACKING + ou – pour régler le paramètre sélectionné. Quelques secondes après avoir relâché la touche, l’affichage revient à l’écran normal. Vous pouvez ajuster les graves, les aiguës et la balance du son.
Réglage du programmateur de mise sous tension 4 Appuyez sur SET/TRACKING + ou – pour sélectionner MINU. MARCHE et appuyez ensuite sur ENTER. MINU MAR/ARR MINU. MARCHE 12:00AM CNL 001 DIM –SAM ANNULER Lorsque vous avez réglé ce programmateur, l’appareil se met sous tension à l’heure programmée et syntonise la chaîne programmée. MINU. ARRET 12:00AM ANNULER TV VCR/CATV 5 Appuyez sur SET/TRACKING + ou – pour régler l’heure et appuyez ensuite sur ENTER. MINU MAR/ARR MINU.
9 Appuyez sur SET/TRACKING + ou – pour afficher MARCHE et appuyez ensuite sur ENTER. L’indicateur ON-TIMER de l’appareil s’allume. MINU MAR/ARR MINU. MARCHE 10:30AM CNL 023 DIM–SAM MARCHE MINU. ARRET 12:00AM Réglage du programmateur de mise hors tension Lorsque vous avez réglé ce programmateur, l’appareil se met chaque jour hors tension à l’heure programmée. TV VCR/CATV ANNULER 10 Appuyez trois fois sur MENU pour revenir à l’écran normal. • A l’heure programmée, la chaîne passe à une chaîne programmée.
LECTURE Réglage du programmateur de mise hors tension (suite) 5 6 Lecture d’une cassette Appuyez sur SET/TRACKING + ou – pour régler l’heure et appuyez ensuite sur ENTER. MINU MAR/ARR MINU. MARCHE 12:00AM CNL 001 DIM–SAM ANNULER zEJECT MINU. ARRET 11:00PM TV MONITOR ANNULER Appuyez sur SET/TRACKING + ou – pour régler les minutes et appuyez ensuite sur ENTER. AD-SKIP Pour changer les minutes par intervalles de dix minutes, maintenez la touche SET/TRACKING + ou – enfoncée.
Si vous ne parvenez pas à obtenir une image de lecture claire Bien que le magnétoscope ajuste automatiquement l’alignement, il se peut que vous deviez le régler manuellement si la cassette est de qualité médiocre. Si l’image et le son comportent des parasites, réglez l’alignement manuellement. Pour ajuster l’alignement manuellement En cours de lecture, appuyez plusieurs fois de suite sur SET/TRACKING + ou – jusqu’à ce que vous obteniez la meilleure qualité d’image possible.
Lecture répétée d’une cassette Différentes fonctions de recherche TV VCR/CATV POWER TV VCR/CATV Touches numériques (1 à 9) INDEX CALL RESET dPLAY ZERORETURN wREC/OTR fREW/[ ENTER MENU gF FWD/] sSTOP REC. END SEARCH SET/TRACKING +/– Avant de commencer... Réglez le sélecteur TV VCR/CATV sur TV VCR. 1 2 Appuyez sur MENU. Rembobinage ou avance rapide jusqu’ à un point donné. — Retour à Zéro Appuyez sur SET/TRACKING + ou – pour sélectionner AUTO REPEAT. M E N U PROG. ENR. PROG. FONC PROG.
Recherche avec la fonction d’indexation — Recherche d’index Le magnétoscope insère automatiquement un signal d’index sur la cassette chaque fois qu’un enregistrement démarre. Vous pouvez utiliser ces signaux pour localiser le début de chaquee nregistrement. Avant de commencer... Réglez le sélecteur TV VCR/CATV sur TV VCR. 1 Appuyez sur INDEX en mode d’arrêt ou de lecture. 2 Appuyez sur les touches numériques (1-9) pour sélectionner le numéro d’index (jusqu’à 9).
ENREGISTREMENT Enregistrement d’une émission télévisée 3 TV VCR/CATV Pour sélectionner une émission CATV à l’aide des touches numériques Mettez le sélecteur TV VCR/CATV sur CATV. Pour sélectionner un numéro entre 10 et 19, appuyez sur 0 pour le chiffre des centaines et appuyez ensuite sur les touches 1 à 9 pour introduire le chiffre des dizaines puis des unités.
Lecture du passage que vous venez d’enregistrer — Lecture monotouche La fonction de lecture monotouche s’avère très pratique après un enregistrement suivant le système VCR Plus+® (page 25) ou un enregistrement programmé manuellement (page 27). Vous pouvez réaliser des enregistrements par programmateur et ne reproduire ultérieurement que le passage que vous venez d’enregistrer à l’aide du programmateur en appuyant sur une seule touche.
Enregistrement avec la fonction monotouche (suite) Pour arrêter l’enregistrement Appuyez sur la touche s STOP de la télécommande ou Z STOP/EJECT de l’appareil. Le bouton wREC/OTR de l’appareil s’éteint. Pour allonger la durée d’enregistrement pendant un enregistrement Appuyez sur w REC/OTR jusqu’à ce que la durée voulue apparaisse dans la fenêtre d’affichage.
3 Appuyez sur SET/TRACKING + ou – pour sélectionner 1 FOIS, QUOT ou HEBDO. Pour Une seule émission Une émission journalière Une émission hebdomadaire, par ex. tous les lundis (HEB-LUN) 4 Sélectionnez 1 FOIS QUOT HEBDO Appuyez sur ENTER. • Les informations du programmateur suivantes apparaissent sur l’écran. • Si vous désirez modifier le réglage ici, voir “Changement des réglages”. PLUSCODE NO.
Réglage manuel du programmateur 5 Si vous ne pouvez pas utiliser le système VCR Plus+®, vous pouvez programmer manuellement des enregistrements. Vous pouvez programmer jusqu’à 8 enregistrements dans un délai d’un mois à partir de la date d’aujourd’hui. TV VCR/CATV • Pour changer les minutes par intervalles de 10 minutes, maintenez la touche SET/TRACKING + ou – enfoncée. • La liste des enregistrements programmés apparaît. 6 Pour programmer un autre enregistrement, répétez les étapes 3 à 5.
Copie Raccordement d’un autre magnétoscope VX-S207 (Arrière) VX-S207 (Avant) AUDIO VIDEO R L (MONO) OUT LINE 1 Jaune Rouge Rouge Blanc Jaune Blanc ou Câble audio/vidéo (non fourni) Vers les prises de sortie audio/vidéo Autre magnétoscope (lecteur) ou Conseils • Si l’autre magnétoscope est un modèle mono, ne raccordez qu’une fiche audio à la prise AUDIO IN L (MONO).
AUTRES FONCTIONS Réglage de la puce V 5 Réintroduisez le même mot de passe par mesure de sécurité et appuyez ensuite sur ENTER. REGLAGE PUCE V Vous pouvez programmer une limitation suivant l’âge afin d’empêcher les enfants de regarder ou d’écouter des scènes violentes ou des programmes pour adultes. Cet appareil est conforme à “CLASS. PROG. TV” et “CLASS. FILM”. Pour pouvoir utiliser la fonction de puce V, vous devez d’abord enregistrer un mot de passe.
• Si TV-MA est sélectionné, les éléments suivants apparaissent. REGLAGE CLASS. :TV-MA VIOLENCE CONTEXTE SEXUEL LANGUE ADULTE ON ON ON Pour utiliser le téléviseur après avoir activé la protection Lors de la réception d’une émission protégée à l’aide de la fonction de puce V, le message “PROTECTION-PUCE V” apparaît. PROTECTION-PUCE V SI VOUS ANNULER LA PROTECTION ENTRER MOT DE PASSE. 4 Appuyez sur MENU pour revenir au menu V-CHIP SET.
Son télévisé multicanal (MTS) et système de son Hi-Fi TV VCR/CATV Touches numériques CHANNEL N/M Enregistrement du son d’une émission SAP Avant de commencer... • Introduisez une cassette et sélectionnez la vitesse de défilement de la bande. • Réglez le sélecteur TV VCR/CATV sur TV VCR. 1 2 wREC/OTR AUDIO SET/TRACKING +/– M E N U PROG. ENR. PROG. FONC PROG.
Signal enregistré et signal transmis de l’émission MTS Ecran du Emission téléviseur Signal transmis via AUDIO OUT Signal enregistré SAP Piste hi-fi Piste normale L R Mono — Mono OFF Mono Mono Mono STEREO Stéréo OFF Canal Gauche/ Droit Mono Gauche + droit Canal Canal gauche droit Mono Gauche: Mono Droit:SAP Mono Mono Mono SAP SAP SAP OFF Canal Gauche/ Droit Mono Gauche + droit Canal Canal gauche droit ON Gauche: Gauche + droit SAP Droit:SAP OFF SAP Mono+SAP ON STEREO/ Stéréo
INFORMATIONS COMPLEMENTAIRES Dépannage Si l’appareil semble ne pas fonctionner correctement, relisez les instructions d’utilisation et consultez ensuite le guide dedépannage suivant. La réception télévisée est parasitée ou il n’y a pas de réception télévisée. Raccordez correctement l’antenne. Absence d’image ou de son L’appareil est en mode d’entrée LINE. Absence de son Augmentez le niveau du volume. Absence ou mauvaise qualité des couleurs Ajustez le réglage des couleurs.
Spécifications Tyntoniseur Syntoniseur à fréquence synthétisée Système de télévision M Couverture des chaînes VHF: 2 à 13 UHF: 14 à 69 CATV: 5A, A-1 à A-5, A à W, W+1 à W+84 Mémoire de programmes 181 Entrée d’antenne 75 ohms, asymétrique Tube image VX-S207 406(L) × 305(H) mm (16 × 12 1/8 po) 508 mm (en diagonal e) (20 po) VX-S137 208(L) × 211(H) mm (8 1/4 × 8 3/8 po) 335 mm (en diagonal e) (13 po) Système d’enregistrement vidéo Système de balayage hélicoïdal à 2 têtes rotatives Têtes vidéo 2 têtes double az
Composants et commandes Panneau frontal (VX-S207) Ecran du téléviseur Touche =ONE-TOUCH PLAYBACK Compartiment de la cassette Touche wREC (Enregistrement)/ OTR (One-Touch Recording) Touche DPLAY Touche POWER Prise pour casque d’écoute Prises LINE 2 IN VIDEO/ AUDIO L (MONO)/R Indicateurs (POWER, TIMER, REC, ON-TIMER) Capteur de télécommande Touche ZSTOP/EJECT Touche gF FWD (avance rapide)/ ] Touche fREW (rembobinage)/ [ Touches CHANNEL M/N Touches VOLUME +/– Panneau frontal (VX-S137) Ecran du télévis
Panneau arrière Support d’antenne Crochet de sécurité (VX-S207 uniquement) Connecteur UHF/VHF Prises VIDEO OUT/AUDIO OUT L/R Prises LINE 1 IN VIDEO/ AUDIO L (MONO)/R Crochet du cordon d’alimentation Cordon d’alimentation Télécommande Touche VCR PLUS+ Sélecteur TV VCR/CATV Touche OTPB (lecture monotouche) Touche POWER Touche zEJECT Touche SLEEP Touches numériques (0-9) Touche PREV.
For Assistance and Information,Call Toll Free 1-800-BUY-AIWA (United States and Puerto Rico) 8A-JTD-901-31 000620DTN-YX Printed in Thailand