CD Stereo System XR-EM30 OPERATING INSTRUCTIONS En (English) MANUAL DE INSTRUCCIONES E (Español) MODE D'EMPLOI F (Français) U Owner’s record For your convenience, record the model number and serial number (you will find them on the rear of your set) in the space provided below. Please refer to them when you contact your Aiwa dealer in case of difficulty. Model No. Serial No. (Lot No.
IMPORTANT SAFETY INSTRUCTIONS WARNING To reduce the risk of fire or electric shock, do not expose this appliance to rain or moisture. CAUTION En RISK OF ELECTRIC SHOCK DO NOT OPEN “CAUTION:TO REDUCE THE RISK OF ELECTRIC SHOCK, DO NOT REMOVE COVER (OR BACK). NO USER-SERVICEABLE PARTS INSIDE. REFER SERVICING TO QUALIFIED SERVICE PERSONNEL.
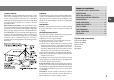
TABLE OF CONTENTS Outdoor Antenna Lightning Power lines - An outside antenna system should not be located in the vicinity of overhead power lines or other electric light or power circuits, or where it can fall into such power lines or circuits. When installing an outside antenna system, extreme care should be taken to keep from touching such power lines or circuits as contact with them might be fatal.
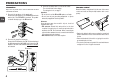
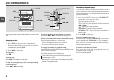
PREPARATIONS Connection Plug in the AC power cord to the AC outlet after all other connections are made. 1 Connect the speakers to the main unit. Connect the right speaker to the SPEAKERS R terminals and the left to the SPEAKERS L terminals. The speaker cords with the stripes go to the 0 terminals. En 2 Connect the supplied antennas. Connect the FM antenna to the FM 75 Ω terminals and the AM antenna to the AM LOOP jack. Connect the FM antenna to the FM 75 Ω terminals without the 2 mark, as illustrated.
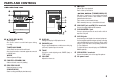
PARTS AND CONTROLS 8 sCLEAR CD and Tape: stops playback. Radio: clears a preset station. Main unit: front/rear 1 2 3 4 6 7 9 8 0 ! 5 1 cTAPE (REC MUTE) Starts playback. Also used to enter 4-second blank spaces during recording. TUNER/AUX/BAND Selects Radio function and the radio band. Also selects the function of external equipment connected to AUX IN jacks. ECD Starts and pauses CD play. @ 9 AM LOOP jack and FM 75 Ω terminals Connect the supplied AM and FM antennas.
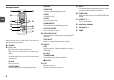
Remote control 1 DISPLAY 7 2 En 3 4 5 6 8 9 0 ! PROGRAM Selects programmed CD playback mode. TIMER Selects timer mode. 7 FUNCTION Switches the active function among TAPE, TUNER, AUX and CD. SLEEP Selects sleep-timer mode. 8 PRESET +,Tunes in a preset station. RANDOM/REP Selects random or repeat CD playback mode. 9 f/r, t/g CD EDIT/CHECK Selects edited CD recording. 3 REC/REC PAUSE Starts and pauses recording when pressed with SHIFT held down.
ADJUSTMENTS BEFORE OPERATION To display the time while the power is on Hold down SHIFT and press CLOCK on the remote control. The time will be displayed for 6 seconds. TAPE, TUNER/AUX/BAND, CD CLOCK POWER 6STANDBY/ON DISPLAY s TONE DISPLAY CD, TUNER/BAND, TAPE, AUX,s f,g SET f,g SHIFT To switch to the 24-hour standard Display the time and press s within 6 seconds. With each press, the clock alternates between 12- and 24hour standard time.
CD OPERATIONS OPEN 0–10, +10 E PROGRAM s En DISPLAY DISPLAY RANDOM/ REP f,g s E f,g SHIFT This unit plays back finalized CD-R/RW discs as well as audio CDs. To search (playback in fast forward or reverse) Hold down f or g. Release at the desired point. Playing a CD To select a track with the remote control (Direct play) Press the numbered buttons to select a track. - To select the 25th track, press +10, +10 and 5. - To select the 11th track, press +10 and 1.
Programmed play Plays back up to 30 selected tracks in programmed order. 1 Hold down SHIFT and press PROGRAM on the remote control in stop mode. "PRGM" flashes on the display. 2 Press the numbered buttons on the remote control to program a track. -To select the 25th track, press +10, +10 and 5. -To select the 11th track, press +10 and 1. The selected track number lights up on the display. To check the program Press f or g repeatedly in stop mode.
RADIO OPERATIONS Tuning in preset stations TUNER MODE TUNER/ AUX/BAND 0–10, +10 POWER En f,g s SET PRESET +,TUNER/BAND f,g SHIFT Manual tuning Preset tuning 1 Press TUNER/AUX/BAND (TUNER/BAND on the remote control) repeatedly to select a band. Preset up to 32 of your favourite stations and tune them in directly. 2 Press f or g repeatedly to tune in a station. Presetting stations "TUNE" is displayed when a station is tuned in. "1" is displayed for FM stereo reception.
SOUND ADJUSTMENTS Adjustments To switch to monaural FM reception Hold down SHIFT and press TUNER MODE on the remote control so that "MONO" is displayed. To cancel, repeat the above so that "STEREO" is displayed. TONE VOLUME Tip: When FM stereo reception is poor, switching to monaural reduces noise. To switch the AM tuning interval The default setting of the AM tuning interval is 10 kHz/step. If you use this unit in an area where the frequency allocation system is 9 kHz/step, change the tuning interval.
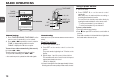
TAPE PLAYBACK Notes on cassettes TUNER MODE c En REC/ REC PAUSE SYNCHRO REC FUNCTION f,g zPUSH EJECT REC/ REC PAUSE REC MUTE s c f,g SHIFT s Playback Use only type I (normal) tapes. 1 Press zPUSH EJECT to open the cassette holder. 2 Insert the tape. Insert with the exposed side down and the side to be played facing out from the unit, and press zPUSH EJECT to close the cassette holder. To stop playback Press s. To rewind or fast forward Press f or g.
TAPE RECORDING Basic recording Use only type I (normal) tapes. 1 Press zPUSH EJECT to open the cassette holder. 2 Insert the recording tape. Insert with the exposed side down, and the side to be recorded on facing out from the unit. Press zPUSH EJECT to close the cassette holder. 3 Press FUNCTION on the remote control to select the source to be recorded. 4 Prepare the source. To record CD, load a disc. To record a radio broadcast, tune in the desired station.
Programmed Edit Recording FUNCTION s En REC/ REC PAUSE f,g CD EDIT/ CHECK REC/ REC PAUSE 0–10, +10 s f,g SHIFT As you program the CD tracks to record, Programmed Edit Recording displays the remaining recording time for each side of the tape, so you can easily select a set of desired tracks within the length of your tape. • Recording cannot start from a point halfway in the tape. • You cannot program more than 30 tracks. • You cannot program a track with a track number larger than 30.
8 Hold down SHIFT and press CD EDIT/CHECK once to switch back to side A. To stop recording Press s. Recording and CD playback stop simultaneously. 9 Press REC/REC PAUSE once. To check the program 1 Before recording, hold down SHIFT and press CD EDIT/CHECK on the remote control to select side A or B. 2 Press f or g repeatedly. The track number and program number are displayed in succession. The tape is rewound to the beginning of side A.
TIMER OPERATIONS 5 Press f or g to set the timer-activated duration, then press SET. POWER POWER 6STANDBY/ON En s TONE TIMER SLEEP 6 Press f or g to adjust the volume for timer playback, and press SET. s f,g SET With each press, the timer-activated duration changes in 5-minute steps between 5 to 240 minutes. f,g SHIFT The volume level can be adjusted from 0 to 16. 7 Prepare the source. To play CD, load a disc. To play a tape, insert the tape.
Timer recording Timer recording is available only for TUNER and AUX (with an external timer) sources. 1 Hold down SHIFT and press TIMER on the remote control repeatedly so that "5 REC" is displayed. 2 Within 6 seconds, press SET. 3 Press f or g to set the timer-on time, and press SET. Each press changes the time in 1-minute steps. Holding these buttons down will vary the time in 10-minute units. 4 Press f or g to select the source, and press SET. •For timer recording of a radio broadcast, select "TU".
REFERENCE En Care and maintenance Troubleshooting Occasional care and maintenance of the unit and the software are needed to optimize the performance of your unit. If your unit fails to perform properly, check the following guide and the relevant sections of the Operating Instructions. To clean the cabinet Use a soft and dry cloth. If the unit surfaces are extremely dirty, use a soft cloth lightly moistened with mild detergent solution. Do not use strong solvents such as alcohol, benzine or thinner.
GENERAL Specifications Power requirements Power consumption Dimensions (W × H × D) MAIN UNIT CX-LEM30 TUNER FM tuning range FM usable sensitivity (IHF) FM antenna terminal AM tuning range AM usable sensitivity AM antenna 87.5 MHz to 108 MHz 13.
Printed in China