aiwa MD/CD STEREO SYSTEM XR-H33MD OPERATING INSTRUCTIONS For assistance and information call toll free 1-800-BUY-AIWA (United States and Puerto Rico) 87-NB8-909-01 971220AKY-U-0 ENGLISH pg. 1 WARNING TO REDUCE THE RISK OF FIRE OR ELECTRIC SHOCK, DO NOT EXPOSE THIS APPLIANCE TO RAIN OR MOISTURE. "CAUTION: TO REDUCE THE RISK OF ELECTRIC SHOCK, DO NOT REMOVE COVER (OR BACK). NO USER-SERVICEABLE PARTS INSIDE. REFER TO QUALIFIED SERVICE PERSONNEL.
important operating and maintenance (servicing) instructions in the literature accompanying the appliance. Owner's record For your convenience, record the model number and serial number (you will find them on the rear of your set) in the space provided below. Please refer to them when you contact your Aiwa dealer in case of difficulty. Model No. CX-NH33MD SX-NH33 Serial No. (Lot No.) PRECAUTIONS Read the Operating Instructions carefully and completely before operating the unit.
service or replace the outlet. To avoid defeating the safety feature of the polarized plug, do not force it into a power outlet. 3 AC power cord - When disconnecting the AC power cord, pull it out by the AC power plug. Do not pull the cord itself. - Never handle the AC power plug with wet hands, as this could result in fire or shock. - Power cords should be routed to avoid being severely bent, pinched, or walked upon. Pay particular attention to the cord from the unit to the power socket.
GRAPHIC EQUALIZER. . . . . . . . . . . . . . . . . . . . . . . . . . . . . . . . . . . . . . . . . . . . . . . . .6 RADIO RECEPTION MANUAL TUNING. . . . . . . . . . . . . . . . . . . . . . . . . . . . . . . . . . . . . . . . . . . . . . . . . . . . 7 PRESETTING STATIONS. . . . . . . . . . . . . . . . . . . . . . . . . . . . . . . . . . . . . . . . . . . . . . .8 TAPE PLAYBACK BASIC OPERATIONS. . . . . . . . . . . . . . . . . . . . . . . . . . . . . . . . . . . . . . . . . . . . . . . . . .
SPECIFICATIONS. . . . . . . . . . . . . . . . . . . . . . . . . . . . . . . . . . . . . . . . . . . . . . . . . . . . 34 TROUBLESHOOTING GUIDE. . . . . . . . . . . . . . . . . . . . . . . . . . . . . . . . . . . . . . . . . .35 MD GUIDE MESSAGES. . . . . . . . . . . . . . . . . . . . . . . . . . . . . . . . . . . . . . . . . . . . . . . 36 PARTS INDEX. . . . . . . . . . . . . . . . . . . . . . . . . . . . . . . . . . . . . . . . . . . . . . . . . . Back cover PREPARATIONS pg.
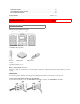
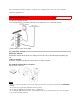
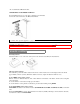
The cords with the white stripe should be connected to the + terminals and the other cords to the - terminals. Speaker Hookup Illustration PREPARATIONS (cont.) pg. 4 2 Connect the supplied antennas. Connect the FM antenna to the FM 75 Ω terminals and the AM antenna to the AM LOOP terminals. 3 Connect the AC cord to an AC outlet. To position the antennas FM feeder antenna: Extend this antenna horizontally in a T-shape and fix its ends to the wall with cellophane tape, etc.
• Do not unwind the AM antenna wire. CONNECTING AN OUTDOOR ANTENNA For better FM reception, use of an outdoor antenna is recommended. Connect the outdoor antenna to the FM 75 Ω terminals. To connect other optional equipment.→ page 31. PREPARATIONS (cont.) pg. 5 REMOTE CONTROL Inserting batteries Detach the battery cover on the rear of the remote control and insert two R6 (size AA) batteries.
NOTE • If the unit is not going to be used for an extended period of time, remove the batteries to prevent possible electrolyte leakage. • The remote control may not operate correctly when: - The line of sight between the remote control and the remote sensor on the bottom of the front panel (see the illustration of "BEFORE OPERATION") is exposed to intense light, such as direct sunlight. - Other remote controls are used nearby (television, etc.
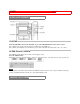
SOUND pg. 6 AUDIO ADJUSTMENTS VOLUME Turn the VOLUME control on the main unit, or press the VOLUME buttons on the remote control. The volume level is shown on the displayed as a number from 0 to MAX (31). The volume is automatically set to 16 when the power is turned off when the volume level is set to 17 or more. SUPER T-BASS SYSTEM The T-BASS system enhances the realism of low frequency sound. Press the T-BASS button. Each time it is pressed, the level changes.
This unit provides the following three different kinds. ROCK: Powerful sound emphasizing treble and bass. POP: More presence in the vocals and midrange. CLASSIC: Accented lower frequencies for jazz-type music. Press the ROCK, POP, or CLASSIC button. The selected equalization mode is displayed. To cancel the selected mode Press the selected button again. "GEQ OFF" is displayed. To select with the remote control Press the GEQ button repeatedly while pressing SHIFT.
1 Press the TUNER/BAND button repeatedly to select the band. When the TUNER/BAND button is pressed while the power is off, the power is turned on directly. 2 Press the DOWN or UP button to select a station. Each time the button is pressed the frequency changes. When a station is received, "TUNE" is displayed for 2 seconds. During FM stereo reception, is displayed. To search for a station quickly (Auto Search) Keep the DOWN or UP button pressed until the tuner starts searching for a station.
The unit can store a total of 32 preset stations. (Each band has a maximum of 20 available preset stations.) When a station is stored, a preset number is assigned to the station. Use the preset number to tune in to a preset station directly. 1 Press the TUNER/BAND button to select a band. Then, press the DOWN or UP select a station. 2 Press the SET button to store the station. A station is assigned a preset number for each band in consecutive order beginning from 1. button to 3 Repeat steps 1 and 2.
TAPE PLAYBACK pg. 9 BASIC OPERATIONS • On deck 1, tapes are always played back on both sides. On deck 2, you can select a reverse mode to play one or both sides. • Use Type I (normal) tapes only. 1 Press the TAPE button and press the EJECT mark to open the cassette holder. Insert a tape with the exposed side down. Push the cassette holder to close. 2 Press the button to start play. : The front side is being played (forward). : The back side is being played (reverse).
To play from front side to reverse side once only, select . To play both sides repeatedly, select . • When tapes are loaded in both decks, on the display indicates Continuous Play. 3 Within 10 seconds, press ENTER again. When tapes are loaded in both decks Press TAPE first to select a deck. The selected deck number is displayed. To stop play, press the button. To pause play (deck 2 only), press the button. To resume play, press again.
4 Press to start playback. Playback continues until is pressed. About cassette tapes • To prevent accidental erasure, break off the plastic tabs on the cassette tape after recording with a screwdriver or other pointed tool. To record on the tape again, cover the tab openings with adhesive tape, etc. (On Type II tapes, take care not to cover the Type II tape detection slot.) • 120-minute or longer tapes are extremely thin and easily deformed or damaged. They are not recommended.
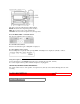
LOADING DISCS Press the CD button, then press the OPEN/CLOSE button to open the disc compartment. Load disc (s) with the label side up. To play one or two discs, place the discs on the tray 1 and 2. To load three discs, press the DISC CHANGE button to rotate the trays after placing two disc. Place the third disc on tray 3. Close the disc compartment by pressing the OPEN/CLOSE button. PLAYING DISCS Load discs. To play all discs in the disc compartment, press Play begins with the disc on tray 1. .
To play one disc only, press one of the DISC DIRECT PLAY 1-3. The selected disc is played once. To stop play, press the button. To pause play, press the button. To resume play, press again. To search for a particular point during playback, keep the or the desired point. To skip to the beginning of a track during playback, press the or JOG until the desired track is displayed. To remove discs, press the OPEN/CLOSE button.
A single disc or all the discs can be played repeatedly. Press the RANDOM/REPEAT button repeatedly. Each time it is pressed, the function can be selected cyclically. c RANDOM is surrounded in red. d lights up on the display. e RANDOM is surrounded in red and light up on the display. To play all discs, press the button to start play. To play a single disc, press DISC DIRECT PLAY 1-3. NOTE During random play following operations are not possible: - to select the tracks directly with the numbered buttons.
4 Repeat steps 2 and 3 to program other tracks. 5 Press the button to start play. To check the program Each time the or be displayed. button is pressed in stop mode, a disc number, track number, and program number will To clear the program Press CLEAR in stop mode. To add tracks to the program Repeat steps 2 and 3 in stop mode. The track will be programmed after the last programmed track. To change the programmed tracks Clear the program and repeat all the steps again.
1 Press the MD button. 2 Insert a disc into the disc drive with the label side up and in the direction of the arrow. TOC READING is displayed while the unit reads the data on the inserted disc. Then the information contained in the disc is displayed. 3 Press . Play begins. To stop play, press the button. To pause play, press the button. To resume play, press again. To search for a particular point during playback, keep the or the desired point.
MULTI JOG control until the desired track is displayed. To eject a disc, press the EJECT button and pull the disc out. NOTE Do not hold the disc while ejecting it, otherwise a disc can not be inserted the next time. If this happens, turn off the power and disconnect the AC power cord. Then connect it again. To start play when the power is off (Direct play function) Press the MD button. The power is turned on and play of the inserted disc begins.
c RANDOM is surrounded in red. d lights up on the display. e RANDOM is surrounded in red and light up on the display. NOTE During random play, the following operations are not possible: - to select the tracks directly with the numbered buttons. - to skip to the previously played track with the button or the MULTI JOG control. PROGRAMMED PLAY Up to 30 tracks can be programmed from the inserted disc. Use the remote control. 1 Press PRGM while pressing SHIFT in stop mode. "PRGM" lights up.
Each time or is pressed in stop mode, a track number and a program number will be displayed. To clear the program Press CLEAR in stop mode. When the disc is removed, the program is also cleared. To add tracks to the program Repeat step 2 in stop mode. The track will be programmed after the last track. To change the programmed tracks Clear the program and repeat all the steps. NOTE During programmed play, you can not perform random play, check the remaining time, or select a track. TAPE RECORDING pg.
(3) Within 10 seconds, press ENTER again. 3 Press one of the function buttons and prepare the source to be recorded. To record from a CD, press the CD button and load the CD(s). Then, select an track to be recorded first with the , buttons or MULTI JOG control. To record form an MD, press the MD button and insert an MD. Then, select a track to be recorded first with the , buttons or MULTI JOG control. To record from a radio broadcast, press the TUNER button and tune into a station.
NOTE • Set the tape to the point where recording will start. • The reverse mode is automatically set to " ". Note that recording will be done on one side of the tape only. 1 Press TAPE. 2 Insert the original tape into deck 1 and the tape to be recorded on into deck 2. Insert the tapes with the sides to be played back or recorded on first facing out from the unit. 3 Press the TAPE/DECK 1/2 button to select deck 1. "TAPE 1" is displayed. 4 Press z TAPE REC/REC MUTE to start recording.
3 Press the SYNC DUB button to start recording. The tapes are rewound to the beginning of the front sides, and recording starts. To stop dubbing Press . RECORDING (cont.) pg. 17 AI EDIT RECORDING The AI edit function enables CD recording without worrying about tape length and track length. When a CD is inserted, the unit automatically calculates the total track length. If necessary, the order of tracks is rearranged so that no track is cut short.
5 Press the numbered buttons on the remote control to designate the tape length. 10 to 99 minutes can be specified. Example: When using a 60 minute tape, press the 6 and 0 buttons. In a few seconds, the microcomputer determines the tracks to be recorded on each side of the tape. • The and buttons are also available to designate the tape length. 6 Press the z TAPE REC/REC MUTE button to start recording on the first side.
PROGRAMMED EDIT RECORDING Programmed edit function enables CD recording while check the remaining time on each side of the tape as the tracks are programmed. NOTE The programmed edit recording will not start from a point halfway in the tape. The tape must be recorded from the beginning of either side. 1 Insert the tape into deck 2. Insert the tape with the side to be recorded on first facing out from the unit. 2 Press the CD button and load the CD(s).
7 Press the EDIT/CHECK button on the remote control while pressing SHIFT to select side B and program the tracks for side B. After confirming B on the display, repeat step 5. 8 Press z TAPE REC/REC MUTE button to start recording. The tape is rewound to the beginning of the front side, the lead segment is played through for 10 seconds, and recording starts. When recording on the front (side A) ends, recording on the back (side B) starts. To stop recording Press clear.
1 Insert a recordable MD into the disc drive with the label side up and in the direction of the arrow. 2 Press the CD button and load a CD to be recorded on tray 1. 3 Press the CD MD button once to start recording. "CD MD direct" is displayed and recording begins. During recording, display changes to the elapsed playing time. When the last track of the CD finishes playing, the recording stops automatically.
The track order information in the original CD will be copied as the index marks. To record on a previously recorded MD If there is an unrecorded section left of the MD, the new recording automatically starts from where the previous recording finished. If you want to start recording from the beginning of a previously recorded MD, erase the previous recording completely. (See page 28.
interruption, if you press the DISC CHANGE button to replace the CDs during recording. 1 Insert a recordable MD into the disc drive with the label side up and in the direction of the arrow. 2 Press the CD button and load the CDs to be recorded. 3 Press the CD MD button twice to start recording. "CD MD single" is displayed and recording begins with the first track of the CD on tray 1. To replace CDs during recording, press the DISC CHANGE button and replace with other CDs.
1 Insert a recordable MD into the disc drive with the label side up and in the direction of the arrow. 2 Press CD and load CDs. 3 Press PRGM on the remote control while pressing SHIFT. PRGM is displayed. 4 Press the DISC DIRECT PLAY 1-3 to select a CD. Then, press the numbered buttons 0-9 and +10 button to program a track. 5 Repeat step 4 to program other tracks. 6 Press the CD MD button to start recording. Recording begins. When the programmed tracks finish playing, the recording stops automatically.
4 Within 10 seconds, press the ENTER button and turn the MULTI JOG control to select and index mark mode. To register index marks automatically at the beginning of each track, select "Mark:AUTO?". To register index marks every 5 minutes, select "Mark:TIME?". To register without index marks, select "Mark:OFF?". 5 Within 10 seconds, press the ENTER button. 6 Press zMD REC. The unit enters the standby mode and waits until CD is displayed. 7 Press the to start recording. Recording begins.
MD RECORDING (cont) pg. 22 RECORDING FROM A TAPE, THE RADIO OR CONNECTED EQUIPMENT 1 Insert a recordable MD into the disc drive with the label side up and in the direction of the arrow. 2 Press one of the function buttons and prepare the source to be recorded. To record from a tape, press the TAPE button and insert a tape. To record from the radio, press the TUNER button and tune in a station.
6 Press the zMD REC button. Unit enters the standby mode and waits until the remaining recordable time of the MD is displayed. 7 Press the button to start recording. 8 Press the button to stop recording. When the recording finishes, TOC EDIT is displayed and the data concerning the contents of the recording are registered. To add index marks during recording Press the ENTER button at the desired point during recording.
the recording sound will be monaural. 1 Insert a recordable MD into the disc drive with the label side up and in the direction of the arrow. 2 Press one of the function buttons and prepare the source to be recorded. To record from a tape, press the TAPE button and insert a tape. To record from the radio, press the TUNER button and tune in a station. • To record from a source of equipment connected to DIGITAL IN terminal on the rear, press AUX/D-IN repeatedly until "D-IN" appears in the display.
When the recording finishes, TOC EDIT is displayed and the data concerning the contents of the recording are registered. To add index marks during recording Press the ENTER button at the desired point during recording. NOTE When one of the Function buttons is pressed, the extended recording mode is canceled. EXTENDED TIMER RECORDING 1 Carry out steps 1 to 5 of "SETTING THE TIMER RECORDING" on page 30. 2 Carry out steps 3 to 5 of "EXTENDED RECORDING" on this page so that "MONO" is displayed.
Ultra compact size made possible by ATRAC*2 technology A newly developed digital audio compression technology called the ATRAC system automatically extracts only the frequencies that are actually audible to the human ear and cuts the frequencies which are inaudible. This compresses the amount of data to be recorded to 1/5 of the normal amount. The ATRAC system is based upon studies carried out in the field of auditory psychology and does not impair the quality of the audible sound.
MD EDIT pg. 25 REGISTERING THE DISC TITLE AND TRACK TITLE You can register the titles of the discs and tracks according to the CD which you made the recording from. Personal messages also can be registered. REGISTERING THE DISC TITLE 1 Press the MD button and insert an MD to register the titles. 2 Press MODE button in stop mode. "Disc Title?" is displayed for 10 seconds. 3 Within 10 seconds, press the ENTER button. The unit into character entry mode. 4 Enter a letter, number or symbol.
NOTE • While TOC EDIT is displayed, do not disconnect the AC cord or shake the unit. Otherwise, the TOC data is not recorded properly and the edited contents on a disc can not be played. • A disc can not be edited: - when a prerecorded disc is inserted. (PB DISC is displayed.) - when the record-protect tab on an inserted disc is moved to the protected position. (Can't Edit is displayed.) - during random play or programmed play. (2) Turn the MULTI JOG control to select a desired character.
Title? is displayed for 10 seconds. 3 Within 10 seconds, press the ENTER button. The unit turns into character entry mode. 4 Enter a letter, number of symbol. (1) Press the MODE button repeatedly to select the kind of character (capital letters, small letters or numbers/symbols). (2) Turn the MULTI JOG control to select a desired character. (3) Press the button after you have selected a character. The selected character stops flashing and moves to the left. MD EDITING (cont) pg.
You can divide a track into two parts by registering an index mark. Example To divide the fifth track into two parts at 2 minutes 30 seconds. 1 Press the MD button and insert an MD. 2 During playback, press the Playback enters pause mode. at the point to be divided. 3 Press MD EDIT repeatedly until "Divide" is displayed. "Divide 5?" is displayed. 4 Within 10 seconds, press ENTER. A 3-second part from the point pressed 5 Adjust the point to divide with is played repeatedly.
- when elapsed time is displayed as 0:00 MD EDITING (cont) pg. 27 COMBINING TWO TRACKS You can combine two tracks by erasing the index mark in between. Example To combine the 2nd track and the 3rd track by erasing the index mark at the beginning of the 3rd track. 1 Press the MD button and insert an MD. 2 Select the latter track of the two tracks that you want to combine with the numbered buttons 0-9 and +10 on the remote control or turn MULTI JOG.
If only one track is titled on the tracks to be combined, this title remains. NOTE You can not combine a track recorded in monaural and a track recorded in stereo. CHANGING THE ORDER OF THE TRACKS You can change the order of tracks after completing a recording. The order does not go back to the original order even when the power turns off. Example To move the 3rd track to the 1st position. 1 Press the MD button and insert an MD.
6 Within 10 seconds, press the ENTER button. The order of tracks is changed. When EJECT is pressed to eject a disc, TOC EDIT is displayed, the data concerning the contents of the editing are registered. MD EDITING (cont) pg. 28 ERASING TRACKS ERASING ALL TRACKS ON A DISC 1 Press the MD button and insert an MD. 2 Press the MD EDIT button repeatedly until "Erase All?" is displayed. 3 Within 10 seconds, press ENTER. If you erase all the tracks, you cannot retrieve them again.
1 Press the MD button and insert an MD. 2 Select the track that you want to erase with MULTI JOG or the numbered buttons on the remote control. 3 Press the MD EDIT button repeatedly until "Erase" is displayed. Example: To erase the 3rd track. 4 Within 10 seconds, press the enter button. If you erase a track, you cannot retrieve it again. Make sure to check that it is all right to erase the track. To cancel, press the button. 5 Within 1 minute, press the ENTER button again.
2 Press the DOWN or UP button to designate the hour, and press the The hour stops flashing and the minute starts flashing. SET button. 3 Press the DOWN or UP button to designate the minute, and press the The minute stops flashing on the display and the clock starts from 00 seconds. SET button. To display the current time Press CLOCK on the remote control while pressing SHIFT. The time is displayed for 4 seconds. However, the time cannot be displayed during recording.
SET. Repeat to designate the minute of the timer on time. After you designate the timer-on time, one of the source name flashes on the display. 3 Press the DOWN or UP button to select a source, and press • If the TUNER button is pressed, the band cannot be selected in this step. CLOCK AND TIMER (cont) SET. pg. 30 4 Select the duration for the timer-activated period with the SET.
2 Designate the hour of the timer-on time by pressing to designate the minute of the timer-on time. DOWN or UP, and press SET. Repeat 3 Press DOWN or UP to select a source, and a tape or an MD to be recorded on. Then, press SET. To record from the radio broadcast on an MD, select FM (or AM) MD. To record from the radio broadcast on a tape, select FM (or AM) To record from connected equipment on an MD, select VIDEO To record from connected equipment on a tape, select VIDEO TP. MD. TP.
To check the time remaining until the power is turned off Press SLEEP once while pressing SHIFT. The remaining time is displayed for 4 seconds. To cancel the sleep timer Press SLEEP twice while pressing SHIFT so that "SLEEP" on the display disappears. OTHER CONNECTIONS CONNECTING OPTIONAL EQUIPMENT Refer to the operating instructions of the connected equipment for details. • The connecting cords are not supplied. Obtain the necessary connecting cords.
CD or MD DIGITAL OUT (OPTICAL) jack. When the CD or MD DIGITAL OUT (OPTICAL) jack is not being used Attach the supplied dust cap. OTHER CONNECTIONS (cont) pg. 32 DIGITAL IN (OPTICAL) JACK This unit can input digital sound signals through this jack. Use an optical cable to connect digital audio equipment. This unit has a sampling frequency rate converter and it enables you to record from a equipment whose sampling frequency is different from MD, such as a BS/CS tuner, DAT recorder, or etc.
TO PLAY EQUIPMENT CONNECTED TO THE DIGITAL IN JACK 1 Press AUX/D-IN repeatedly until "D-IN" appears on the display. 2 Play the connected equipment. GENERAL pg. 33 CARE AND MAINTENANCE Occasional care and maintenance of the unit and the software are needed to optimize the performance of your unit. To clean the cabinet Use a soft and dry cloth. If the surfaces are extremely dirty, use a soft cloth lightly moistened with mild detergent solution.
• After playing a CD, store the CD in its case. Do not leave the CD in places that are hot or humid. Care of tapes • Store tapes in their cases after use • Do not leave tapes near magnets, motors, television sets, or any source of magnetism. This will downgrade the sound quality and cause noise. • Do not expose tapes to direct sunlight, or leave them in a car parked in direct sunlight.
. . . . . . . . . . . . . . . . . . . . . . . . . . . . . . . . . . . . . . . . . . . . . . . . . . . . . . . . . . 6 ohms or more . . . . . . . . . . . . . . . . . . . . . . . . . . . . . . . . . . . . . . . . . . . . . . .PHONES (stereo jack): accepts . . . . . . . . . . . . . . . . . . . . . . . . . . . . . . . . . . . . . . . . . . . . . . headphones of 32 ohms or more . . . . . . . . . . . . . . . . . . . . . . . . . . . . . . . . . . . . . . . . . .
Specifications and external appearance are subject to change without notice. • US AND FOREIGN PATENTS LICENSED FROM DOLBY LABORATORIES LICENSING CORPORATION. COPYRIGHT Please check the laws on copyright relating to recordings from discs, radio or external tape for the country in which the machine is being used. NOTE This equipment has been tested and found to comply with the limits for a Class B digital device, pursuant to Part 15 of the FCC Rules.
→ Connect an outdoor antenna. The reception contains noise interferences or the sound is distorted. • Is the system picking up external noise or multipath distortion? → Change the orientation of the antenna. → Move the unit away from other electrical appliances. CASSETTE DECK SECTION The tape does not run. → Is deck 2 in pause mode? (→ page 9) The sound is off-balance or not adequately high. - Is the playback head dirty? (→ page 33) Recording is not possible.
To reset If an unusual condition occurs in the display window or the cassette decks, reset the unit as follows. 1 Press POWER to turn off the power. 2 Press POWER to turn the power back on while pressing CLEAR. Everything stored in memory after purchase is canceled. If the power cannot be turned off in step 1 because of a malfunction, reset by disconnecting the AC cord, and connect it again. Then carry out step 2. GENERAL (cont.) pg.
Mecha Error Error occurs in the loading mechanism. (All functions except POWER will be disabled.) Turn the power off and disconnect the AC cord once. Then turn it on again. If this message still appears, consult your local Aiwa dealer. Can't Copy Dubbing is prohibited by the SCMS standard. --- No Signal The digital connecting cord (optical) is not plugged in properly. Plug it in properly. MD Error A trouble occurs in the MD unit. Refer to your local Aiwa dealer.
DISP . . . . . . . . . . . . . . . . . . . . . . . . . . . . . . . . . . . . . . . . . . . . . . . . . . . . . . . . . . . 13,19 MODE . . . . . . . . . . . . . . . . . . . . . . . . . . . . . . . . . . . . . . . . . . . . . . . .9,10,15921-23,25 13 EJECT . . . . . . . . . . . . . . . . . . . . . . . . . . . . . . . . . . . . . . . . . . . . . .9,10,13,15,16-18 14 DISC DIRECT PLAY 1-3 . . . . . . . . . . . . . . . . . . . . . . . . . . . . . . . . . . .11,12,17,18,20 15 0-9,+10 . . . . . . . . . . . . . . .