Compact Disc Stereo System XR-M131 U C For assistance and information (United States and Puerto Rico) 8B-CLB-903-31 010620DYK-H-B OPERATING INSTRUCTIONS En (English) MANUAL DE INSTRUCCIONES E (Español) MODE D'EMPLOI F (Français)
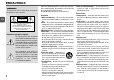
PRECAUTIONS WARNING To reduce the risk of fire or electric shock, do not expose this appliance to rain or moisture. CAUTION En RISK OF ELECTRIC SHOCK DO NOT OPEN “CAUTION:TO REDUCE THE RISK OF ELECTRIC SHOCK, DO NOT REMOVE COVER (OR BACK). NO USER-SERVICEABLE PARTS INSIDE. REFER SERVICING TO QUALIFIED SERVICE PERSONNEL.
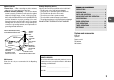
Outdoor Antenna 1 Power lines — When connecting an outdoor antenna, make sure it is located away from power lines. 2 Outdoor antenna grounding — Be sure the antenna system is properly grounded to provide protection against unexpected voltage surges or static electricity build-up.
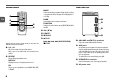
Remote control Detach the battery compartment lid at the rear of the remote control and insert two R6 (size AA) batteries with correct polarity.
PARTS AND CONTROLS Main unit: front 6 1 2 3 7 8 9 4 0 5 1 POWER 6STANDBY/ON Switches the unit on and off (standby). 2 QSOUND Turns QSOUND on or off. 3 TIMER/SLEEP Selects timer setting mode. 4 3-MODE EQUALIZER Selects a sound equalization curve, ROCK, POP or JAZZ. 5 PHONES jack Plug in optional headphones set with a stereo mini plug (ø3.5 mm, 1/8 in.). Speaker output is canceled. 6 CD OPEN Opens or closes the disc compartment. 7 TAPE Selects Tape function.
Remote control Main unit: rear MODE Selects random play, programmed play, AI edit recording or programmed edit recording mode for CD playback or recording. 1 En 2 3 4 BAND Selects Radio function and the radio band. 5 6 1 2 FUNCTION Switches the active function among TAPE, FM/AM, AUX and CD. 3 3 VOL (k/i) 4 POWER 4 5 aPAUSE 6 cPLAY r/f, g/t (SKIP/SEARCH) Buttons with the same or similar names on the main unit basically have the same function.
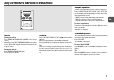
ADJUSTMENTS BEFORE OPERATION Graphic equalizer Selects a sound equalization curve to match the music type. Press 3-MODE EQUALIZER (ROCK, POP, JAZZ) (EQ on the remote control repeatedly) to select one of the three equalization curves. - ROCK: Powerful sound emphasizing treble and bass - POP: More presence in the vocals and midrange - JAZZ: Accented lower frequencies for jazz-type music To cancel equalization Press the selected equalization mode button (EQ on the remote control repeatedly).
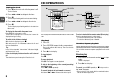
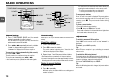
CD OPERATIONS Setting the clock 1 Press a on the main unit while the power is off. c The hour flashes. 2 Press f or g to designate the hour. En 3 Press a. CD OPEN CD a sCLEAR 0-9,+10 MODE The hour stops flashing and the minute starts flashing. f,g 4 Press f or g to designate the minute. cPLAY 5 Press a. The time display stops flashing and the clock starts from 00 seconds. To display the time while the power is on. Press DISPLAY on the remote control.
Repeat play Programmed playback Press REPEAT on the remote control repeatedly to select "REPEAT ALL" or "REPEAT 1". Plays back up to 30 selected tracks in programmed order. To cancel, press REPEAT repeatedly so that the repeat indicator goes off. To repeat a selected set of tracks Select the tracks with programmed playback, then press REPEAT on the remote control to select repeat playback. (See "Programmed playback" on this page.
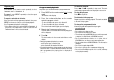
RADIO OPERATIONS TUNER/BAND POWER aSET En You can tune in the desired preset station directly by pressing the numbered buttons on the remote control. - To select preset number 10, press +10 and 0. - To select preset number 15, press +10 and 5. cPRESET 1 0-9,+10 sCLEAR f,g TUNING DOWN/UP BAND c MODE FUNCTION a f,g s Manual tuning Preset tuning 1 Press TUNER/BAND (BAND on the remote control) repeatedly to select a band. Preset up to 32 of your favorite stations and tune them in directly.
TAPE OPERATIONS TAPE a Basic recording c Use only type I (normal) tapes. Only one side of the tape can be recorded on at a time. sCLEAR 1 Press TAPE. 0-9,+10 MODE wREC/ REC MUTE f,g zPUSH EJECT cPLAY aPAUSE f,g sSTOP Playback Use only type I (normal) tapes. 1 Press TAPE. 2 Press z to open the cassette holder. 3 Insert the tape. Insert with the exposed side down and playback side facing out from the unit. To rewind or fast forward Press f or g.
En To stop recording Press s. Edited CD recording 6 Press MODE once on the remote control. To pause recording (only for TUNER or AUX source) Press a. Press again to resume. AI Edit Recording 7 Turn over the tape and press w to start recording on side B. To record a selected set of tracks from a CD Program the desired tracks (see "Programmed playback") and then press w. Preparation Prepare a tape that is longer than the CD length. The recording time left for side B appears on the display.
6 Repeat step 5 to select the rest of the tracks for side A. The remaining recording time of side A is displayed. You cannot select a track with a longer playing time. 7 Press MODE on the remote control to switch to side B and select the tracks for the side. 8 Press MODE on the remote control to switch back to side A and press w to start recording on side A. The tape is rewound to the beginning of side A and recording starts. When recording on side A finishes, "SIDE CHA" appears on the display.
TIMER OPERATIONS 5 Press f or g to select the source, and press a. POWER 6STANDBY/ON aSET sCLEAR TIMER/SLEEP En f,g POWER a f,g s •For timer play of a CD, select "CD". •For timer play of a tape, select "TAPE". •For timer play of a radio broadcast, select "FM" or "AM". You will select the band later in step 8. •For timer play of the equipment connected to the AUX jacks, select "AUX". 6 Press f or g to set the timer-activated duration, then press a.
Timer recording Timer recording is available only for TUNER and AUX (with an external timer) sources. 1 Press TIMER/SLEEP repeatedly so that "5" lights up and "TM REC" is displayed. 2 Carry out step 2 to step 4 described in "Timer playback". 7 Insert the recording tape and then turn the unit off. "5" and 4 remain on the display to indicate the timer standby mode. At timer-on time, the unit turns on and records the selected source. After the specified timer-activated duration, the unit turns off again.
REFERENCE En Care and maintenance Troubleshooting Occasional care and maintenance of the unit and the software are needed to optimize the performance of your unit. If your unit fails to perform properly, check the following guide and the relevant sections of the Operating Instructions. To clean the cabinet Use a soft and dry cloth. If the unit surfaces are extremely dirty, use a soft cloth lightly moistened with mild detergent solution. Do not use strong solvents such as alcohol, benzene or thinner.
GENERAL Specifications Power requirements Power consumption Dimensions (W × H × D) MAIN UNIT TUNER FM tuning range FM usable sensitivity (IHF) FM antenna terminals AM tuning range AM usable sensitivity AM antenna 87.5 MHz to 108 MHz 13.2 dBf 75 ohms (unbalanced) 530 kHz to 1710 kHz (10 kHz step) 531 kHz to 1602 kHz (9 kHz step) 350 µV/m Loop antenna AMPLIFIER Power output Total harmonic distortion Input Outputs 5.5 W + 5.
NOTE This equipment has been tested and found to comply with the limits for a Class B digital device, pursuant to Part 15 of the FCC Rules. These limits are designed to provide reasonable protection against harmful interference in a residential installation. This equipment generates, uses, and can radiate radio frequency energy and, if not installed and used in accordance with the instructions, may cause harmful interference to radio communications.