Compact Disc Stereo System XR-M313 U For assistance and information (United States and Puerto Rico) 8B-CL7-903-01 010120AYK-H-M OPERATING INSTRUCTIONS En (English) MANUAL DE INSTRUCCIONES E (Español) MODE D'EMPLOI F (Français)
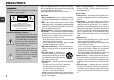
PRECAUTIONS WARNING To reduce the risk of fire or electric shock, do not expose this appliance to rain or moisture. CAUTION RISK OF ELECTRIC SHOCK DO NOT OPEN En “CAUTION:TO REDUCE THE RISK OF ELECTRIC SHOCK, DO NOT REMOVE COVER (OR BACK). NO USER-SERVICEABLE PARTS INSIDE. REFER SERVICING TO QUALIFIED SERVICE PERSONNEL.
Outdoor Antenna 1 Power lines — When connecting an outdoor antenna, make sure it is located away from power lines. 2 Outdoor antenna grounding — Be sure the antenna system is properly grounded to provide protection against unexpected voltage surges or static electricity build-up.
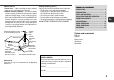
PREPARATIONS Connection Plug in the AC power cord to the AC power outlet after all other connections are made. 1 Connect the speakers to the main unit. 1 Connect the right speaker to the SPEAKERS R terminals and the left to the SPEAKERS L terminals. The speaker cords with the stripes go to the terminals. En 2 Connect the supplied antennas. Connect the FM antenna to the FM 75 Ω terminals and the AM antenna to the AM LOOP terminals.
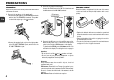
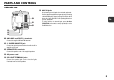
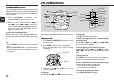
PARTS AND CONTROLS Main unit: rear 1 2 3 6 AUX IN jacks Accept analog sound signals from external equipment. Connect external equipment using an optional connecting cable with RCA phono plugs (red plug to the R jack, white plug to the L jack). Refer also to the operating instructions for your equipment. To switch function to external input, press function (FUNCTION on the remote control) repeatedly to select the AUX function.
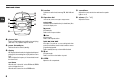
Main unit: front En 1 2 5 6 7 8 9 3 4 1 phones jack Plug in optional headphones set with a stereo mini plug (ø3.5 mm, 1/8 in.). Speaker output is canceled. 2 power 6standby/on Switches the unit on and off (standby). 3 display CD: displays the track number being played and elapsed playing time, the remaining time of play, and the volume level. Radio: displays the frequency of the tuned station and the volume level. eco/demo When the unit is turned off: selects ECO mode, DEMO mode or displays the clock.
Remote control 2 The numbered buttons take on these functions when pressed with SHIFT held down: 1,2 3 4 5 6 7 8 9 0 ! @ REPEAT Selects repeat CD play mode. PROGRAM Selects programmed CD play mode. 0 FUNCTION ! aPAUSE @ cPLAY En r/f, g/t (SKIP/SEARCH) sSTOP MONO Switches between stereo or monaural FM reception. CLOCK Selects clock setting mode. RANDOM Selects random CD play mode. Buttons with the same or similar names on the main unit basically have the same function.
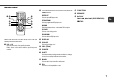
ADJUSTMENTS BEFORE OPERATION aset sound/ timer enter/color, f,g,sclear power 6standby/on En CLOCK EQ COLOR POWER volume (N/M) f,g eco/demo SHIFT BAND VOL(k/i) aPAUSE sSTOP Power DEMO Turning the unit on Press power 6 standby/on (POWER on the remote control). Alternatively, press BAND on the remote control. If the clock has not been set, a DEMO appears on the display when the unit is turned off. Turning the unit off Press power 6standby/on again. The unit goes into standby.
SOUND ADJUSTMENTS 4 Push the dial left (f) or right (g) (press f or g on the remote control) to select a source, then press enter/color (COLOR on the remote control). 5 Push the dial left (f) or right (g) (press f or g on the remote control) to select the color, then press enter/color (COLOR on the remote control). 6 Repeat steps 4 and 5 to determine the colors for other sources. 7 Press enter/color (COLOR on the remote control).
CD OPERATIONS Q SURROUND system The Q SURROUND system built into this unit uses only two speakers at the left and right to create an atmosphere that sounds as if you are surrounded by two front speakers and two rear speakers. En 1 Press sound/timer repeatedly until "QSURROUND" flows from right to left. 2 Within 4 seconds, push the dial left (f) or right (g) (press f or g on the remote control) so that "ON QSURROUND" flows from right to left and the "QSURROUND" indicator lights up on the display.
The display changes in the following order: 1 Track number being played and elapsed playing time 2 Remaining time of play 3 Volume level •Remaining time of play cannot be displayed during random play or programmed play. To repeat a selected set of tracks First select the tracks with programmed play. Then selects repeat play. (see "Programmed play" on this page). To check the program Push the dial left (f) or right (g) (press f or g on the remote control) repeatedly in stop mode.
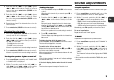
RADIO OPERATIONS Tuning in preset stations 1 Select the band. aset En cpreset f,g, sclear power 6standby/on MONO 0-9,+10 SHIFT BAND cPLAY aPAUSE f,g sSTOP function Manual tuning Preset tuning 1 Press function (BAND on the remote control) repeatedly to select a band. Preset up to 32 of your favorite stations and tune them in directly. The unit switches to the radio from any other function and alternates between FM and AM.
TIMER OPERATIONS Adjustments To switch to monaural FM reception Hold down SHIFT and press MONO on the remote control so that "MONO" is displayed. To cancel, press again to display "STEREO". enter/clear, f,g Tip: When FM stereo reception is poor, switching to monaural reduces noise. power 6standby/on To switch the AM tuning interval The default setting of the AM tuning interval is 10 kHz/step. If you use this unit in an area where the frequency allocation system is 9 kHz/step, change the tuning interval.
REFERENCE 4 Push the dial left (f) or right (g) to set the timer-on time. 5 Press function repeatedly to select the desired playback source, then press enter/color or a. En 6 Push the dial left (f) or right (g) to set the timer-activated duration. With each push, the timer-activated duration changes in 5-minute steps between 5 to 240 minutes. If there is no operation for 4 seconds, the current setting is entered automatically. 7 Within 4 seconds, press enter/color or a.
Poor radio reception •Check antenna connection. Adjust the antenna to find the best reception. •Move unit and antenna away from other electric appliances and cords. The CD player works poorly •Is the disc correctly inserted? •Is the disc dirty? •Is the lens affected by condensation? If so, wait approximately one hour and try again. The speaker lights do not turn on •Are the speaker light cords connected properly? •Is the speaker light setting on? (See "Turning the speaker lights on and off" on page 9.
NOTE This equipment has been tested and found to comply with the limits for a Class B digital device, pursuant to Part 15 of the FCC Rules. These limits are designed to provide reasonable protection against harmful interference in a residential installation. This equipment generates, uses, and can radiate radio frequency energy and, if not installed and used in accordance with the instructions, may cause harmful interference to radio communications.